top of page

Changing your Wix Video settings

Wix Video: Allowing Others to Embed Your Video on their Site

Allow your visitors to embed your video on their site or blog using HTML code. It's a great way to show your content to the world!

Important:

  • This option is only available for videos you have uploaded, not videos added from Facebook, Vimeo or YouTube.

  • This option is only available after upgrading to a Premium Plan or for Premium accounts.

To set up the embedding option:

  1. Go to Video Library in your site's dashboard.

  2. Hover over the relevant video and click the Edit icon .

  3. Scroll down to Embed Options.

  4. Click the toggle to enable embedding.

  5. Select the information you wish to display.

Note:

You can add a custom logo to the embedded video, and choose when it appears. The recommended format for your logo is a transparent PNG file, 254 x 152 px.
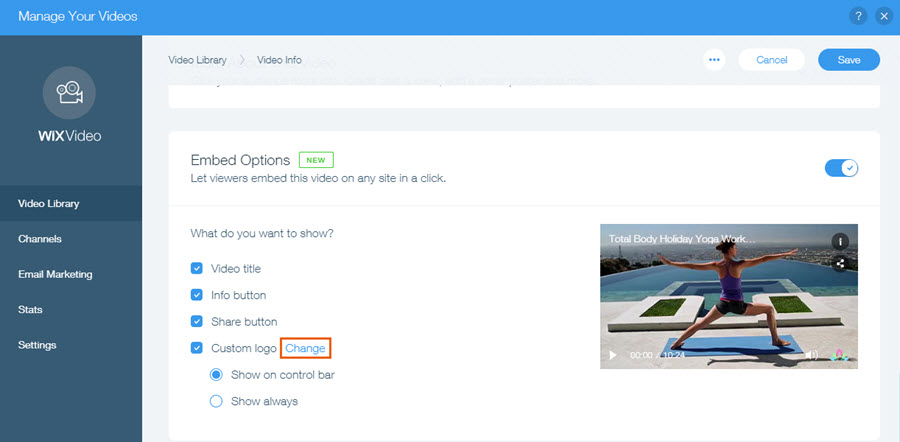
The Change option highlighted next to Custom logo.

After setting up the embed option, visitors watching a video on your site can click the share icon and then access the embed code.

The share and embed buttons being clicked on a video.

Important information about embedded videos

  • When your visitor embeds the video, all the relevant information, including title, cover, action cards, and price appear in the embedded video.

  • If your video is set to allow renting or streaming, viewers will be directed to your Wix site to complete the purchase.

  • Any changes you make to the video's information on your site also appears on the embedded video. However, changes made to the settings, such as changes in fonts and design after embedding the video do not appear in the embedded video.

Embedded videos in mobile friendly view

  • The size of embedded videos in mobile friendly view should be manually adjusted in the html code.
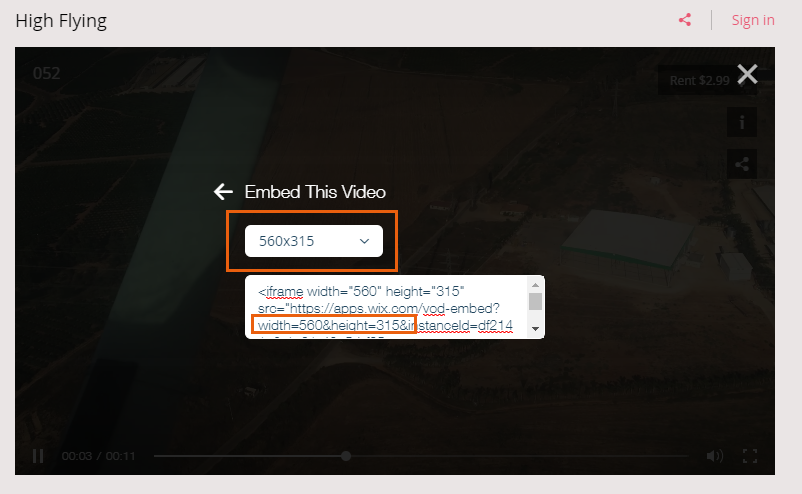
The size indicators highlighted in a video's HTML code.

Need A Professional Website?
Contact Us 
Today!

Wix Forms: Troubleshooting

Wix Forms: Removing a Form from Your Site

Wix Forms: Saving Your Form Data to Your Contacts

Wix Forms: Creating Automated Email Responses for Form Submissions

Wix Forms: Choosing Who Gets Notified About Form Submissions

Wix Forms: Viewing and Managing a Submissions Table

Wix Forms: Customizing the Success Message and Thank You Page of Site Forms

Wix Forms: Designing Your Site Forms

Wix Forms: Adding a Signature Field

Wix Forms: Protecting Your Site Forms from Spam

Wix Forms: Adding a Subscriber Opt-In Checkbox to a Site Form

Wix Forms: Adding a File Upload Field

Wix Forms: Managing Your Form Fields

Wix Forms: Managing Your Standalone Form Fields

Wix Forms: Translating Your Forms with Wix Multilingual

Wix Forms: Adding and Setting Up a Standalone Form

Wix Forms: Adding and Setting Up a Form on Your Site

Wix Forms: An Overview

Wix Functions: Creating a Custom Loyalty Program Reward

Wix Functions: Adding Custom Validations to Your Forms

Wix Functions: Adding Additional Fees at Checkout

Wix Functions: Creating a Function

Wix Automations: Understanding Conditions Operators

Wix Automations: Using the Run Velo Code Action

Wix Automations: Troubleshooting Wix Automations

Wix Automations: Creating a Multi-Action Automation

Wix Automations: Sending Data via Webhook

Using Zapier to Automate Connections with Third-Party Apps

Wix Automations: Sending Data to Google Sheets

Wix Automations: Managing Your Automations

wix experts
Graphic2Traffic web design
©
bottom of page