top of page

Setting up Photo Albums

Wix Photo Albums: Creating a Favorites List for Clients (Proofing)

You can use Wix Photo Album's proofing feature to let your clients and album visitors create lists of their favorite photos.

It also allows your clients to comment and specify any special instructions they have for the photos. For example, they can let you know how many copies they'd like, or if they'd like a particular photo in black and white.

Important:

Favorites lists are only available for new albums. They are not available for albums that you created in the past.

To create and share a list:

You can create a new favorites list and share it with your clients from Photo Albums in your site's dashboard.

  1. Go to Photo Albums in your site's dashboard.

  2. Create a new album. Learn how to create an album

  3. Click Publish Now.

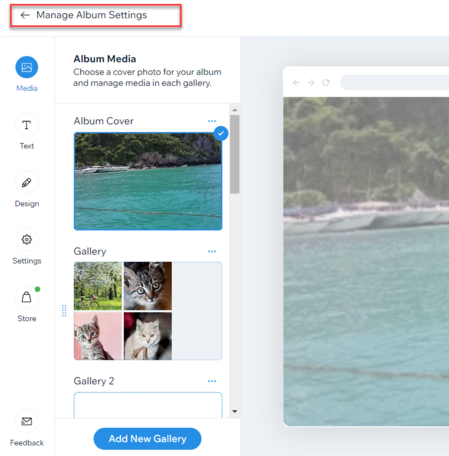
  4. Click Manage Album Settings.

A screenshot of a photo album in edit mode, with the Manage Album setting button highlighted.

  1. Click Get Started under Favorites lists on the right.

  2. Click +Create List.

  3. Add a name for your list.

  4. (Optional) Add instructions or additional information for your clients under Add a note.

  5. Select who can access your list under Privacy settings.Public: Anyone that can view your album can view this list.
    Secret: Only people with the link can access the list.

A screenshot of the edit favorite lists setting panel showing how to edit the list name and change privacy settings.

  1. Click Save.

  2. Choose how you want to share the link, or tap View List to see what it looks like.Copy link: Copy the link and send it to your client.
    Email: Send the link via email.
    WhatsApp: Send the link via WhatsApp.

Tip:

After you've created your list, you can view it on your live site, download the photos that your clients select, update your list's information, and manage your list's members. Learn more about managing your favorites list.

Need A Professional Website?
Contact Us 
Today!

Wix Forms: Troubleshooting

Wix Forms: Removing a Form from Your Site

Wix Forms: Saving Your Form Data to Your Contacts

Wix Forms: Creating Automated Email Responses for Form Submissions

Wix Forms: Choosing Who Gets Notified About Form Submissions

Wix Forms: Viewing and Managing a Submissions Table

Wix Forms: Customizing the Success Message and Thank You Page of Site Forms

Wix Forms: Designing Your Site Forms

Wix Forms: Adding a Signature Field

Wix Forms: Protecting Your Site Forms from Spam

Wix Forms: Adding a Subscriber Opt-In Checkbox to a Site Form

Wix Forms: Adding a File Upload Field

Wix Forms: Managing Your Form Fields

Wix Forms: Managing Your Standalone Form Fields

Wix Forms: Translating Your Forms with Wix Multilingual

Wix Forms: Adding and Setting Up a Standalone Form

Wix Forms: Adding and Setting Up a Form on Your Site

Wix Forms: An Overview

Wix Functions: Creating a Custom Loyalty Program Reward

Wix Functions: Adding Custom Validations to Your Forms

Wix Functions: Adding Additional Fees at Checkout

Wix Functions: Creating a Function

Wix Automations: Understanding Conditions Operators

Wix Automations: Using the Run Velo Code Action

Wix Automations: Troubleshooting Wix Automations

Wix Automations: Creating a Multi-Action Automation

Wix Automations: Sending Data via Webhook

Using Zapier to Automate Connections with Third-Party Apps

Wix Automations: Sending Data to Google Sheets

Wix Automations: Managing Your Automations

wix experts
Graphic2Traffic web design
©
bottom of page