


Setting up Photo Albums
Wix Photo Albums: Managing Your Photo Album
After creating your album, you can access and manage it from your Photo Albums dashboard. From there, you can share your album, duplicate it, customize the album URL and more.
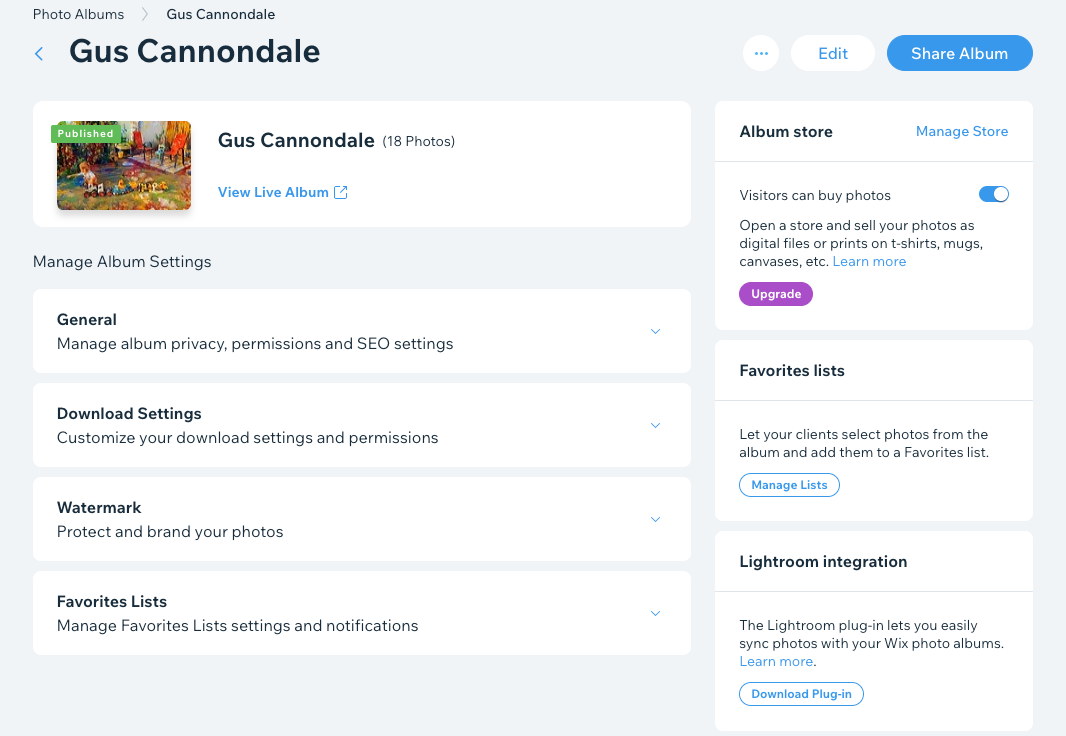
To manage your photo album:
Go to Photo Albums in your site's dashboard.
Click Manage Album next to the relevant album.
Choose what you want to do:
Edit album
Click Edit at the top right to modify your album. Learn more about editing photo albums.
When you're ready, click Publish Now to make the changes go live.
Share album
Click Share Album at the top right.
Choose a sharing option:Copy Link: Copy a link to your album so you can share it wherever you want.
Email: Send an email message with a link to your album.
WhatsApp: Share a link to your album via WhatsApp.
Click Done.
View album
Click the More Actions icon
 at the top right.
Click View album to view the live version of your album.
Duplicate album
Click the More Actions icon
at the top right.Click Duplicate album.
Choose what you want to copy from the album.Entire album: Copy all media, texts, styles and settings to a new album.
Album template: Only copy styles and settings to a new album.
Click Duplicate Album.
Delete album
Click the More Actions icon
at the top right.Click Delete.
Click Delete album to permanently delete your album.
Note: When you delete an album, its images remain in your Photo Albums Media Manager. To free up storage space, access your Photo Albums Media Manager or Manage Storage page to delete the files you don't need.
Change the album URL
Click Change next to the album URL.
Enter the URL path for the album.
Click Save.
Note: It can take up to an hour for the live URL to update.
Manage your general settings
Click the drop-down next to General under Manage Album Settings.
Choose from the following options:
Who can access this album? Choose an option:Everyone: Anyone who goes to the album can access it.
Password holders: Visitors must enter the password to access the album. Enter the password for the album. Then choose the language of the password entry page from the drop-down.
Tip: Click Show Password to see the password that you typed.
Let visitors share photos: Enable the toggle to show a share icon on each photo, video and gallery.
Display: Enable the toggle to show this album on the Photo Albums page of your main site.
SEO: Enable the toggle to allow search engines to find your album.
Click Save.
Manage your download settings
Click the drop-down next to Download Settings.
Choose from the following options:Allow single photo downloads: Enable the toggle to let visitors download individual photos. Then choose the download quality: Low resolution or High resolution.
Note: Photos downloaded in high resolution won’t have a watermark, even if it’s activated.
Allow downloads of entire galleries: Enable the toggle to let visitors download entire galleries in high resolution.
Click Save.
Manage your watermark settings
Click the drop-down next to Watermark.
Enable the Add watermark toggle to show a watermark on your media. Then choose which items you want to show the watermark on: Images, Gallery thumbnails, or Cover.
Tip: Click Customize watermark to upload your own watermark and set the opacity, size and position of it.Click Save.
Add an album store to sell photos
Click Get Started under Album store to start selling your photos as digital files or prints.
(If you already have an album store) Choose what you want to do under Album store:
Manage Store: Click to edit your album store.
Visitors can buy photos: Enable the toggle to allow visitors to buy photos.
Learn more about setting up your photo albums store.
Manage your favorites lists
Click Manage Lists under Favorites lists on the right.
Learn more about creating favorites lists for visitors to your site.
Add a Lightroom integration
Click Download Plug-in under Lightroom integration at the bottom right. The Wix Photo Albums plugin downloads to your computer as a zip file.