


Setting up your hotel
Wix Hotels by HotelRunner: Creating and Managing Your Rate Plans
Rate plans allow you to offer your guests options like full board or free cancellation with a room. You can create different rate plans and then apply them to different room types. Create and manage all of your rate plans from the Property Setup section of your site's dashboard.
Important:
This article refers to the latest version of Wix Hotels by HotelRunner. We are in the process of releasing Wix Hotels by HotelRunner but it's not available to everyone yet. Sign up for more information about Wix Hotels by HotelRunner and join the beta.
For information on the previous version of Wix Hotels, click here.
In this article, learn more about:
Creating your rate plans
Create different rate plans to give your guests the best experience possible for their price point. You can offer different rate plans based on the sales channels and markets where they're available.
You can also provide guests more flexibility when they book with meal plan and cancellation options. Go to Property Setup in your site's dashboard to get started.
To create your rate plans:
Go to Rate Plans in your site's dashboard.
Click + Create Rate Plan.
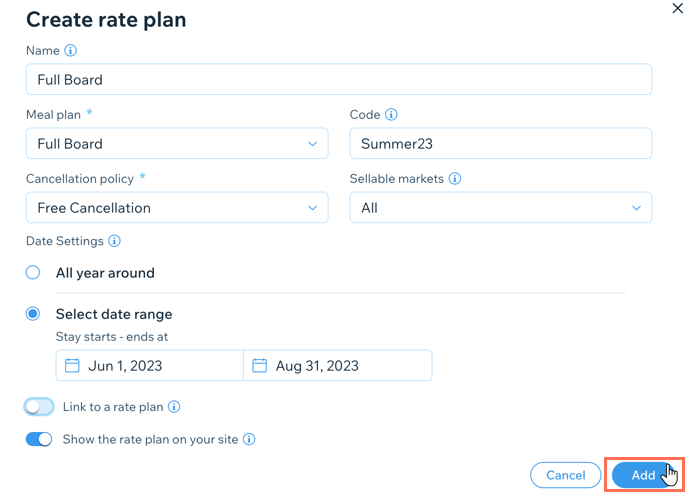
Enter the rate plan Name.
Tip: We recommend you avoid mentioning the room type in the name of the rate plan.Select the relevant Meal plan from the drop-down, for example, "Full board".
Enter the Code for the meal plan. This unique code is used to integrate your information with the property management system.
Choose your Cancellation policy from the drop-down.
Choose your Sellable markets from the drop-down. These are the countries where you offer the rate plan. For example, you could offer the rate plan only to guests booking from North America.
Choose when this rate plan is available under Date Settings:All year round: Choose this option for rate plans that don't change from season to season.
Select date range: Choose this option for seasonal rate plans. This is a great way to encourage off-season bookings with cheaper or more flexible rate plansEnter the relevant Start and End dates for the rate plan.
(Optional) Enable the Link to a rate plan toggle to link this plan to another.
Click the Show the rate plan on your site toggle:Enabled: Guests can see this rate plan on your site.
Disabled: The rate plan doesn't appear on your site, but it still appears for online travel agencies.
Click Add.
Assigning rate plans to a room type
With your rate plan created, you can assign it to various room types. This is a great way to offer your guests more choice and more value when they go to book their room.
To assign a rate plan to a room type:
Go to Rate Plans in your site's dashboard.
Click + Assign a room type under the relevant rate plan.
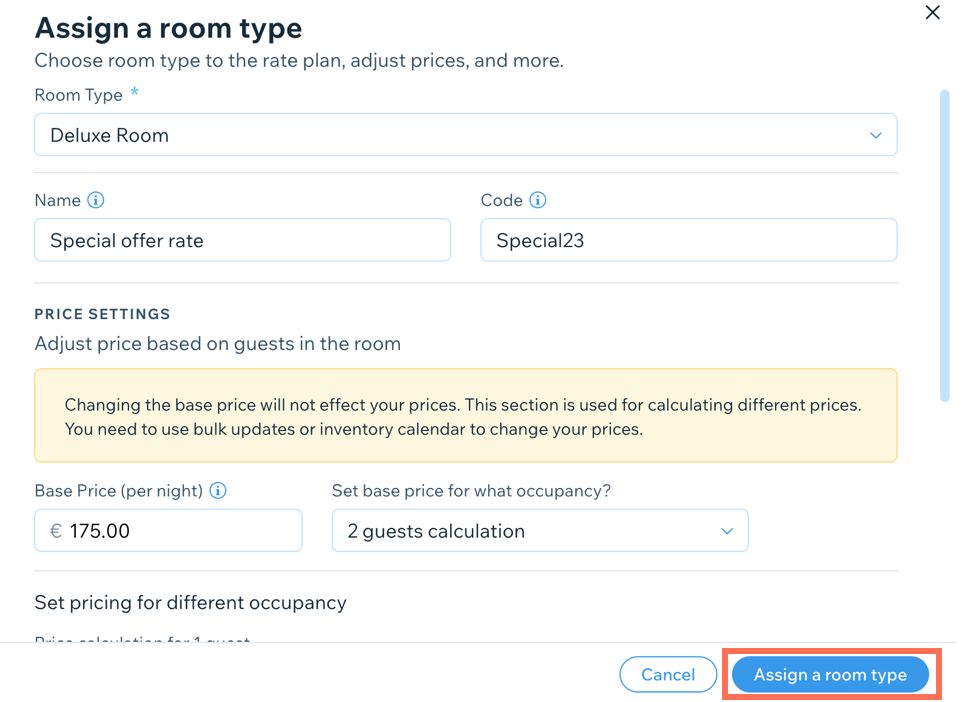
Choose the relevant room from the Room Type drop-down.
Click Assign a room type.
Enter the Name you want to appear next to the room type when guests go to book.
Enter the code for the room type and rate plan combination.
Enter the Base Price (per night) for the rate plan and room type combination.
Choose how many guests the base price applies to from the Set base price for what occupancy? drop-down.
Adjust the price using the available options under Set pricing for different occupancy. You can increase or decrease the price by a fixed amount or a percentage where appropriate.
Click Assign a room type.
Note:
If you set a different base price for a combination of a rate plan and a room type, this does not affect the base price of the room type on its own. To change the base price of a room type, go to Bulk Updates or the Inventory Calendar in your site's dashboard.
Editing your rate plans
You can update any of your rate plans at any time. This is useful if you need to tweak your pricing or your policies.
To edit your rate plans:
Go to Rate Plans in your site's dashboard.
Hover over the relevant rate plan and click Edit.
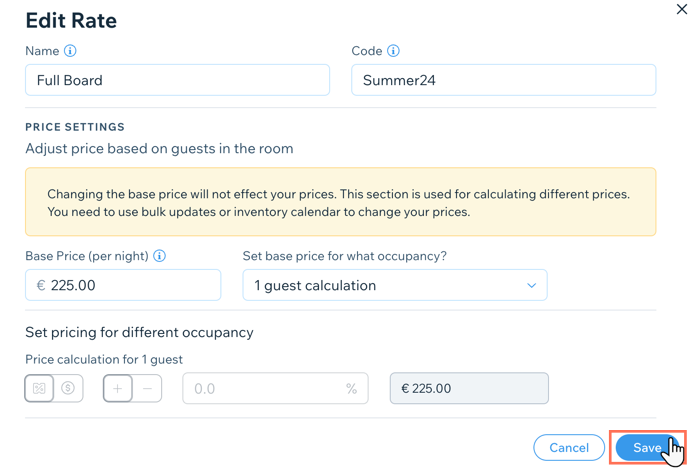
Update the relevant details, including the name, code, base price and base price occupancy.
Click Save.
Note:
For the rate plan changes to take effect on your live site, you also need to update the base price using either bulk updates or the inventory calendar.
Deleting your rate plans
You can delete old or unused rate plans at any time from Property Setup in your site's dashboard. This can make it easier to track your latest offerings throughout the year.
Note:
Once you delete a rate plan, you cannot undo the action and have to create a new rate plan from scratch.
To delete a rate plan:
Go to Rate Plans in your site's dashboard.
Hover over the relevant plan and click the More Actions icon
 .
.Click Delete.
Click Delete again to confirm.
