


Managing your calendar & bookings
Wix Bookings: Letting Clients Check In by Scanning a Chip, Card or Barcode
Connect a wedge reader to the Client Check-In app to allow your clients to check in as they arrive for sessions. Depending on the reader you have, clients can check in using a card, fob or a QR code.
Before you begin:
If you have not done so already, add the Client Check-In app to your site.
If you already installed the app, make sure to update to the latest version to connect your wedge reader:
Go to Manage Apps in your dashboard.
Click Update App next to Client Check-In.

Step 1 | Allow clients to scan to check in
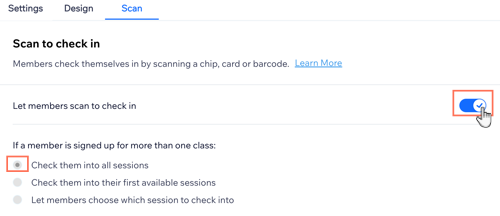
To allow clients to check in using a wedge reader, start by enabling the toggle in the Client Check-In app. Choose what happens when clients scan their chip, card or barcode – if they booked multiple sessions, you can check them into the first available session or all at once.
To allow clients to check in by scanning a chip, card or barcode:
Go to Manage Apps in your dashboard.
Click Open next to Client Check-In.
Click the Scan tab.
Enable the Let members scan to check in toggle.
Choose what happens when clients scan using the wedge reader:Check them into all sessions: Clients check in for all their upcoming appointments and classes.
Check them into their first available sessions: Clients check into the next class or appointment they booked.
Let members choose which session to check into: Allow clients to choose which classes or appointments they want to check into.
Click Save.
Step 2 | Set up client IDs with your wedge reader
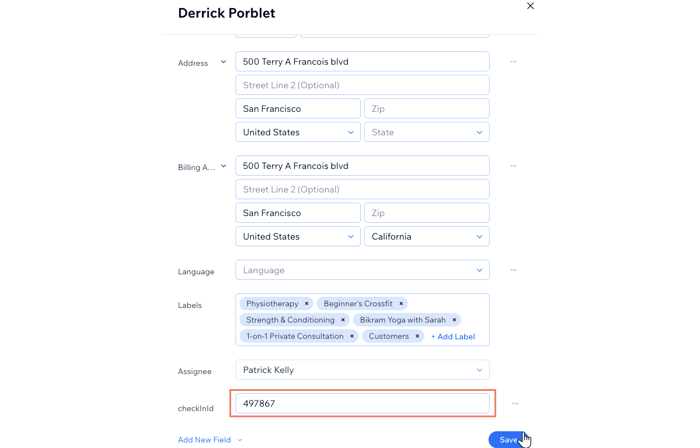
After enabling the toggle, the CheckInId field appears on your members' Contact cards. You then use this field to enter the member's card, chip or barcode ID number.
Next, scan the card, chip or barcode to sync it with the client's profile. This will allow them to check themselves in when arriving for their bookings.
Important:
Editing the ID number or renaming the CheckInId field can create issues and prevent clients from checking in.
To connect the Client Check-In app to a wedge reader:
Connect your wedge reader to your computer or tablet.
Go to Contacts in your site's dashboard.
Hover over the relevant contact and click View.
Click Edit Contact.
Enter the ID number on the client's card, chip or barcode next to checkInId.
Scan the client's card, chip or barcode for the first time to activate the client on the system.
Click Save.
Step 3 | Check in your clients as they arrive
When clients arrive for their bookings, they scan their activated card, chip or barcode at reception. They see different options, depending on the settings you choose during setup.
Click below to learn what your clients see in each scenario:
1 class appears
The client scans their card, chip or barcode and taps Select to check in on your device.

Multiple classes appear
If your client booked more than 1 class, they see one of the following options, depending on the settings you choose during setup:
Check them into all classes: Clients check in for all their upcoming classes.
Check them into their first available class: Clients check in to the next class they booked.
Let members choose which class to check into: Clients choose which classes they want to check into.

Troubleshooting check in issues
Experiencing issues when your clients try to check in? Click the error you see for advice on how to resolve it.
No classes were found
The "No classes were found" message can appear if the client is more than 5 hours early for their upcoming booking.

There was an issue checking you in
This error message appears if no contacts match with the CheckInId on your system. It can also appear if multiple clients have the same code by accident.
Check the client's checkInId matches their card, chip or barcode in Contacts in your site's dashboard. You can then update the relevant code to the correct one where necessary.
