


New Automation Builder
The New Automation Builder: Setting Up a 'Scheduled Time' Trigger
Wix Automations allows you to automate actions based on specific time frames. This can help you manage your site more efficiently and ensure timely reoccurring actions for your business.
This can help you maintain consistent communication with your audience, manage promotions, and send timely reminders to your site collaborators. For example, you can set up an automation to send a promotional email every year to inform your customers about your annual Christmas sale.
Setting up a 'Scheduled time' trigger
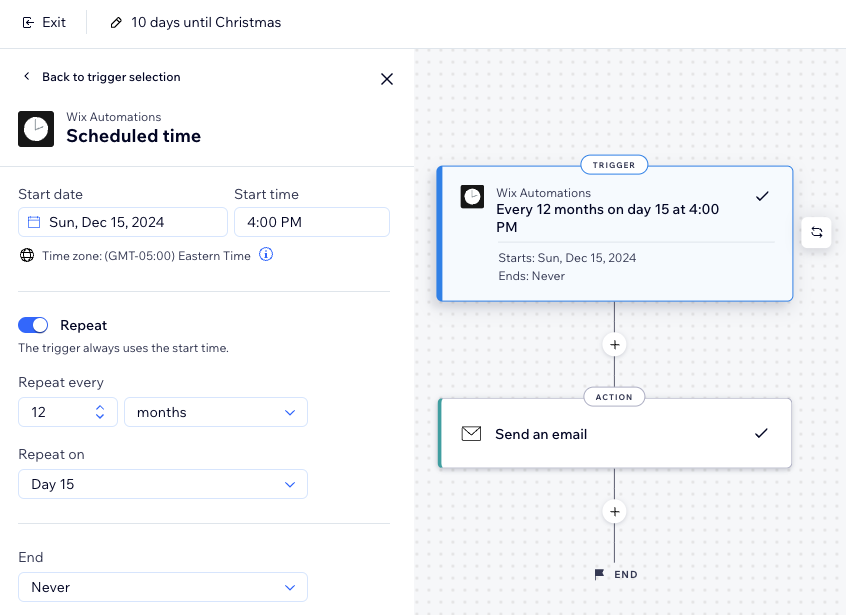
Set your trigger to run at a specific time instead of something the site visitor does. Set a start and end time as the trigger, choose the action, and decide if the automation should repeat.
To set up a 'scheduled time' trigger:
Go to Automations in your site's dashboard.
Click + New Automation at the top right.
Click Start from Scratch to begin from a blank automation template.
Click the title to give your automation a name.
Click Scheduled time as your trigger.
Select a Start date.
Select a Start time.
(Optional) Click the Repeat toggle:Set how often the trigger repeats (e.g. day, week, month).
Click the drop-down menu to select an End:Never: Trigger doesn't have a set end date.
On specific day: Select a specific date for the trigger to end.
Click Apply.
Click the Add Step icon
 and add an Action.
Choose an action from the panel.
Note: The actions available differ based on your trigger choice.Set up the action using the available settings to your business needs.
Click Activate.
Setting your action as 'Send an Email'?
Make sure the action executes properly by manually adding the recipients when you configure the action. Since the automation is triggered by a certain time and not by something the visitor does, it means no recipient information is collected when the automation is triggered.
Frequently asked questions (FAQs)
Click below to learn more about this.
How can I ensure my automation runs smoothly?
There are a few things you can check to ensure that the automation runs smoothly:
Double-check the start and end times, repeat intervals, and specified days of the week.
Ensure your time zone is set correctly.
Regularly review and update your automations to align with your business needs.
Can I have multiple triggers?
No, each automation can only have one trigger. As a work around, you can implement the same logic for different triggers. Duplicate your automation from the automations table in your dashboard and change the trigger in the copied automation.
When adding 'Send an email' as the action for my automation, how can I ensure it gets to the right people?
To make sure your email is sent to the right people, you need to manually add them to your automation.
After selecting 'Send an email' as the action, click Add Recipients under the Set recipients tab. You can then select specific contacts, labels, segments, or collaborator roles.

Why is my recipient list not updated?
If you recently updated a segment, you will need to manually refresh the list to see it updated. If not, it will take up to 24 hours to refresh.
Can I edit an automation after it has been created?
Yes, you can edit an automation anytime by going to the automations table in your dashboard, selecting the automation, and making the necessary changes.