


Using the Wix app for Wix Stores
Wix Stores: Creating Coupons Using the Wix App
Boost your sales by creating coupons for your customers directly from the Wix app on your mobile device.
In this article, learn more about:
Creating store coupons
Go to your site in the Wix app.
Tap Manage
 at the bottom.
Scroll down to Marketing and tap Coupons.
Tap Add a Coupon.
Choose what you want to do:
Create a $ Discount coupon (e.g. $10 off)
Tap $ Discount.
Enter the amount that will be taken off the price and tap Next.
Enter the coupon code.
Note: This is the code customers enter.Enter the name of the coupon.
Note: Appears in the cart page and dashboard.Tap Next.
Choose which orders the coupon applies to:Minimum order subtotal: Apply the coupon only when the order reaches a minimum subtotal. Enter the minimum amount and tap Next.
All products: Apply the coupon to any products in your store.
Specific product: Limit the coupon to a specific product only. Tap the relevant product.
Specific category: Limit the coupon to a specific category only. Tap the relevant category and tap Next.
Select one of the following (doesn't apply for Minimum order subtotal):Apply only to the lowest priced item: If a customer buys multiple items that the coupon applies to, only the lowest price item is discounted.
Apply to every item in an order: If a customer buys multiple items that the coupon applies to, all are discounted.
Set the coupon's start and end date:Tap the date.
Select the start date from the calendar.
Enter the end date or tap No end date.
Tap Save.
(Optional) Apply limits to the number of times the coupon can be used:
Limit number of total uses:Tap the Limit number of total uses toggle to enable it.
Enter the number of times the coupon can be used.
One use per customer: Tap the toggle to enable it.
Tap Done.
(Optional) Tap Share to share your new coupon.
Create a % Discount coupon (e.g. 10% off)
Tap % Discount.
Enter the coupon code.
Note: This is the code customers enter.Enter the name of the coupon.
Note: Appears in the cart page and dashboard.Tap Next.
Choose which orders the coupon applies to:Minimum order subtotal: Apply the coupon only when the order reaches a minimum subtotal. Enter the minimum amount and tap Next.
All products: Apply the coupon to any products in your store.
Specific product: Limit the coupon to a specific product only. Tap the relevant product.
Specific category: Limit the coupon to a specific category only. Tap the relevant category and tap Next.
Select one of the following (doesn't apply for Minimum order subtotal):Apply only to the lowest priced item: If a customer buys multiple items that the coupon applies to, only the lowest price item is discounted.
Apply to every item in an order: If a customer buys multiple items that the coupon applies to, all are discounted.
Set the coupon's start and end date:Tap the date.
Select the start date from the calendar.
Enter the end date or tap No end date.
Tap Save.
(Optional) Apply limits to the number of times the coupon can be used:
Limit number of total uses:Tap the Limit number of total uses toggle to enable it.
Enter the number of times the coupon can be used.
One use per customer: Tap the toggle to enable it.
Tap Done.
(Optional) Tap Share to share your new coupon.
Create a Free Shipping coupon
Tap Free Shipping.
Enter the coupon code.
Note: This is the code customers enter.Enter the name of the coupon.
Note: Appears in the cart page and dashboard.Tap Next.
Choose which orders the coupon applies to:Minimum order subtotal: Apply the coupon only when the order reaches a minimum subtotal. Enter the minimum amount and tap Next.
All orders: Apply the coupon to any order made in your store.
Set the coupon's start and end date:Tap the date.
Select the start date from the calendar.
Enter the end date or tap No end date.
Tap Save.
(Optional) Apply limits to the number of times the coupon can be used:
Limit number of total uses:Tap the Limit number of total uses toggle to enable it.
Enter the number of times the coupon can be used.
One use per customer: Tap the toggle to enable it.
Tap Done.
(Optional) Tap Share to share your new coupon.
Create a Sale Price coupon (Offer selected products at a specific price)
Tap Sale Price.
Enter the sale price.
Note: This is the price customers pay.Enter the coupon code.
Note: This is the code customers enter.Enter the name of the coupon.
Note: Appears in the cart page and dashboard.Tap Next.
Choose which orders the coupon applies to:All products: Apply the coupon to any products in your store.
Specific product: Limit the coupon to a specific product only. Tap the relevant product.
Specific category: Limit the coupon to a specific category only. Tap the relevant category and tap Next.
Set the coupon's start and end date:Tap the date.
Select the start date from the calendar.
(Optional) Select an end date.
Tap Save.
Set the coupon's start and end date:Tap the date.
Select the start date from the calendar.
Enter the end date or tap No end date.
Tap Save.
(Optional) Apply limits to the number of times the coupon can be used:
Limit number of total uses:Tap the Limit number of total uses toggle to enable it.
Enter the number of times the coupon can be used.
One use per customer: Tap the toggle to enable it.
Tap Done.
(Optional) Tap Share to share your new coupon.
Create a Buy X Get Y Free coupon
Tap Buy X get Y free.
Tap the + and - buttons to set how many products customers must purchase to get free product(s).
Tap the + and - buttons to set the number of products customers gets free.
Tap Next.
Enter the coupon code.
Note: This is the code customers enter.Enter the name of the coupon.
Note: Appears in the cart page and dashboard.Tap Next.
Choose which orders the coupon applies to:All products: Apply the coupon to any products in your store.
Specific product: Limit the coupon to a specific product only. Tap the relevant product.
Specific category: Limit the coupon to a specific category only. Tap the relevant category and tap Next.
Set the coupon's start and end date:Tap the date.
Select the start date from the calendar.
Enter the end date or tap No end date.
Tap Save.
(Optional) Apply limits to the number of times the coupon can be used:
Limit number of total uses:Tap the Limit number of total uses toggle to enable it.
Enter the number of times the coupon can be used.
One use per customer: Tap the toggle to enable it.
Tap Done.
(Optional) Tap Share to share your new coupon.
FAQs
Click a question below to learn more about store coupons.
Can I duplicate a coupon?
If you want to create a new coupon with settings that are similar to a coupon you already have, you can save time by duplicating it and then making changes.
To duplicate a coupon:
Go to your site in the Wix app.
Tap Manage
at the bottom.Scroll down to the Marketing section and tap Coupons.
Tap the relevant coupon.
Tap the More Actions icon
 .
.Tap Duplicate.
Edit the coupon and tap Done.
Can I deactivate or delete a coupon?
You can deactivate a coupon when you no longer want to offer a particular promotion and then activate it again when the time is right. If you won't need it in the future, you can delete it.
Go to your site in the Wix app.
Tap Manage
at the bottom.Scroll down to the Marketing section and tap Coupons.
Tap the relevant coupon.
Tap the More Actions icon
.Select an option:Deactivate / Activate: Tap Deactivate so customers can't use it or Activate to make it available.
Delete: Tap Delete and then tap OK to confirm.
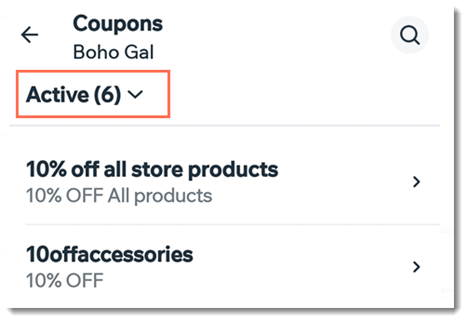
Tip: By default, the coupon section displays only your active coupons. Tap the drop-down to view coupons with other statuses.
How can I apply a coupon to a group of products?
To apply a coupon to a group of products, create a new category and add all the relevant products. No need to display this category on your site - it can be used only for the sale.
Can I apply coupons to product subscriptions?
Yes, most types of coupons can be applied to subscriptions. To set this up, go to Coupons in your site's dashboard. Coupons cannot be applied to subscriptions using the Wix app.