top of page

Designing your store

Wix Stores: Adding and Setting Up an 'Add to Cart' Button

You can place a standalone 'Add to Cart' button anywhere on your site. The button is linked to the product you choose. This can come in handy when you're writing about a product somewhere on your site and want to make it easy for a customer to add the product to their cart.

Step 1 | Add the 'Add to Cart' button

Start by navigating to the relevant page and then dragging the Add the Cart button from the Add Panel to the ideal spot.

GIF showing how to add an Add to Cart button to a site page in a Wix site

Wix Editor

Studio Editor

  1. Go to your editor.

  2. Click Add Elements on the left side of the editor.

  3. Click Stores.

  4. Drag the Add to Cart Button to the page.

Step 2 | Connect the button to a product

For the button to work properly, you need to select which product is added to the customer's cart when clicked.
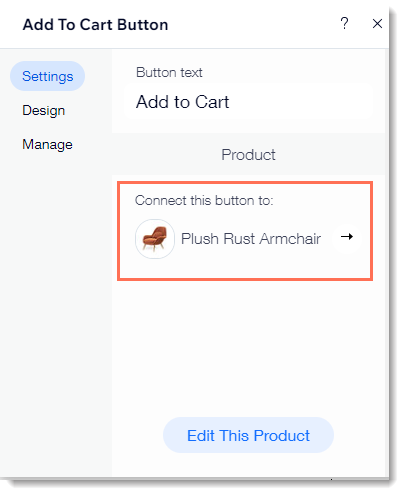
Screenshot of the settings panel where you select which product is connected to the Add to Cart button

To connect the button to a product:

  1. Click the Add to Cart button in your editor.

  2. Click Settings.

  3. (Optional) Edit the button text.

  4. Connect the button to a product. Select the default product or select a different product.

Step 3 | Design the button

Now you can design the button to fit perfectly on the page.

To customize the design of the button:

  1. Click the Add to Cart button in your editor.

  2. Click Settings.

  3. Click Design.

  4. Make any of the following customizations:Select a button style.
    Select a button color and drag the slider to adjust the opacity.
    Select a border color and drag the slider to adjust the border width.
    Drag the slider to make the corners rounder or more square.
    Select a text color or font.
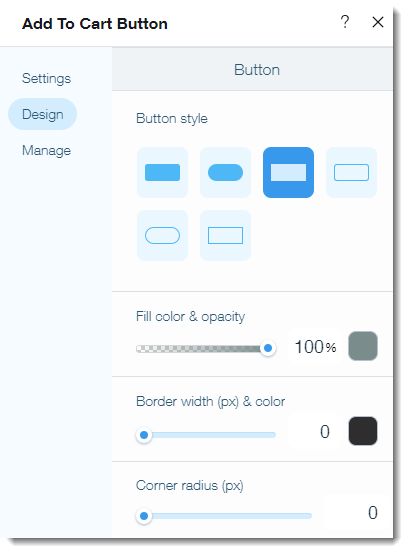
Screenshot of the design options available with the Add to Cart button

Note:

When a product is out of stock, the button text changes to "Out of Stock". It is not possible to edit the design of the "Out of Stock" button.

Need A Professional Website?
Contact Us 
Today!

Wix Stores: Setting Up Affiliate Marketing with the Goaffpro App

Wix Contacts: About Your Contact Panel

Wix Contacts: Using Pinned Actions in Your Contact Panel

Wix Contacts: Creating a Test Contact

Wix Contacts: Changing a Contact's Subscription Status

Wix Contacts: Adding and Managing Custom Contact Fields

Wix Contacts: Creating and Using Contact Labels

Wix Contacts: Creating a Segment

Wix Contacts: About Segments

Wix Contacts: Exporting Your Contacts

Wix Contacts: Troubleshooting Contact Importing Issues

Wix Contacts: Importing Contacts by Uploading a CSV File

Wix Contacts: Importing Contacts from a Gmail Account

Wix Contacts: Managing Your Contact List

Wix Contacts: Manually Adding a Contact

Wix Contacts: An Overview

Wix Forms: Creating a Coupon

Wix Forms: Setting Up Tax on Your Form

Wix Forms: The Difference between the New and Old Wix Forms

Wix Forms: Viewing Form Submissions from Your Dynamic Pages

Wix Forms: Managing Your Forms from the Dashboard

Wix Forms: Choosing an Address Field

Wix Forms: Adding and Setting Up a Donation Form

Wix Forms: Adding Submission Limits to Your Forms

Wix Forms: Adding and Managing Rules

Wix Forms: Upgrading Wix Forms

Wix Forms: Adding and Setting Up a Multi-Step Form

Wix Forms: Adding Payments to a Site Form

Wix Forms: Enabling Double Opt-In for Subscribers

Wix Forms: Adding and Setting Up a Subscribe Form

wix experts
Graphic2Traffic web design
©
bottom of page