Setting up your hotel
Wix Hotels by HotelRunner: Managing Your Reservation Settings
Important:
This article refers to the latest version of Wix Hotels by HotelRunner. We are in the process of releasing Wix Hotels by HotelRunner but it's not available to everyone yet. Sign up for more information about Wix Hotels by HotelRunner and join the beta.
For information on the previous version of Wix Hotels, click here.
Reservation Settings is where you customize how guests find and reserve rooms at your property. You can also choose the details you want guests to submit along with their reservation.
Step 1 | Set your general rules
Start by setting up your confirmation rules and room reservation limits.
To set your general rules:
Go to Property Settings in your site's dashboard.
Click Manage Booking Engine next to Reservation Settings.
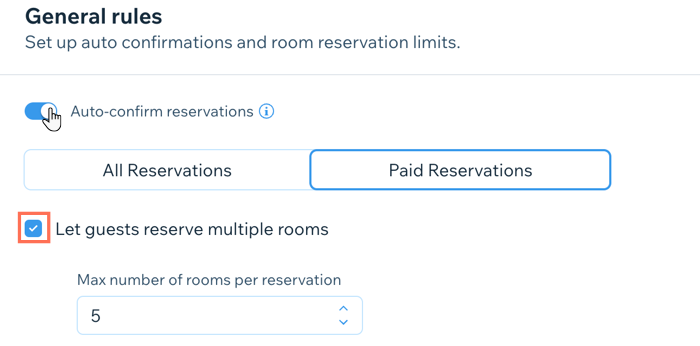
Click the Auto-confirm reservations toggle to choose whether you manually confirm your reservations, or confirm each reservation automatically:Enabled: Reservations confirm automatically. Click to choose whether this rule applies to All Reservations or only to Paid Reservations.
Disabled: Choose this option if you prefer to manually confirm each reservation yourself.
Click to select the Let guests reserve multiple rooms checkbox:Checked: Guests can reserve multiple rooms per booking. Set the Max number of rooms per reservation.
Unchecked: Guests can only reserve one room per booking.
Click Save at the top.
Step 2 | Set your search rules
With your general rules set, you can now choose how guests search for rooms and the kinds of results they see.
To set your search rules:
Go to Property Settings in your site's dashboard.
Click Manage Booking Engine next to Reservation Settings.
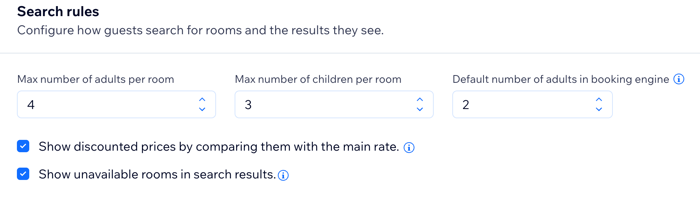
Enter the Max number of adults per room.
Enter the Max number of children per room.
Enter the Default number of adults in booking engine.
Select the Show discounted prices by comparing them with the master rate checkbox to show guests the best value options in their search results.
Select the Show unavailable rooms in search results checkbox to give your guests the chance to try searching for alternative dates or contact you about making a reservation.
Click Save at the top.
Step 3 | Choose the details you need from guests
With your general reservation and search rule settings selected, you can now choose what details you need guests to submit as part of their reservations.
To choose the details you need from guests:
Go to Property Settings in your site's dashboard.
Click Manage Booking Engine next to Reservation Settings.
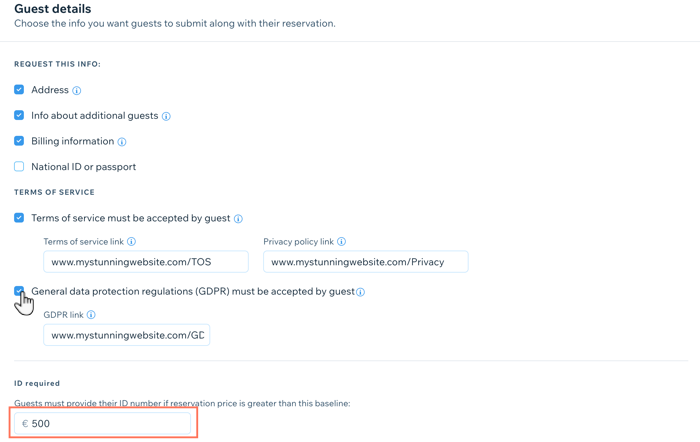
Scroll to the Guest details section and select the checkboxes next to the relevant information you require from guests as part of their reservations:Address: Select the checkbox to request your guest’s country, city, ZIP code and street address.
Info about additional guests: Ask for the name and birthday of each guest included in the reservation.
Billing information: Ask for your guest’s billing information, including their billing address and tax ID.
National ID or passport: Request a digital copy of the guest's national ID or passport as part of their reservation.
Terms of service must be accepted by guests: Ask your guests to confirm the terms of services before completing their reservation. Enter links to your terms of service and your privacy policy.
Note: Make sure to add a link if you select the checkbox, otherwise your guests see a 404 error.
General data protection regulations (GDPR) must be accepted by guest: Ask your guests to consent to the general data protection regulation before completing their reservation. Enter a link to your GDPR compliance page.
Note: Make sure to add a link if you select the checkbox, otherwise your guests see a 404 error.
ID required: Guests must provide their ID number if the reservation price is above a certain amount. Enter the relevant amount in the field.
Click Save at the top.