


Memberships, packages & payments
Wix Bookings: Sending an Invoice
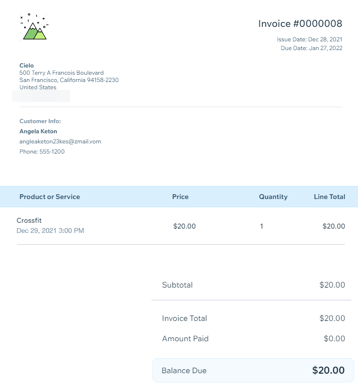
Send invoices to clients to collect online payments for services they booked. For your convenience, you can send an invoice before or after the appointment, class, or course occurs. Your client receives an invoice with the details they provided when booking the service.
In this article, learn more about:
Requirements for sending invoices
The ability to charge your clients with an invoice is available under certain conditions. Be sure to review the conditions below to successfully charge with invoices.
You or your client must first book the session.
Note: You can send invoices before or after the session takes place.The service must have a fixed price.
The session cannot be related to a service that is only offered within a pricing plan.
The person sending the invoice must be a site collaborator with any of the following permissions:Owner
Admin (Co-Owner)
Bookings Admin
Back Office Manager
Custom role with Bookings permission set to Manage Bookings Payments
Sending invoices to clients
Send invoices to request payment for services, or to create a record for you and your clients. When you share the invoice with your client by email or as a link, they can complete the payment online using any of your available payment methods.
Note:
When you collect payment for an invoice, you can charge the entire value of the order, or a custom amount (for payments in installments).
To send your clients an invoice:
Go to the Booking Calendar in your site's dashboard.
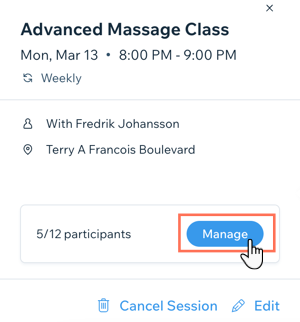
Click the relevant session in your calendar.
Click Manage.
Click Collect Payment next to the relevant client.
Click Charge with invoice.
Note: If your client does not have an email on file, you need to add one to send an invoice.
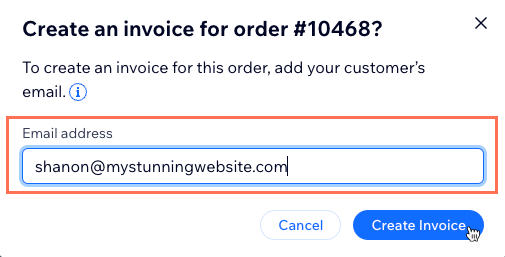
Click Create Invoice.
Review the invoice details to make sure they're correct.
Choose what you want to do next:Print: Print out the invoice if your client requires a physical copy.
Share Link: Create a shareable link that you can send via email, social media or messenger app.Click to create a link to the invoice.
Click Copy Link.
Click Done.
Note: when you create the link to the invoice, it automatically marks the invoice as Sent.
Send via Email: Send the client their invoice via email.Click to edit the subject line.
Click to edit the message you send in the email.
Click Send.
Charging clients' invoices
You can charge your client for an invoice in different ways, depending on how they're paying. Make complete or partial payments on the invoice by charging the client's credit card. You can also record cash, bank transfer, check or other methods, whether the payment is full or partial.
To charge clients' invoices:
Go to Booking Calendar in your site's dashboard.
Click the relevant session in your calendar.
Make the payment for your client, depending on the service type:Appointments: Click Collect Payment.
Classes or Courses:Click Manage next to participants.
Hover over the relevant participant.
Click Collect Payment.
Choose what you want to do next:
Charge the client's credit card
You can enter your client's credit card details to charge them for an invoice. Decide whether you want to charge the entire invoice amount, or a custom amount of your choice.
To make a partial payment:
Click Charge with credit card.
Select the Charge a custom amount checkbox.
Enter the relevant custom amount for the partial payment.
Note: The total amount due appears under the custom amount field.Enter the client's credit card details.
Click Charge.

To charge for the entire order:
Click Charge with credit card.
Enter the client's credit card details.
Click Charge.

Record a payment (using cash, check, etc.)
If your client used a different method to pay your invoice, you can record the payment in the Booking Calendar.
To record a payment:
Click View Invoice.
Click Collect Payment at the top.
Click Record payment.
Enter the Amount received.
Enter the Payment date.
Choose the relevant Payment method from the drop-down.
Click Record Payment.

FAQs
Click a question below to learn more about invoices in Wix Bookings.
Can I edit the invoice?
No. The invoice details are automatically taken from the booking.
What do my clients see in the invoice?
When you send a booking payment request, your client receives an invoice with information about the session.
Payment request invoices include the following details:
Participant's full name
Participant's email
The invoice due date
The name of the service
The date and time of the session
The price of the service and amount due for the session. For example, if a session is booked for 3 participants, at a cost of $50 each, the invoice total is $150.
Can I automatically create invoices for paid orders?
Yes, you can automatically create invoices for every paid order.
Can I charge different tax rates for services at different locations or countries?
Yes, you can charge different tax rates for services in different locations or countries.