


Wix Bookings
Wix Bookings: Managing Your Resources
Important:
We are in the process of launching this feature, but it's not available to everyone yet.
Make sure your staff and clients have the resources they need for the best experience by creating and managing your resources. You can assign resources to certain staff members, or to specific locations.
This is great if you offer services where your staff also require access to specific rooms, resources or equipment. Using resources, you can also limit your availability for more in-demand services. This helps prevent overbooking and allows for smoother day-to-day operations.
Show me an example of how to manage my availability using resources
You own and operate a beauty parlor with two business locations in Uptown and Downtown.
Each location has 3 rooms for services, such as spray tans and skin treatments. You also offer massages in each location, but have 3 massage tables at the Uptown location, and just 1 at the Downtown location.
Start by creating the Room and Massage table resource types for both locations. Then add the relevant number of rooms and tables for each location:
Uptown: 3 rooms, 3 tables
Downtown: 3 rooms, 1 table
Finally, in Booking Services, assign the relevant resources in each location to the services in the relevant location. Make sure you assign the correct resources for each service at their respective locations.
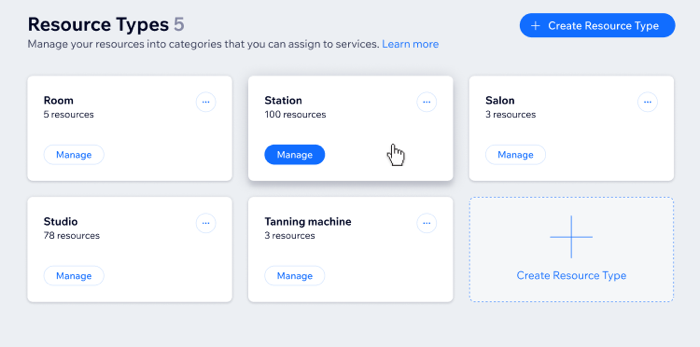
In this article, learn more about:
Creating a resource type
Your staff may require specific resources in order to offer their services. This can include certain rooms, machinery or other materials. You can create up to 10 resource types for your business. You can then add individual resources to the resource types you create.
Important:
Resources are for internal use by you and your staff only. They are not visible to your clients.
By default, resources are available 24/7. Currently, you cannot edit the available hours for resources.
The number of resource types and items you can offer depends on your plan. Upgrade your site or upgrade your Studio plan if you need to create more resources.
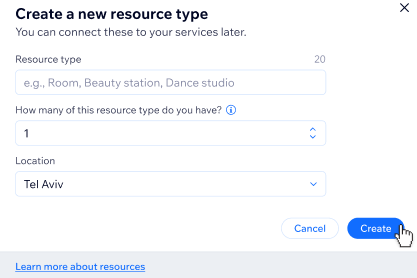
To create a resource type:
Go to Resources in your site's dashboard.
(First time only) Click Get Started.
Click + Create Resource Type.
Enter the Resource type.
Tip: Numbering automatically appears next to the resource type, so enter 'Room' instead of 'Rooms' to avoid confusing your staff and clients.Enter how many of this resource type you have.
(Optional) Assign a Location to this resource type if you offer services at more than one location.
Click Create.
Renaming or deleting a resource type
As your business grows, you may need to rename or delete some of your existing resource types. You can update your resource types at any time from your site dashboard.
Notes:
When you delete a resource type, sessions already scheduled with the resource type remain on your Booking Calendar.
Each of your resource types needs at least one resource.
To rename a resource type:
Go to Resources in your site's dashboard.
Click the More Actions icon
 next to the relevant resource type.
Choose the relevant option:
Rename:Click Rename.
Enter the new name.
Click Save.
Delete:Click Delete.
Click Delete again to confirm.
Adding a resource to a resource type
Add resources to their relevant resource types from the Resources section of your site's dashboard. As you add resources, make sure you assign them to the relevant locations where they're required.
To add a resource:
Go to Resources in your site's dashboard.
Click Manage under the relevant resource type.
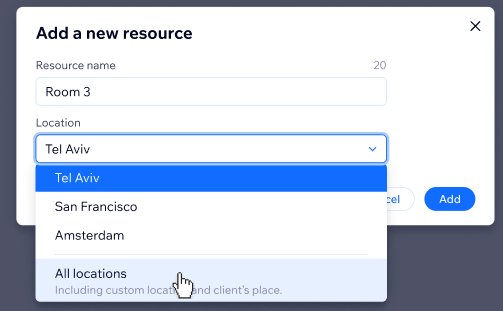
Click Add Resource.
Enter the Resource name.
(Optional) Click to select the Location, if you offer services which require the resource at multiple locations.
Note: If you select All locations, make sure you can provide this resource everywhere it's required, without overbooking.
Editing or deleting resources
As your business grows, you may need to edit or delete existing resources to make way for new ones.
Note:
When you delete a resource, the resource is not removed from existing sessions that have already been scheduled. You can remove the resource manually from the session in the Booking Calendar.
To edit or delete an existing resource:
Go to Resources in your site's dashboard.
Click Manage under the relevant resource type.
Choose what you want to do:
Edit:Hover over the relevant resource and click Edit.
Enter the new Resource name.
Choose the relevant Location from the drop-down.
Click Save.
Delete:Hover over the relevant resource and click the Delete icon .
.
Click Delete to confirm.
Connecting resources to services
Once you have created your resource types and resources within them, it's time to assign the resources to the relevant services. Make sure you assign the relevant resources to the correct services, at the correct locations. This helps avoid double bookings and ensure your business runs as smoothly as possible.
Important:
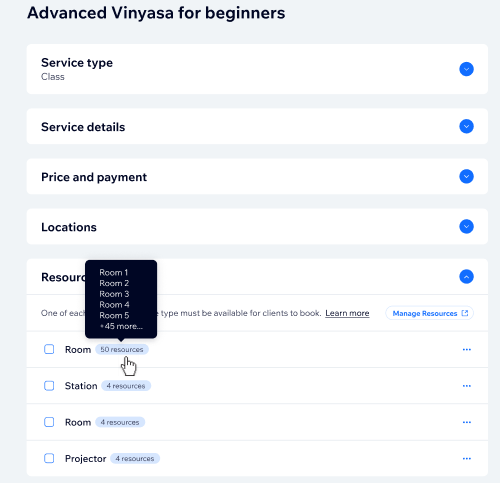
At least one of each resource must be available in order for clients to book the service at their chosen time. When you hover over a resource, you can see at which locations the resource is available.
When connecting more than one resource type, one resource item from each resource type must be available in order for clients to book the service.
You can connect up to 3 resource types per service.
Resources must be available in the same location of the service.
To connect resources to a service:
Go to Booking Services in your site's dashboard.
Click to select the relevant service.
Scroll down and click to expand Resources.
Click to select the checkbox next to each relevant resource type you want to assign to the service.
Click Save.
FAQs
Click a question below to learn more.
My clients can't book one of my services, how do I fix this?
For clients to be able to book your services that require resources, make sure to check the following:
At least one of each resource must be available in order for clients to book the service at their chosen time. When you hover over a resource, you can see at which locations the resource is available.
Resources must be available at the same time, in the same location as the service.
Upgrade your site or upgrade your Studio plan if you need to create more resources.
Can I only allow clients to book services that require resources during specific hours?
By default, resources are available 24/7. Currently, you cannot edit the available hours for resources. You can, however, limit the relevant staff member's availability, or set a more restrictive Booking policy for your resource-based services.