top of page

Memberships, packages & payments

Memberships, packages & payments

When clients pay you offline for a service (e.g. cash, check), you can mark their payment manually from the Booking Calendar.

You can also set reminders about partial payments for services, assigning a task to yourself or your staff to follow up with the client.

In this article, learn more about:

Marking a service as paid

When clients pay for services in-person, you can mark them as paid from the participants list for the relevant service.

To mark a service as paid:

  1. Go to Booking Calendar in your site's dashboard.

  2. Click on the relevant session.

  3. Click Manage next to the Participants List.
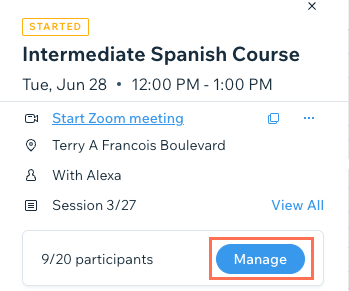
A screenshot of the manage button of a service in the booking calendar. This is where you access the participants list.

  1. Find the relevant client in the list.

  2. Select the relevant option from the Payment Status drop-down.
    Note: Selecting Paid in person cannot be undone.
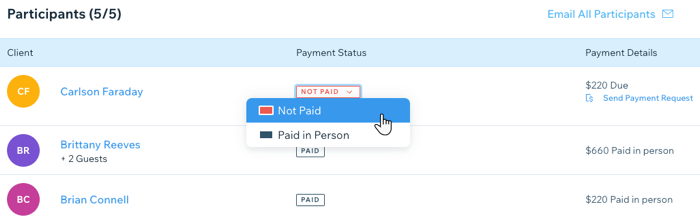
A screenshot of the participants list, marking a client as paid.

Note:

We are in the process of releasing a new version of the Booking Calendar, so it's not available to everyone yet. Your version may appear slightly different than pictured in this article.

Setting reminder tasks for partial payments

Received partial payment from your client in person? You can mark it as paid, while creating a task for yourself to follow-up and collect the rest of the payment.

To set a reminder task for partial payments:

  1. Go to the Contacts tab in your dashboard.

  2. Click the relevant client.

  3. Scroll down the Overview tab to Tasks & reminders.

  4. Click Add next to Tasks & Reminders.

  5. Enter your note explaining the partial payment.

  6. Assign the follow-up task to yourself or a staff member.

  7. Click the calendar icon  to set when the follow up reminder appears.

  8. Click Done.

  9. When the client completes payment, you can then mark them as paid in the participants list of the relevant service.
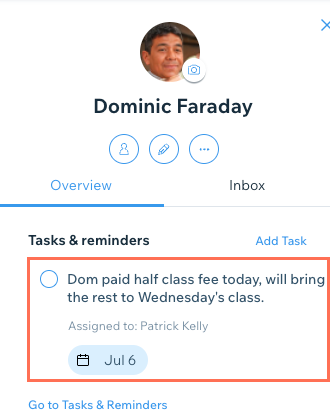
A screenshot of a reminder task in the contact tab.

Need A Professional Website?
Contact Us 
Today!

Wix Stores: Setting Up Affiliate Marketing with the Goaffpro App

Wix Contacts: About Your Contact Panel

Wix Contacts: Using Pinned Actions in Your Contact Panel

Wix Contacts: Creating a Test Contact

Wix Contacts: Changing a Contact's Subscription Status

Wix Contacts: Adding and Managing Custom Contact Fields

Wix Contacts: Creating and Using Contact Labels

Wix Contacts: Creating a Segment

Wix Contacts: About Segments

Wix Contacts: Exporting Your Contacts

Wix Contacts: Troubleshooting Contact Importing Issues

Wix Contacts: Importing Contacts by Uploading a CSV File

Wix Contacts: Importing Contacts from a Gmail Account

Wix Contacts: Managing Your Contact List

Wix Contacts: Manually Adding a Contact

Wix Contacts: An Overview

Wix Forms: Creating a Coupon

Wix Forms: Setting Up Tax on Your Form

Wix Forms: The Difference between the New and Old Wix Forms

Wix Forms: Viewing Form Submissions from Your Dynamic Pages

Wix Forms: Managing Your Forms from the Dashboard

Wix Forms: Choosing an Address Field

Wix Forms: Adding and Setting Up a Donation Form

Wix Forms: Adding Submission Limits to Your Forms

Wix Forms: Adding and Managing Rules

Wix Forms: Upgrading Wix Forms

Wix Forms: Adding and Setting Up a Multi-Step Form

Wix Forms: Adding Payments to a Site Form

Wix Forms: Enabling Double Opt-In for Subscribers

Wix Forms: Adding and Setting Up a Subscribe Form

wix experts
Graphic2Traffic web design
©
bottom of page