top of page

Managing your orders

Wix Stores: Viewing and Fulfilling Local Delivery Orders

Customize the columns in your Orders tab to make it easy to view all your local delivery and scheduled orders, so that you can get them out to your customers on time.

Step 1 | Customize the columns in the Orders tab

When you go to the Orders tab, the default columns are always displayed. By adding the "Delivery Method" and "Delivery Time" columns to your orders list, you can view your upcoming local orders at a glance and see which ones need to be dealt with right away.

To customize the columns in the Orders tab:

  1. Go to Orders in your site's dashboard.

  2. Click the Customize column icon .

  3. Select the checkboxes next to Delivery time and Delivery method.

  4. (Recommended) Deselect the checkboxes next to any columns you don't need.

Step 2 | Filter the orders that are displayed

Filter your order list to help you focus on the task you or your staff members want to do next.

For example, if a staff member is preparing local delivery orders that need to be delivered on Nov. 2, they can filter the order list to display those orders and hide the rest.

To filter the order list for local delivery:

  1. Click Filter.

  2. (Optional) Select the checkboxes next to Unfulfilled and Partially Fulfilled.

  3. Do either or both of the following:Select the local delivery option under Delivery Method.
    Select the relevant delivery day under Delivery Time.

Step 3 | Save your order list view

Once you've got the columns and filters just the way you like them, you can save your view. You can even save multiple views for different purposes. For example, if you deliver from two locations, you can save the view for each one separately.

After setup, when you want to fulfill orders, simply select the view you need.
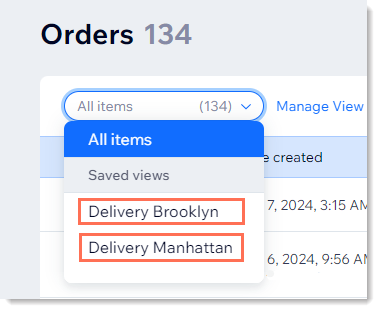
Screenshot of a store order that has saved order list views for 2 delivery locations

Need A Professional Website?
Contact Us 
Today!

Wix Automations: Adding and Sending a Coupon

Wix Automations: Sending Automated Emails to Contacts After Form Submissions

Wix Automations: Customizing Automated Emails

Wix Automations: Creating a New Automation

Wix Automations: An Overview

The New Automation Builder: Understanding Email Types

The New Automation Builder: Creating a Multi-Action Automation

The New Automation Builder: Sending Data via Webhook

The New Automation Builder: Adding and Sending a Coupon

The New Automation Builder: Troubleshooting Wix Automations

The New Automation Builder: Understanding Conditions Operators

The New Automation Builder: Setting Up a 'Scheduled Time' Trigger

The New Automation Builder: Sending Data to Google Sheets

The New Automation Builder: Using the Property Picker

The New Automation Builder: Viewing and Managing Automations Installed for You

The New Automation Builder: Customizing Automated Emails

The New Automation Builder: Managing Your Automations

The New Automation Builder: Creating an Automation

The New Automation Builder: Overview

Microsoft Office 365 Mailbox Limits

Resetting the Password for Additional Office 365 Mailboxes

Resetting Your Admin Password for Your Office 365 Mailbox

Accessing Your Microsoft Office 365 Mailbox Through Your Wix Account

Accessing Your Microsoft Office 365 Mailbox Through Your Wix Account

Accessing the Microsoft Office 365 Admin Center

Activating Your Microsoft Office 365 Mailbox Purchased from Wix

Google Workspace: Troubleshooting Login Issues

Google Workspace: FAQs

Google Workspace: Contacting Google Support

Google Workspace Error Message: "You do not have access to Email"

wix experts
Graphic2Traffic web design
©
bottom of page