top of page

Managing products and categories

Wix Stores: Displaying the Product Price per Unit

Display a price breakdown to make it easy for customers to compare prices.

Tip:

Displaying a price per unit is required in some regions, such as Germany.
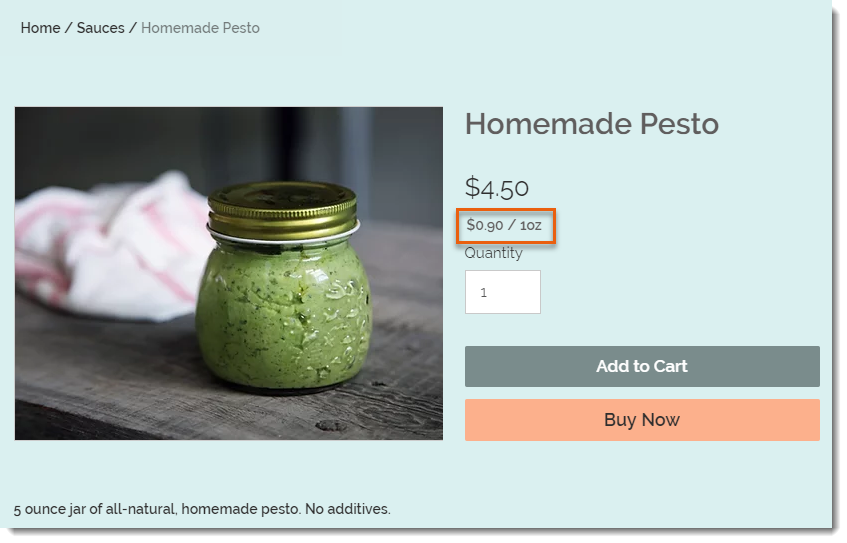
Screenshot of a product in a Wix store that has a price per unit display

To set up the price per unit display as in the image above, you need to select your type of unit (in this example, it's ounces), then enter the total weight of the product (it's a 5-ounce jar). Finally, you need to enter the unit you are using for your calculations (i.e. 1 ounce is the base unit in this example).
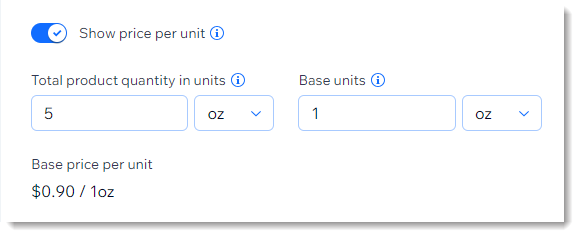
Screenshot of part of the product creation page showing the price per unit setup

After entering these parameters, the price per ounce (for example) is calculated automatically and appears on your live site under the product price.

After setup:

The price per unit calculation updates automatically whenever you:

  • Change the product price

  • Add a sale price

  • Add product variants with higher or lower prices

To add a price per unit display:

  1. Go to Products in your site's dashboard.

  2. Create a new physical product or edit an existing one.

  3. In the Pricing section, enable the Show price per unit toggle.

  4. Under Total product quantity in units, select the relevant type of unit (e.g. ounces) from the drop-down.
    Tip: You can switch between metric and imperial units in your regional settings.

  5. Under Total product quantity in units, enter the total product quantity in units (e.g. if you are selling a 5-ounce jar, enter "5").

  6. Enter the unit you want to measure by (e.g. enter 1 ounce to display a price per ounce).

  7. Click Save.

Need A Professional Website?
Contact Us 
Today!

Wix Automations: Adding and Sending a Coupon

Wix Automations: Sending Automated Emails to Contacts After Form Submissions

Wix Automations: Customizing Automated Emails

Wix Automations: Creating a New Automation

Wix Automations: An Overview

The New Automation Builder: Understanding Email Types

The New Automation Builder: Creating a Multi-Action Automation

The New Automation Builder: Sending Data via Webhook

The New Automation Builder: Adding and Sending a Coupon

The New Automation Builder: Troubleshooting Wix Automations

The New Automation Builder: Understanding Conditions Operators

The New Automation Builder: Setting Up a 'Scheduled Time' Trigger

The New Automation Builder: Sending Data to Google Sheets

The New Automation Builder: Using the Property Picker

The New Automation Builder: Viewing and Managing Automations Installed for You

The New Automation Builder: Customizing Automated Emails

The New Automation Builder: Managing Your Automations

The New Automation Builder: Creating an Automation

The New Automation Builder: Overview

Microsoft Office 365 Mailbox Limits

Resetting the Password for Additional Office 365 Mailboxes

Resetting Your Admin Password for Your Office 365 Mailbox

Accessing Your Microsoft Office 365 Mailbox Through Your Wix Account

Accessing Your Microsoft Office 365 Mailbox Through Your Wix Account

Accessing the Microsoft Office 365 Admin Center

Activating Your Microsoft Office 365 Mailbox Purchased from Wix

Google Workspace: Troubleshooting Login Issues

Google Workspace: FAQs

Google Workspace: Contacting Google Support

Google Workspace Error Message: "You do not have access to Email"

wix experts
Graphic2Traffic web design
©
bottom of page