


Designing your store
Wix Stores: Customizing the New Product Page
Important:
The new Product Page is currently available only in the Studio Editor.
Wix's new fully-customizable Product Page lets you bring your design vision to life. Start by customizing the page's global settings, like hiding elements you don't need and selecting your main layout options. Then, adjust other parts of the Product Page to get the perfect look.
Tip:
The Product Page is a dynamic page. That means that you customize it once. The changes you make apply to each of your products.
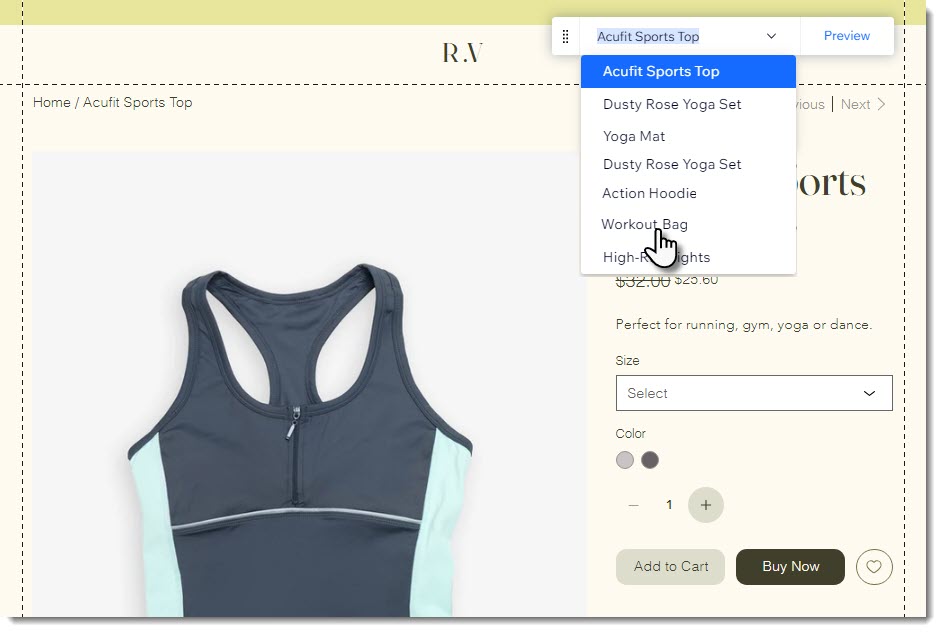
Want to see how your design will look when applied to other products? Simply select a product from the Preview Toolbar.
Step 1 | Customize the global settings
Start by customizing the settings that apply to the entire page. Click the Product Page once in the Editor to display the global settings.
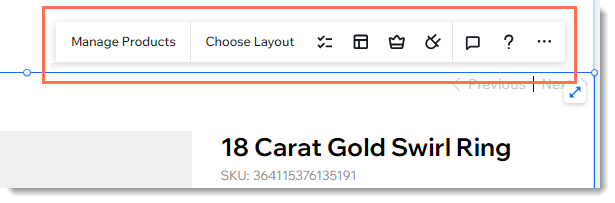
Manage Products: Click to open the dashboard and add or edit products.
Choose Layout: Select layout settings that apply to the entire Product Page.
Tip: Later, you can select a layout for your product image display.Elements: Deselect the checkbox next to any element you want to hide from your Product Page.
Tip: You may not see some visible elements if they are not relevant to the product you're currently viewing. For example, to view the Product Options element, select a product that has options.Plugins: Add plugins that work hand-in-hand with the Product Page, such as Wix Reviews or the Wishlist.
Tip:
Design options are available in the Inspector panel.
Step 2 | Customize individual Product Page elements
Now you have the option of customizing each of the elements you chose to display. Your first click brings up the global settings. Then, click any of the individual elements (e.g. the product name element) to view the available customization options.

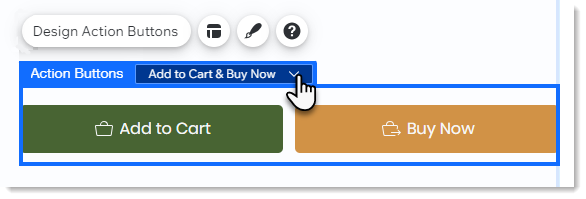
Note that some elements, such as the Action Buttons, have different states that need to be selected before you can view and customize them.
By default, only the Add to Cart and Buy Now buttons are visible. However, after clicking the buttons, you can select other options from the Action Buttons drop-down. These include the Out of Stock button and the Subscribe Now button.
FAQs
Click a question below to learn more about customizing the new Product Page.
I want to design an element, but I don't see it. What can I do?
While you're working on designing the Product Page, by default, you'll see the most recent product you added.
If this product doesn't have product options, for example, you won't see the product option element in the Editor to customize it. To design the element, select a product that does have product options from the Preview Toolbar.

Tip: You may want to create a "dummy" product that includes every element that you need and use it to design the Product Page.
What are each of the elements in the Product Page?
Click the Elements icon  to display the Product Page elements.

Product info
Product name: Name of the product.
Gallery: Product image display.
Description: The description you enter when creating the product.
SKU: A code you can optionally add to each product for inventory tracking.
Product Options: Options the product comes in (e.g. size or color).
Quantity: Allows customers to add more than one of a product to the cart.
Stock status: "Out of Stock" message if you enabled Back-in-Stock notifications or a low stock message (e.g. only 5 left in stock)
Custom text: Field where customers can add text.
Subscription: Allows customers to purchase a subscription (e.g. monthly package).
Info sections: More detailed product information.
Pricing
Price: Regular product price.
"From" label: Displays prices as a range (e.g. From $20).
Strikethrough price: When there's a sale price, the regular price appears crossed out.
Subscription frequency: Displays a notification beside the price if your customer selects a subscription (e.g. $20 / per month). To customize it, select the pricing element.
Discount name: Displays the name of an automatic discount that applies to the product.
Price per unit: When enabled, displays the price per unit calculation.
Tax & shipping info: When enabled, displays tax and shipping details.
Action buttons
Tip: When enabled, you can also customize additional buttons (e.g. Subscribe, Out of Stock). If both buttons are disabled, you and your customers won't have access to any action buttons.
Add to Cart: Adds the product to the cart. Customer can continue shopping.
Buy Now: Takes the customer directly to checkout to purchase a single product.
Navigation
Breadcrumbs: Shows customers how they got to the page.
Previous / Next: Allows customers to quickly navigate to the next or previous product.

Share Buttons: Allow customers to share your products on social media.

How do I customize gallery images?
To customize the aspect ratio, select crop or fit, and more, go to the layout customizations.
Note: Customization options vary depending on the layout you select.
To access image customizations:
Click the Product Page element on your page.
Click the Gallery element on your page.
Click Change Layout.
Select a layout.
Click Customize Layout.
Customize your image using the available options.
Can I customize the mobile view as well?
Wix Editor:
There are a number of customizations you can make in the mobile view. Most changes do not affect the desktop view.
Studio Editor:
Yes, you can fully customize mobile breakpoints. Note that some mobile customizations affect the desktop view, while some are reflected only on mobile.
Is it possible to change the positioning of elements in the Product Page?
It is not currently possible to reorder products and elements on the page.