


Managing products and categories
Wix Stores: Creating Product Categories
Important:
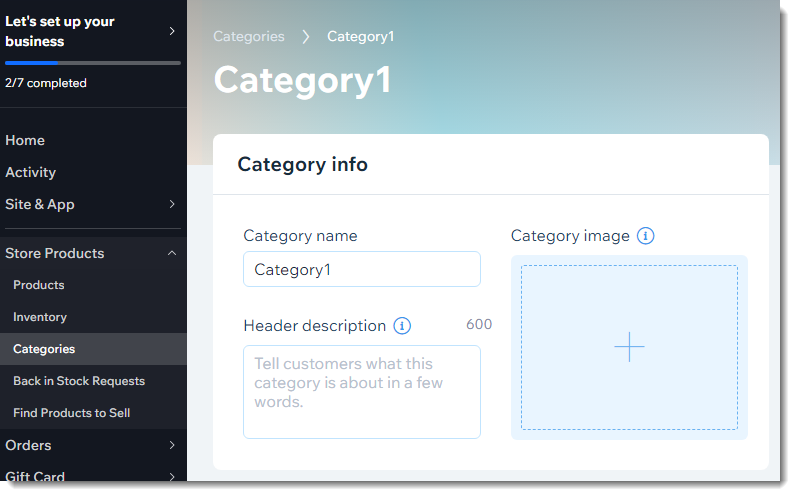
This article is about the new version of product categories. If you click +New Category and your page doesn't look like the image in Step 1 below, you have the original version. If so, click this link to learn how to add and display categories.
Product Categories are groups of products that you use to build your store. After creating a category, you can display it anywhere on your site, share it, apply a coupon or discount to it, or use it as a shop filter. You can add as many categories as you need.
Tip:
Your store comes with the "All Products" category built in.
Step 1 | Add the category details
Click + New Category to get started and add the category details. The image and description appear in search engine results, when a category is shared in social media, and can optionally appear on the Category Page.
To create a category:
Go to Categories in your site's dashboard.
Click + New Category at the top right.
Enter a category name (e.g. Men).
Enter a category description.
Add a category image.Click the Add icon
 .
.
Select an image from your Media Manager or click Upload Media to upload an image.
Click Add to Page.
Tip:
You can add a different image or description for search engine results and social media.
Step 2 | Set the category as active or inactive
A category can be either active or inactive. It's important to choose the right status for each category you create, so you can use it in a way that fits your business needs.
Click below to learn the difference between active and inactive categories:
Active categories
When a category is active, it has its own URL (e.g. www.mysite/category/shirts) which can be discovered by search engines.
Category URLs also make your site more "SEO friendly". They help boost SEO ranking by making it easier for search engines to understand what you're selling and how your site is organized.
You can (but don't have to) use active categories in any of the following ways:
To add to your site menu (by linking the URL)
To display in the Category Page
To display in a Product Gallery on any site page
To use when applying discounts and coupons to a group of products
To create custom shop filters
To share on social media platforms
Inactive categories
You can set a category as inactive when you are not yet ready for it to appear live. You can also use inactive categories for internal purposes, such as when creating discounts and coupons or for your own internal organization.
When you set a category as inactive, it no longer has a URL. This means:
It doesn't show up in search engine results or site search
If you added the link to your site menu, it no longer works
If you displayed it in a Product Gallery, the gallery will display the All Products category instead
If you shared the link, it will no longer work
Note that inactive categories can, however, appear in:
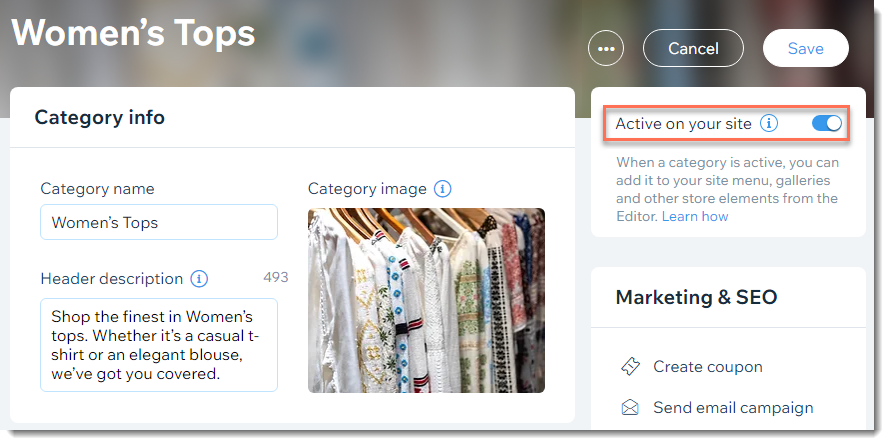
To set the category status, click the Active on your site toggle to enable or disable it.
Step 3 | Add products
If your category is active, it's a good idea to add at least a couple products right away to avoid displaying a blank category. Note that you can add or remove products at any time.
To add products to a category:
Go to Categories in your site's dashboard.
Select the new category you created.
Click + Add Products under Products in category.
Select the products you want to add.
Click Add.

Later, when you create a new product (or edit an existing one), you can add that product to one or more categories.