


Managing store inventory
Wix Stores: Creating and Sending Purchase Orders
Important:
Purchase orders are not yet available for all merchants.
Create purchase orders right in your Wix dashboard. When the stock arrives and you mark it as "Received", your inventory updates automatically.
In this article, learn more about:
Creating a purchase order
Start filling out the form by choosing the supplier you're ordering from. Then, you can add any of your existing products to the purchase order. To order something that's not yet in your catalog or a custom order, add a custom product.
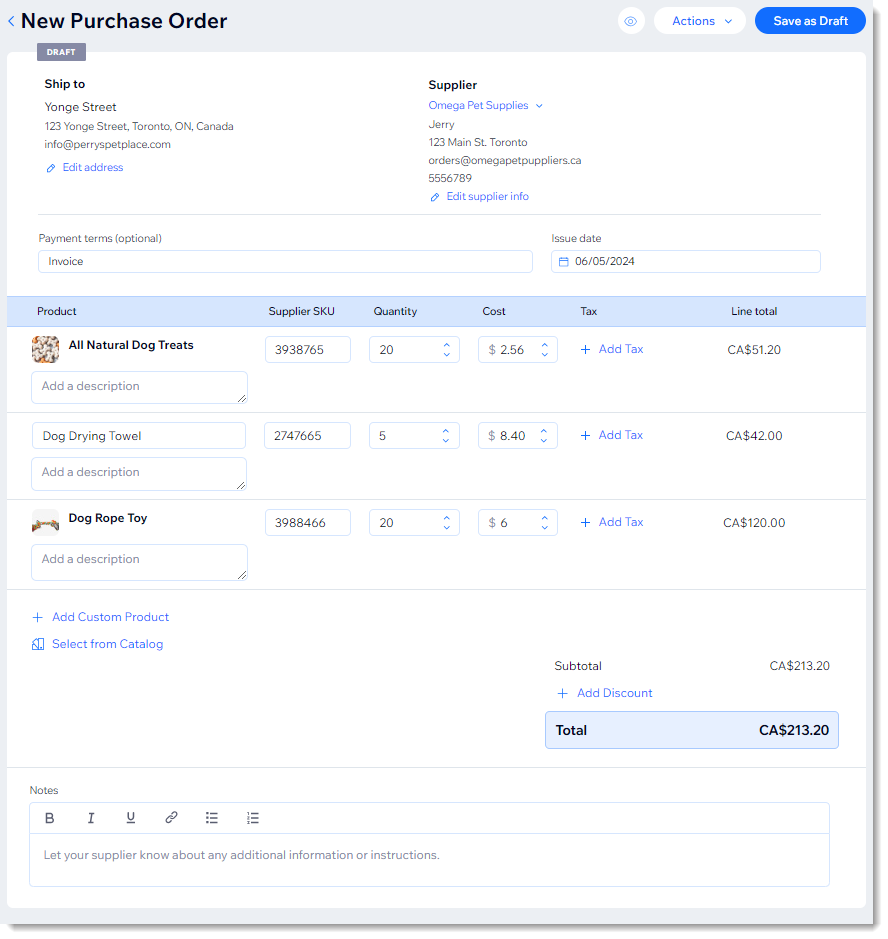
To create a purchase order:
Go to Purchase Orders in your site's dashboard.
Click +Create Purchase Order.
(Optional) Edit the Ship to address, to ship the products to a different location.
Add a new supplier:
Tip: Next time you can simply select this supplier from the list.Click Select supplier.
Click +Add Supplier.
Enter the supplier's details and click Save.
(Optional) Enter the payment terms.
Add products that are in your store's catalog:Click Select from Catalog.
Select a product.
If the product has product options, click Continue and select a variant.
Click Add to Order.
(Optional) Add a description.
If needed, change the SKU to the supplier's SKU.
Select the quantity.
Enter your cost.
(Optional) Click tax and create a tax rate.
Tip: Next time you can select the tax rate.
Repeat to add more of your store products.
Add products not yet in your store's catalog:Click +Add Custom Product.
Add the product name.
(Optional) Add a description.
Enter the supplier's SKU.
Select the quantity.
Enter your cost.
(Optional) Click tax and create a tax rate.
Tip: Next time you can select the tax rate.
Repeat to add more custom products.
(Optional) Add a note to the order.
(Optional) Click +Add Discount to enter a percentage discount.
Click Save as Draft.
(Optional) Download the purchase order as a PDF file or email it to yourself.
Important: We suggest not entering your supplier's email address since they will not be able to reply to the email.(Optional) Select Mark as ordered.
Click Done.
Sending your purchase order to the supplier
You have created and saved a draft of your purchase order. Now you need to send it to your supplier or place the order using your supplier's own ordering system.
If you haven't yet downloaded the purchase order as a PDF or emailed it to yourself, you can do so by clicking the More Actions icon next to the relevant order and selecting those options.
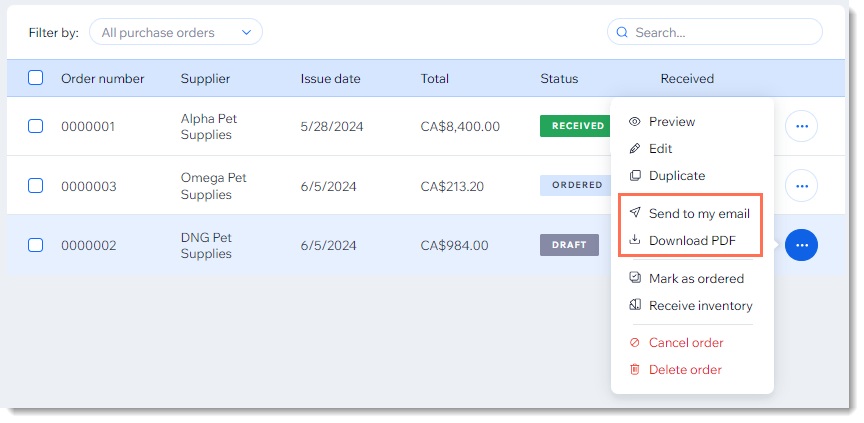
Tip:
Make sure you don't enter your supplier's email address after clicking Sent to my email, since the supplier won't be able to reply to this communication.
FAQs
Click a question below to learn more.
Can I make changes to a purchase order I saved as a draft?
Yes. Click the More Actions icon  next to the relevant purchase order and click Edit.
Tip: After you mark a purchase order as "Ordered", you can no longer make changes.
Can I save time by duplicating a purchase order?
Yes, you can duplicate any order. Click the More Actions icon next to the relevant purchase order and click Duplicate.
How does my inventory update automatically when I receive the order?
When your order arrives, click the More Actions icon next to the relevant purchase order and click Receive inventory. When you mark products as received, your inventory amounts are automatically updated. Learn more about receiving inventory.
