


Managing Retail POS staff and reports
Wix Retail POS: Managing Your Sales History
Important:
This article is about Wix Retail POS tablet for brick & mortar businesses.
For info on using POS on a mobile device, click here.
Access your sales history to view purchases made through your POS or online site. From here, you can retroactively assign a cart to a saved customer and provide receipts.
Note:
The sales history in the point of sale automatically syncs with your desktop. This means that any sale made with Retail POS also appears in the Orders tab in your site's dashboard.
Searching for a specific sale
Find the transaction you need by entering relevant keywords in the search bar or applying filters. You can filter transactions by the relevant sales channel, payment status, fulfilment status and more.

To search for a sale:
Open the POS tablet.
Tap Sales History from the bottom bar.
Find the sale in any of the following ways:Enter an order number, customer name or customer email in the search bar.
Filter sales:Tap the Filter icon .
.
Tap the relevant filter(s) to select them.
Tap Apply Filters at the bottom.
Tap the sale to view it.
Tip:
After locating a sale you can issue a refund or make an exchange.
Printing and emailing receipts
You can always provide your customer with an extra copy of their receipt.
Tip:
You can also print and email gift receipts that don't display prices.
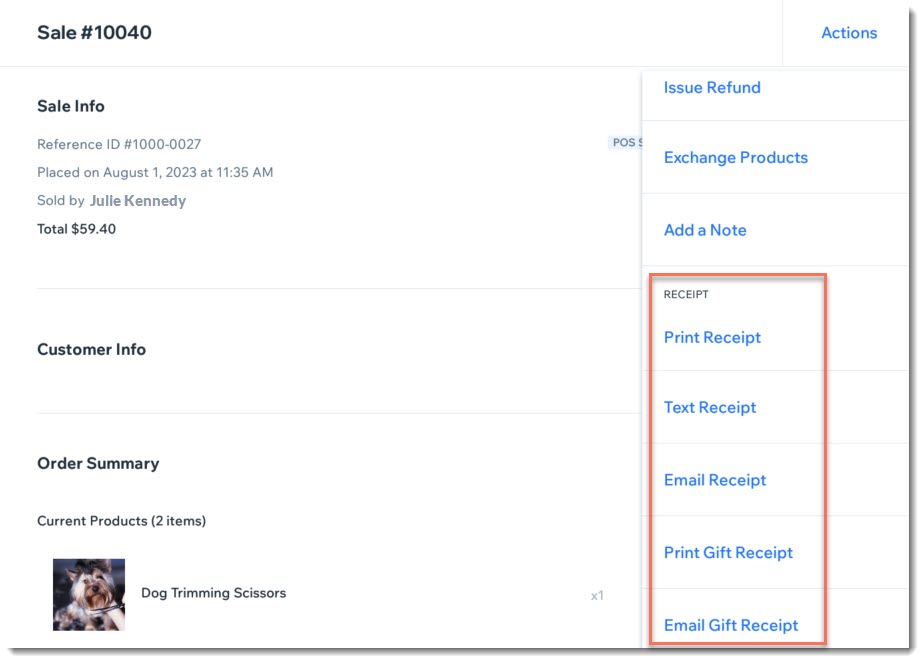
To print and email receipts:
Open the POS tablet.
Tap Sales History from the bottom bar.
Tap the relevant sale to select it.
Tap Actions and then do any of the following:Print a receipt: Tap Print Receipt to print a copy of the receipt on your HP printer.
Text a receipt: Tap Text Receipt, enter the phone number, including country code.
Email a receipt: Tap Email Receipt and enter your customer's email address.
Print a gift receipt: Tap Print Gift Receipt to print a copy of the receipt on your HP printer.
Email a gift receipt: Tap Email Gift Receipt and enter your customer's email address.
Assigning a sale to your customer
You can retroactively assign the sale of store items to the relevant customer to keep track of their purchase history. Find the relevant sale and tap Add Customer to associate it to your customer.
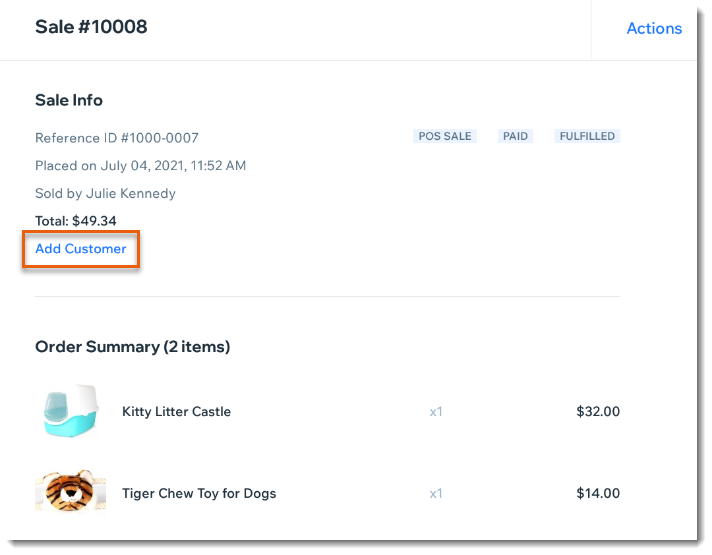
To assign a sale to your customer:
Open the POS tablet.
Tap Sales History from the bottom bar.
Tap the relevant transaction to view it.
Tap Add Customer. and select an option:Tap a saved customer.
Create a new customer:Tap +New Customer.
Enter the customer's detail and tap Save.
Adding a note to a sale
Keep track of important information connected with a sale by leaving a note. These notes are internal and won't be seen by your customers.
To add notes to a sale:
Open the POS tablet.
Tap Sales History from the bottom bar.
Tap the relevant sale.
Tap Actions.
Select Add a note.
Enter the note and tap Save.
Collecting payment for a partially paid sale
If you accepted a deposit on an order, you can collect the balance (or another payment) for this sale.
To collect payment for a partially paid sale:
Open the POS tablet.
Tap Sales History from the bottom bar.
Tap the relevant sale.
Tap Collect.
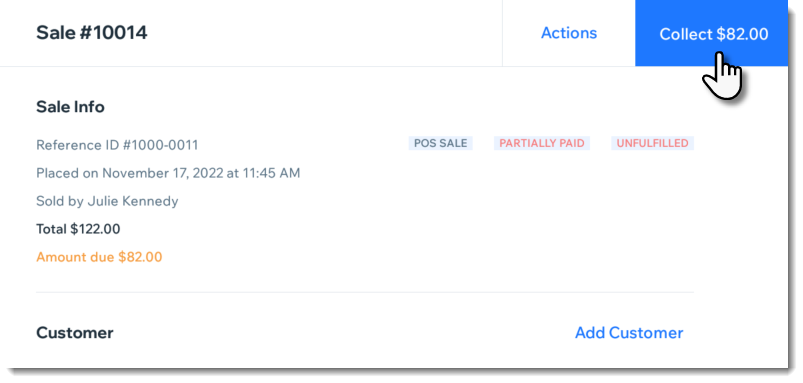
Select a payment type:Collect the balance owed: Process payment as you would for any other sale. The balance amount appears automatically.
Collect another partial payment: Tap Split Total and collect another partial payment.