top of page

Taking online orders

Wix Restaurants: Choosing Which Menus, Sections, and Dishes to Display for Online Ordering

Important:

Show or hide specific dishes or menus when customers place an order online. Certain dishes might only be available for pickup and not delivery, or you might want to create a menu that's only visible for customers who order from the mobile app. You can also choose to allow customers to make special requests for certain dishes of your menu.
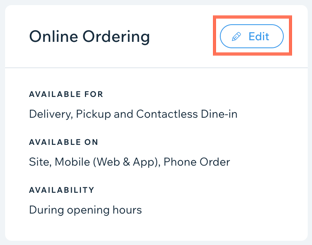
A screenshot of choosing your menu availability for online ordering.

To choose which menus, sections, or dishes to display:

  1. Go to Menus in your site's dashboard.

  2. Navigate to the relevant menu, section, or dish.

  3. Click Edit next to Online Ordering.

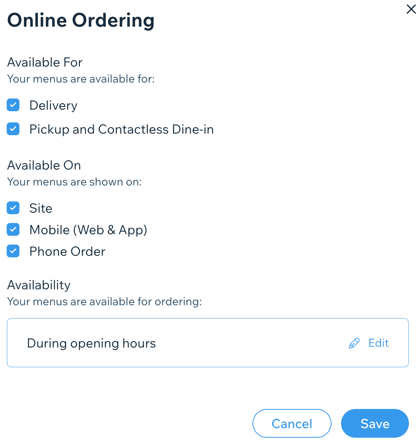
A screenshot of choosing your menu availability for online ordering.

  1. Choose the type of order your customers can place under Available for:Delivery: The items in this menu are available for restaurant delivery.
    Pickup and Contactless Dine-in: The items in this menu are available for restaurant pickup and contactless dine-in.

  2. Choose where the menu, section or dish is shown online under Available On:Site: The menu appears on your site for online ordering.
    Mobile (Web & App): The menu appears on the mobile version of your site and in the member apps.
    Phone Order: The menu is available for phone ordering.

  3. Select the availability of the menu, selection or dish:
    During opening hours:Click Edit under Availability.
    Click Opening Hours.
    Click Apply.

    During custom hours:Click Edit under Availability.
    Click Custom Hours.
    Set your custom hours. Learn more
    Click Apply.

  4. (Optional) For each dish, select the Accept special requests for this dish checkbox to allow customers to ask for special requests or modifications to a dish.

  5. Click Save.

Need A Professional Website?
Contact Us 
Today!

Wix Automations: Adding and Sending a Coupon

Wix Automations: Sending Automated Emails to Contacts After Form Submissions

Wix Automations: Customizing Automated Emails

Wix Automations: Creating a New Automation

Wix Automations: An Overview

The New Automation Builder: Understanding Email Types

The New Automation Builder: Creating a Multi-Action Automation

The New Automation Builder: Sending Data via Webhook

The New Automation Builder: Adding and Sending a Coupon

The New Automation Builder: Troubleshooting Wix Automations

The New Automation Builder: Understanding Conditions Operators

The New Automation Builder: Setting Up a 'Scheduled Time' Trigger

The New Automation Builder: Sending Data to Google Sheets

The New Automation Builder: Using the Property Picker

The New Automation Builder: Viewing and Managing Automations Installed for You

The New Automation Builder: Customizing Automated Emails

The New Automation Builder: Managing Your Automations

The New Automation Builder: Creating an Automation

The New Automation Builder: Overview

Microsoft Office 365 Mailbox Limits

Resetting the Password for Additional Office 365 Mailboxes

Resetting Your Admin Password for Your Office 365 Mailbox

Accessing Your Microsoft Office 365 Mailbox Through Your Wix Account

Accessing Your Microsoft Office 365 Mailbox Through Your Wix Account

Accessing the Microsoft Office 365 Admin Center

Activating Your Microsoft Office 365 Mailbox Purchased from Wix

Google Workspace: Troubleshooting Login Issues

Google Workspace: FAQs

Google Workspace: Contacting Google Support

Google Workspace Error Message: "You do not have access to Email"

wix experts
Graphic2Traffic web design
©
bottom of page