top of page

Wix Mobile POS

Wix Mobile POS: Collecting Tips

Important:

  • This article is about Wix Mobile POS for mobile phones.

  • For info on Wix Retail POS for brick and mortar stores, click here.

Let clients who want to leave a tip do so right in your Mobile POS. You can display preset tip percentages or allow customers to decide on the tip.
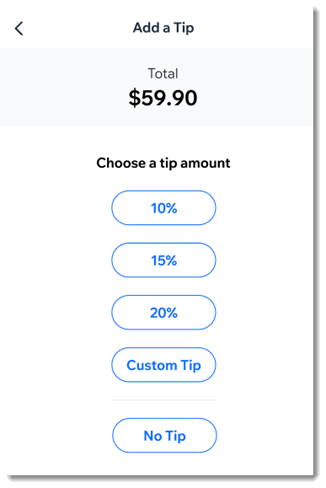
An example of the tip screen customers see on the mobile POS

After you enable tipping, you'll see the option to add a tip as part of the checkout.

Notes:

  • To collect tips, Wix Payments must be your payment provider.

  • It's not possible to collect tips for cash payment or when processing split payments.

  • Tips are available with Wix Stores, Wix Booking, and  Wix Restaurants Orders (New) .

To enable tipping:

  1. Go to your site in the Wix app.

  2. Tap Manage  at the bottom.

  3. Scroll down to the Get Paid section and tap Point of Sale.

  4. Tap the More Actions icon   at the top right.

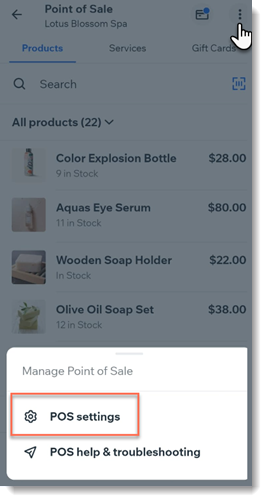
  5. Tap POS settings.
    Note: If you don't have the POS settings option, see the note below.

  6. Select Tips.

  7. Tap the Collect tips toggle to enable it.

  8. (Optional) Change the preset tip percentages:Tap the tip option you want to update.
    Enter a new percentage.

  9. (Optional) Tap the Allow a custom tip amount toggle to enable it.

  10. Tap Save.

Adding POS settings:

Normally, you should be able to access the POS Settings by clicking the More Actions icon  at the top right.
Screenshot of a Wix App point of sale page after clicking the More Actions button with POS settings outlined
If the settings aren't displayed, you can access them by adding Wix Stores to your site.
Note: Make sure you hide store pages from your live site.

Need A Professional Website?
Contact Us 
Today!

Wix Automations: Adding and Sending a Coupon

Wix Automations: Sending Automated Emails to Contacts After Form Submissions

Wix Automations: Customizing Automated Emails

Wix Automations: Creating a New Automation

Wix Automations: An Overview

The New Automation Builder: Understanding Email Types

The New Automation Builder: Creating a Multi-Action Automation

The New Automation Builder: Sending Data via Webhook

The New Automation Builder: Adding and Sending a Coupon

The New Automation Builder: Troubleshooting Wix Automations

The New Automation Builder: Understanding Conditions Operators

The New Automation Builder: Setting Up a 'Scheduled Time' Trigger

The New Automation Builder: Sending Data to Google Sheets

The New Automation Builder: Using the Property Picker

The New Automation Builder: Viewing and Managing Automations Installed for You

The New Automation Builder: Customizing Automated Emails

The New Automation Builder: Managing Your Automations

The New Automation Builder: Creating an Automation

The New Automation Builder: Overview

Microsoft Office 365 Mailbox Limits

Resetting the Password for Additional Office 365 Mailboxes

Resetting Your Admin Password for Your Office 365 Mailbox

Accessing Your Microsoft Office 365 Mailbox Through Your Wix Account

Accessing Your Microsoft Office 365 Mailbox Through Your Wix Account

Accessing the Microsoft Office 365 Admin Center

Activating Your Microsoft Office 365 Mailbox Purchased from Wix

Google Workspace: Troubleshooting Login Issues

Google Workspace: FAQs

Google Workspace: Contacting Google Support

Google Workspace Error Message: "You do not have access to Email"

wix experts
Graphic2Traffic web design
©
bottom of page