top of page

Managing your calendar & bookings

Wix Bookings: Scheduling Your Courses

Schedule your sessions exactly when you want - whether the meetings take place at regular intervals (e.g. 1 hour per week every Monday at 8:00), or a more personalized schedule (e.g. a session of a different length once every three weeks with sessions taught by different instructors).

After creating a Course, you can schedule its sessions from your booking calendar. When clients book a course, they sign up for the entire course and all its sessions.
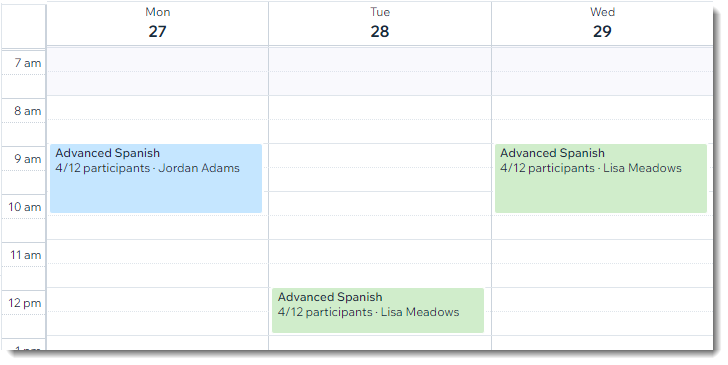
A screenshot of a calendar with courses scheduled.

Before you begin:

Create the Course service that you want to schedule (e.g. Advanced Spanish).

To schedule a course session:

  1. Go to Booking Calendar in your site's dashboard.

  2. Click the time slot in which the course takes place for the first time.

  3. Select Course session.

  4. Add the course session details:Course/Service: Select the course you want to schedule.
    Staff: Select the staff member who is leading the course.
    Start Time: Edit the date and start time of the session.
    Duration: Select the duration of the course.
    Note: Select Custom to enter a custom duration.

    Repeat: Choose how often the course session is offered:Select an option from the drop-down.
    Note: Select Doesn't Repeat to only offer the course once.
    Select the day(s) of the week the course takes places.
    (Optional) Click the field next to Until and choose the date of the last class.

  5. Choose a saving option:Save & Add New: Save the session and start scheduling another one.
    Save: Save the session and return to your calendar.
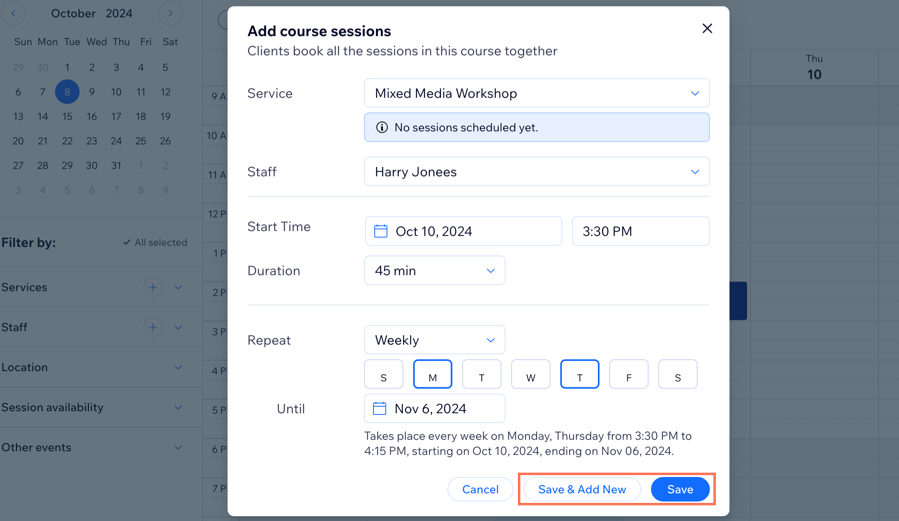
A screenshot of adding the course session details, and where to choose save & add new or just save the session..

Tip:

Go to the Bookings Services tab and click Show Schedule next to the relevant course to view a summary of its schedule.

You can also select the Schedule view in your calendar to check the list of upcoming sessions on the certain date. 

Need A Professional Website?
Contact Us 
Today!

Wix Automations: Adding and Sending a Coupon

Wix Automations: Sending Automated Emails to Contacts After Form Submissions

Wix Automations: Customizing Automated Emails

Wix Automations: Creating a New Automation

Wix Automations: An Overview

The New Automation Builder: Understanding Email Types

The New Automation Builder: Creating a Multi-Action Automation

The New Automation Builder: Sending Data via Webhook

The New Automation Builder: Adding and Sending a Coupon

The New Automation Builder: Troubleshooting Wix Automations

The New Automation Builder: Understanding Conditions Operators

The New Automation Builder: Setting Up a 'Scheduled Time' Trigger

The New Automation Builder: Sending Data to Google Sheets

The New Automation Builder: Using the Property Picker

The New Automation Builder: Viewing and Managing Automations Installed for You

The New Automation Builder: Customizing Automated Emails

The New Automation Builder: Managing Your Automations

The New Automation Builder: Creating an Automation

The New Automation Builder: Overview

Microsoft Office 365 Mailbox Limits

Resetting the Password for Additional Office 365 Mailboxes

Resetting Your Admin Password for Your Office 365 Mailbox

Accessing Your Microsoft Office 365 Mailbox Through Your Wix Account

Accessing Your Microsoft Office 365 Mailbox Through Your Wix Account

Accessing the Microsoft Office 365 Admin Center

Activating Your Microsoft Office 365 Mailbox Purchased from Wix

Google Workspace: Troubleshooting Login Issues

Google Workspace: FAQs

Google Workspace: Contacting Google Support

Google Workspace Error Message: "You do not have access to Email"

wix experts
Graphic2Traffic web design
©
bottom of page