


Managing your calendar & bookings
Wix Bookings: Managing Clients with Appointments Through your Booking Calendar
In your booking calendar, you can keep track of who pays and who attends an appointment at your business. You can also cancel sessions and issue refunds when necessary.
In this article, learn more about:
Marking attendance
Mark attendance and no-shows at your appointments within the booking calendar. Keeping track of attendance can help you make decisions about how you offer appointments.
Dashboard
Wix app
Wix Studio app
Go to Booking Calendar in your site's dashboard.
Click the relevant appointment in your calendar.
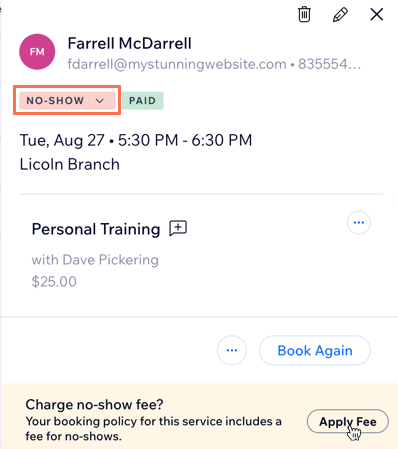
Click the Booked drop-down and select the relevant option:Booked: The client who booked the appointment hasn't arrived yet.
Checked-In: The client has arrived at the appointment and checked in.
No-Show: The client didn't arrive for their appointment. If relevant, you can apply a no-show fee to charge for the missed session.
Note: This option is only available for classes that include cancellation and no-show fees in their booking policy.
Updating payment status
When you receive payment from clients, you can change their payment status. If the client pays a deposit online and the rest in person, you can follow the same steps to mark the session as paid.
Dashboard
Wix app
Wix Studio app
Go to Booking Calendar in your site's dashboard.
Click the relevant appointment in your calendar.
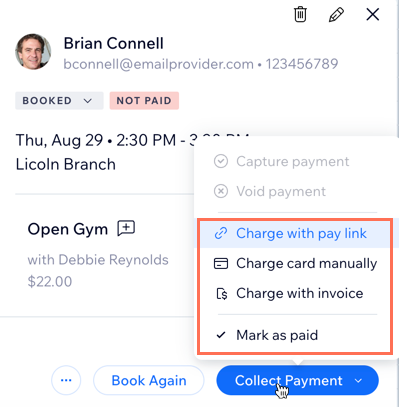
Click the Collect Payment drop-down.
Choose what you want to do:Charge with pay link: Create a pay link and send it to your client.
Charge card manually: Charge a client's credit card manually.
Note: Make sure you connect a payment provider that supports credit card payments.
Charge with invoice: Charge a client through an invoice.
Mark as paid: Select this option if the client pays you in person.
Note: This action cannot be undone.
Canceling appointments and issuing refunds
Depending on your payment provider, you can issue full refunds while canceling an appointment in the bookings calendar.
Charging a cancellation fee?
Charge the cancellation fee first. Then, go to the Order page to process the refund for the paid session.
Dashboard
Wix app
Wix Studio app
Go to Booking Calendar in your site's dashboard.
Click the appointment you want to cancel.
Click the More Actions icon
 next to the session name and select Cancel.
Follow the steps below depending on the type of session you are cancelling:
Individually paid sessions (without cancellation fees)
(Optional) Select the Notify client via SMS checkbox to send an SMS notification.
(Optional) Select the Notify client via email checkbox and add a message for your customer.
(Optional) Select the Mark as refunded checkbox to refund your customer.

Click Cancel Session.
Click Mark as Refunded to confirm the refund.
Individually paid sessions (with cancellation fees)
(Optional) Select the Apply cancellation fee checkbox to charge a cancellation fee.
(Optional) Select the Notify client via SMS checkbox to send an SMS notification.
(Optional) Select the Notify client via email checkbox and add a message for your client.
Click Cancel Session.

(Optional) Edit the cancellation fee.
Note: You cannot charge more than the fee stated in the policyClick Confirm Fee & Continue.

Click View Order.
Click Issue refund.
Enter the refund details:Refund amount: Enter the amount to refund your client.
Reason for Refund (optional): Select a reason for this refund.
Note: Your answer appears only in the order's activity section.
Send a confirmation email to customer: Send your customer an email confirming the refund and amount.
Add a personal note in the email (optional) : Add a personal note to your customer
Click Continue.
Click Mark as Refunded.
Note: This cannot be undone.
Sessions paid using a plan
(Optional)Select the Apply cancellation fee checkbox to charge a cancellation fee.
(Optional) Select the Notify client via SMS checkbox to send an SMS notification.
(Optional) Select the Notify client via email checkbox and add a message for your client.
(Optional) Select the Credit session back to client's plan checkbox to credit back the session.
Click Cancel Session.

(Optional) Edit the cancellation fee.
Note: You cannot charge more than the fee stated in the policy.Click Confirm Fee & Continue.
Click Collect Payment and choose how you want to charge your client: Charge with pay link, Charge card manually, Charge with invoice, Mark as paid.
Click Issue Session Credit to confirm.
Managing clients' details
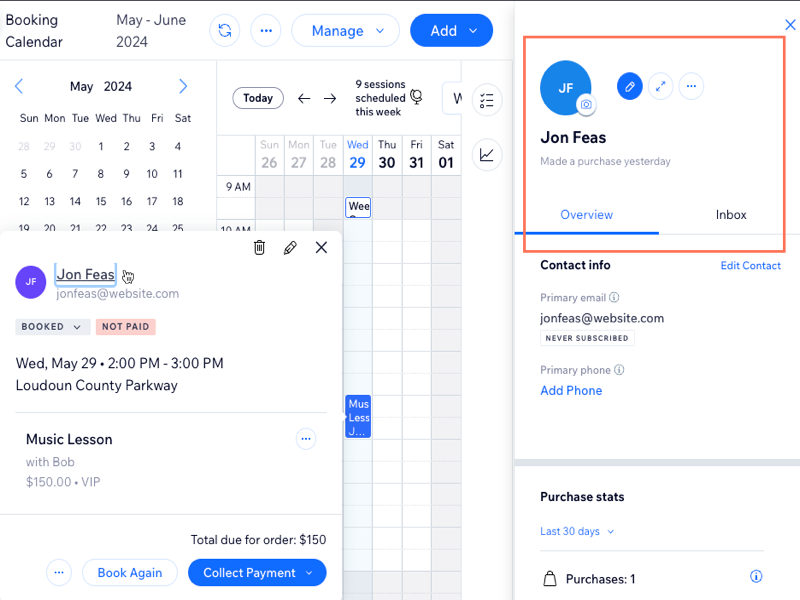
Click on any appointment in the Booking Calendar and select the client to view their contact card. Here, you can see their previous bookings, store important documents they shared and save notes about your client. You can also chat to your clients and send them service links or coupons.
Dashboard
Wix app
Wix Studio app
Go to Booking Calendar in your site's dashboard.
Click the relevant appointment in your calendar.
Click the name of your client to open their contact card.
Choose what you want to do:Click the Edit icon
 to edit the client's contact info (e.g. email, phone number, address).
Click the Overview tab to manage your client's appointments and details, such as updating their contact information, add a label to help organize contacts, link the contact to a workflow, and more.
Note: You might see different options depending on the Wix features you use.
Click Inbox tab to see your contact's activity history, and you can send a chat message, email, and SMS to your contact.
Learn more about viewing and editing your clients' information.
FAQs
Click a question below to learn more about managing appointment clients.
Can I offer a partial refund for an appointment?
Yes, you can issue partial refunds for appointments by going to the relevant appointment in your Orders page.
Can I see a client's full booking history on my Wix app?
Yes. Click on the relevant client's name and tap See All under Agenda to see the client's complete booking history with you.

Can I add notes or extra information to a client's profile?
Yes, you can. To add a note for a client, click Add task so you can follow up with this client. You can also add a note with extra information about the client.
What can I do if I want to charge the cancellation fee but also refund the order?
In this case, you need to first charge the fees and the order, and then issue a refund for the order.