


Emails, SMS, and promotions
Wix Bookings: Creating and Managing Shareable Links
Create shareable links to your bookings pages, memberships, and packages, to make it easy for clients to book your services. You can customize the links to show different services or even showcase the services specific staff members offer.
Shareable links are a great way to get bookings, even if you haven't finished creating your website. We'll make a functional mini-site for you so that you don't miss any bookings while you're adding the finishing touches to your site. Getting the word out about your services is a crucial part of growing your business.
Important:
Make sure to upgrade your site to accept online payments for your services.
We are in the process of releasing shareable links, which are not yet available to everyone.
In this article, learn more about:
Sharing a link to your service list
Share a link with your clients that directs them to a list of services from a single staff member or at a specific location.
To share a link to your service list:
Go to Shareable Links in the dashboard.
Click Create Link under Service list.
Select the relevant person from the Staff member drop-down or select All staff members.
Click Continue.
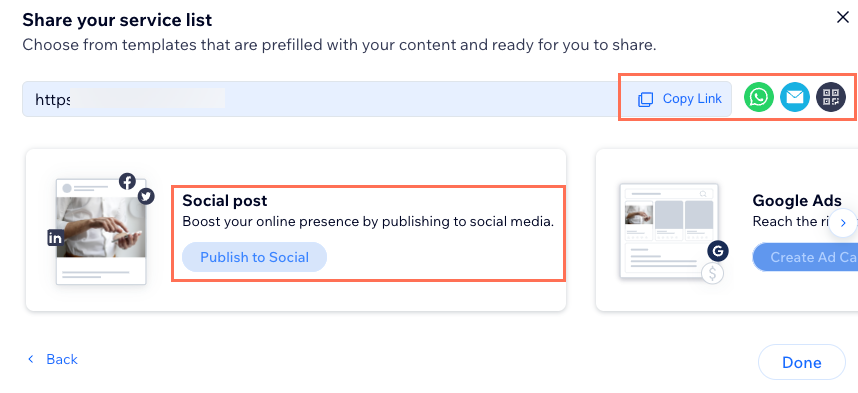
Choose what you want to do:Copy link: Choose this option to copy the complete link. This is a great option for hyperlinked text in promotional emails.
Share via: Choose the relevant platform to share the service link directly: Send via WhatsApp , Send with Email
  , Generate a QR Code
  .
.
Publish to social: Follow the steps below depending on your account:(If you haven't yet) Connect the social accounts you want to publish to.
Customize how your social post will appear on each social channel. The options vary depending on which social accounts you connect:Publish as: If you're posting to Facebook and/or Instagram, choose whether you want to publish your image as a Post, Reel or Story. Stories allow you to publish up to 5 images. You can't enter a caption for this type of post.
Note: Publishing to Stories is not yet available in all Wix accounts.
Caption: Create a caption to add to your social post which will display to your audience.
Tip: Click Create with AI to open the AI text creator menu. Enter a brief description of the content, select a tone of voice and click Create Text to generate a caption for your post.
Add Tracking Link: Include a link to your site so that when people click it, you can view the analytics of who came from your social post.
Media: Hover over the relevant media item and click the Replace media icon to swap out your image or video for another.
When do you want to publish?: Select Publish now or Schedule for later to choose when you want to publish.
Click Publish at the bottom right.
Note: The number next to Publish indicates how many posts you are about to publish. For example, if you have created both a Facebook and Instagram post, the number will show (2). You can also see the platform names next to Publish.
Tip:
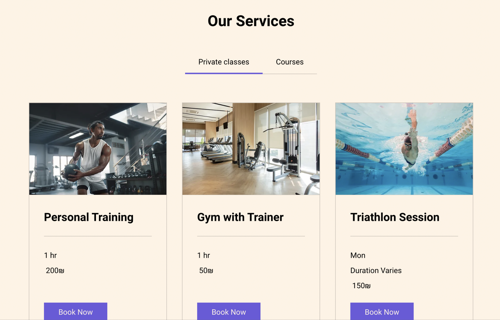
When clients click the link you send, they go to a service list page like this example below:
Sharing a link to a service calendar
You can share a direct link to a specific service's calendar. This is a great option when you are already speaking to a client about a service and want to make it easy for them to book a session right away.
Note:
Links to the service calendar work for appointments and classes. Links to courses direct your clients to the course's service page.
To share a link to a service calendar:
Go to Shareable Links in the dashboard.
Click Create Link under Service calendar.
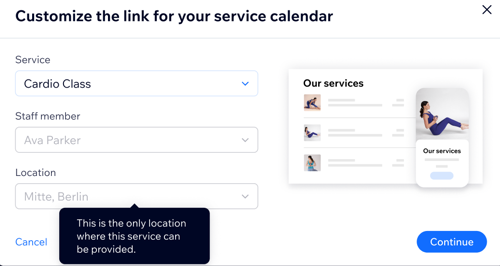
Click to choose the relevant options from the Service, Staff member and Location drop-downs.
Note: If only one staff member offers a service, or if you don't have multiple locations, these drop-downs are unavailable.
Click Continue.
Choose what you want to do:Copy link: Choose this option to copy the complete link. This is a great option for hyperlinked text in promotional emails.
Share via: Choose the relevant platform to share the service link directly: Send via WhatsApp, Send with Email , Generate a QR Code .
Publish to social: Follow the steps below depending on your account:(If you haven't yet) Connect the social accounts you want to publish to.
Customize how your social post will appear on each social channel. The options vary depending on which social accounts you connect:Publish as: If you're posting to Facebook and/or Instagram, choose whether you want to publish your image as a Post, Reel or Story. Stories allow you to publish up to 5 images. You can't enter a caption for this type of post.
Note: Publishing to Stories is not yet available in all Wix accounts.
Caption: Create a caption to add to your social post which will display to your audience. Tip: Click Create with AI to open the AI text creator menu. Enter a brief description of the content, select a tone of voice and click Create Text to generate a caption for your post.
Add Tracking Link: Include a link to your site so that when people click it, you can view the analytics of who came from your social post.
Media: Hover over the relevant media item and click the Replace media icon to swap out your image or video for another.
When do you want to publish?: Select Publish now or Schedule for later to choose when you want to publish.
Click Publish at the bottom right.
Note: The number next to Publish indicates how many posts you are about to publish. For example, if you have created both a Facebook and Instagram post, the number will show (2). You can also see the platform names next to Publish.
Tip:
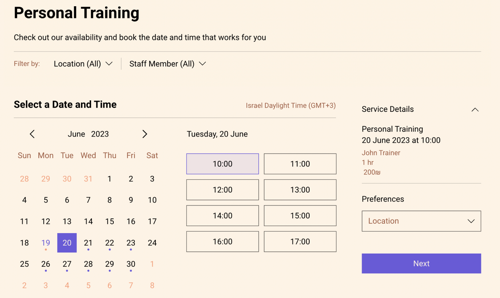
When clients click the link you send, they go to a service calendar page like the example below:
Sharing a link to a service page
You can promote individual services by sharing links to the service page, which contains additional details about the service. This is great for targeted marketing campaigns or when following up with a client after a consultation.
To share a link to a service page:
Go to Shareable Links in the dashboard.
Click Create Link under Service page.
Select the relevant option from the Service drop-down.
Click Continue.
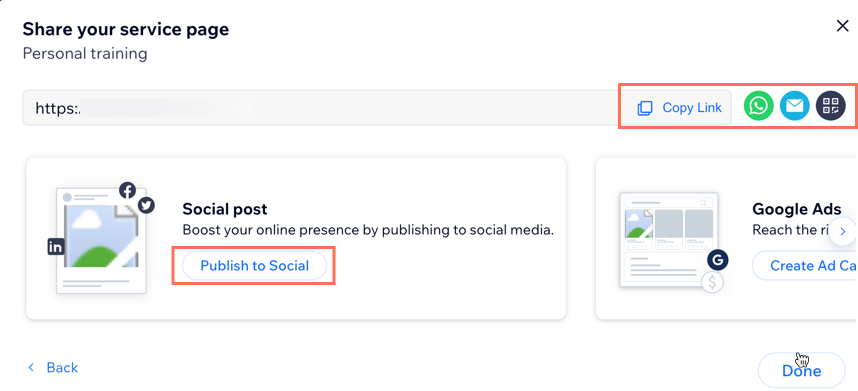
Choose what you want to do:Copy link: Choose this option to copy the complete link. This is a great option for hyperlinked text in promotional emails.
Share via: Choose the relevant platform to share the service link directly: Send via WhatsApp, Send with Email , Generate a QR Code .
Publish to social: Follow the steps below depending on your account:(If you haven't yet) Connect the social accounts you want to publish to.
Customize how your social post will appear on each social channel. The options vary depending on which social accounts you connect:Publish as: If you're posting to Facebook and/or Instagram, choose whether you want to publish your image as a Post, Reel or Story. Stories allow you to publish up to 5 images. You can't enter a caption for this type of post.
Note: Publishing to Stories is not yet available in all Wix accounts.
Caption: Create a caption to add to your social post which will display to your audience.
Tip: Click Create with AI to open the AI text creator menu. Enter a brief description of the content, select a tone of voice and click Create Text to generate a caption for your post.
Add Tracking Link: Include a link to your site so that when people click it, you can view the analytics of who came from your social post.
Media: Hover over the relevant media item and click the Replace media icon to swap out your image or video for another.
When do you want to publish?: Select Publish now or Schedule for later to choose when you want to publish.
Click Publish at the bottom right.
Note: The number next to Publish indicates how many posts you are about to publish. For example, if you have created both a Facebook and Instagram post, the number will show (2). You can also see the platform names next to Publish.
Tip:
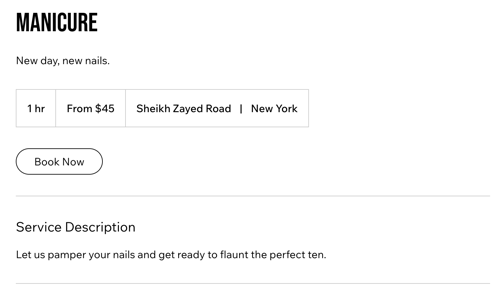
When clients click the link you send, they go to a service page like this example below:
Sharing a link to your memberships and packages
You can share direct links for clients to sign up for your membership plans and packages. This is a great way to generate repeat business and offer better value to your clients when they go to book your services.
To share a link to your memberships and packages:
Go to Shareable Links in the dashboard.
Click Create Link under Memberships and packages.
(If necessary) Select the relevant option from the Service drop-down, then click Continue.
Choose what you want to do:Copy link: Choose this option to copy the complete link. This is a great option for hyperlinked text in promotional emails.
Share via: Choose the relevant platform to share the service link directly: Send via WhatsApp, Send with Email , Generate a QR Code .
Publish to social: Follow the steps below depending on your account:(If you haven't yet) Connect the social accounts you want to publish to.
Customize how your social post will appear on each social channel. The options vary depending on which social accounts you connect:Publish as: If you're posting to Facebook and/or Instagram, choose whether you want to publish your image as a Post, Reel or Story. Stories allow you to publish up to 5 images. You can't enter a caption for this type of post.
Note: Publishing to Stories is not yet available in all Wix accounts.
Caption: Create a caption to add to your social post which will display to your audience.
Tip: Click Create with AI to open the AI text creator menu. Enter a brief description of the content, select a tone of voice and click Create Text to generate a caption for your post.
Add Tracking Link: Include a link to your site so that when people click it, you can view the analytics of who came from your social post.
Media: Hover over the relevant media item and click the Replace media icon to swap out your image or video for another.
When do you want to publish?: Select Publish now or Schedule for later to choose when you want to publish.
Click Publish at the bottom right.
Note: The number next to Publish indicates how many posts you are about to publish. For example, if you have created both a Facebook and Instagram post, the number will show (2). You can also see the platform names next to Publish.
Redirecting existing links to your published site pages
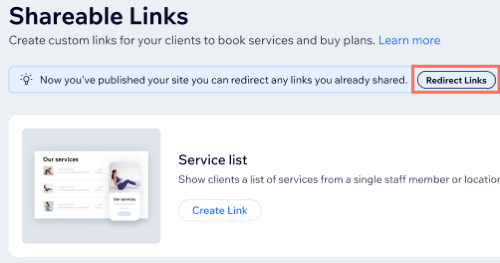
If you created shareable links before you published your site, you can set them to redirect to your live site, once you do publish your live site. After publishing your site, go to Shareable Links in your site's dashboard and click to redirect your links.
Important:
These steps are only relevant if you created shareable links before publishing your site and you have now published your site.
If you don't redirect shareable links that you created before publishing your site, they won't work redirect to your live site. Make sure to follow the steps below to redirect them.
To redirect your existing links to your published site pages:
Go to Shareable Links in the dashboard.
Click Redirect Links at the top.
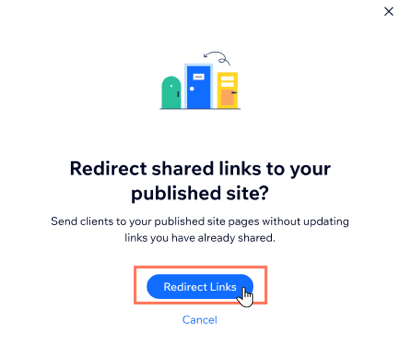
Click Redirect Links to confirm.
Note:
It may take a few minutes for the shareable links to begin redirecting to your live site.
FAQs
Click a question below to learn more.
I haven't finished my website yet, can I still share links to my services?
When you use shareable links with a new Wix site, Wix creates a "mini site" in the background for your existing services, so your clients can still book sessions with you.
Once you publish your finished site, you can then create new shareable links to direct your users to the relevant page on your completed website.
Notes:
Make sure to upgrade your site to one of our Premium or Studio plans to accept online payments for your services.
If you already completed and published your site, Wix doesn't create a mini site for you.
If I don't have a Premium plan yet, can I still share links to my services?
Yes, you can still share links to your services without a Premium plan, but you won't be able to accept online payments.