


Video conferencing with Wix Bookings
Wix Bookings: Creating an Online Service via Zoom
Planning to connect with clients online? Use Zoom to host your appointments, classes or courses. Online sessions are ideal for coaching, tutoring, language classes, fitness sessions, and much more.

Before you begin:
Make sure one or more payment methods are set up in the Accept Payments tab of your site's dashboard.
We’ve recently updated the features included in our premium plans as of January 2023. To use video conferencing you need to upgrade to one of our Business & eCommerce Premium Plans.
Create an online service with Zoom
The first time you create an online service with Zoom, you'll be prompted to connect to your Zoom account or to create a new one. The next time you create an online service, you can skip this step.
Notes:
The Zoom account email address you connect to Wix Bookings displays in the Staff tab of your Booking Calendar. Click Edit to connect a different Zoom account.

Learn more about managing multiple video conferencing accounts.
When clients book the service, they receive their Zoom link in their confirmation email. Your Zoom link is added to your Wix calendar only after a booking is made.
Learn how to:
Create an online Appointment
Go to the Booking Services tab in your site's dashboard.
Click Add a New Service and select appointment or click an existing service to edit it.
Complete the General info section.
Tip: Mention that the service is held online in the service title or subtitle.Complete the Service details section by entering a service duration, buffer time and price.
Connect to Zoom:
Tip: If you've already created an online service with Zoom, skip to step 6.Click Add next to video conferencing.
 Select Zoom.
Click Continue.
Click Connect.
Select an option:Sign in to your existing Zoom account and click Done.
Create a new Zoom account:Click Sign Up, It's Free.
Enter your email address.
Note: An email is sent to the address you enter.
In the email you received from Zoom, click Activate Account.
Enter your name, create a password, then click Continue.
(Optional) Invite colleagues or click Skip this step.
Go back to the Wix dashboard and click Done.
Complete the rest of the service and click Save.
Note: When clients book the service, they receive their Zoom link in their confirmation email. Your Zoom link is added to your Wix calendar only after a booking is made.
Create an online Class or Course
Go to the Booking Services tab in your site's dashboard.
Click Add a New Service.
Select Multiple Participants.
Select Class.
Complete the General info section.
Tip: Mention that the service is held online in the service title or subtitle.Complete the Service details section.
Select an option from the Location drop-down:Business Address: Select an address you entered in the Business Info tab.
Custom Location: Enter a location (e.g. Online). The text appears on your site.
Connect to Zoom:
Tip: If you've already created an online service with Zoom, skip to step 9.Click Add next to video conferencing.
 Select Zoom.
Click Continue.
Click Connect.
Select an option:
Sign in to your existing Zoom account and click Done.
Create a new Zoom account:Click Sign Up, It's Free.
Enter your email address.
Note: An email is sent to your address.
In the email you received from Zoom, click Activate Account.
Enter your name, create a password, then click Continue.
(Optional) Invite colleagues or click Skip this step.
Go back to the Wix dashboard and click Done.
Complete the rest of the service and click Save.
Schedule when the service takes place and select a staff member in the Booking Calendar.Classes
Courses
Note: When clients book the service, they receive their Zoom link in their confirmation email. Your Zoom link is added to your Wix calendar only after a booking is made.
Start your session
When it's time to hold your event, access the service from your calendar or the Wix Owner app and click Start Zoom Meeting. You can also click Copy link  to send the link to clients.
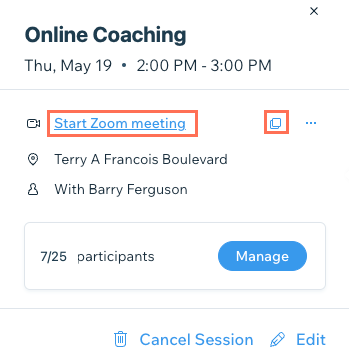
Your clients can join the event by clicking the Zoom link in the:
Confirmation email
Reminder email (if enabled)
Wix Owner app
Note:
If you add a Zoom link to a service that clients have already booked, only new clients receive the link. Make sure to manually send the Zoom link to clients who booked before you added video conferencing via Zoom.
Troubleshooting Zoom Issues
For additional support and resources, check out the following links:
Go to Zoom's Help Center.
I connected to the wrong Zoom account, what do I do?
Go to Staff in your site's dashboard.
Click Edit next to your existing video conferencing link.
Click Continue.
Click Zoom.
Click Continue.
Click Continue again, if prompted.
Enter the correct Zoom account details and log in.

Click Allow.
Tip:
If the above steps do not fix the problem, try uninstalling and reinstalling the Zoom app.
Learn more about connecting a different Zoom account.
I don't see the Zoom link in my calendar, what do I do?
The Zoom link appears in your Bookings Calendar only after a booking is made. Courses and class sessions that have no bookings do not display a link.
Make sure you are the one providing the service. If it's a staff member, they can get the link through the calendar if synced, or through the Wix Owner app.
A staff member removed the Zoom app from the Wix marketplace, and it is causing problems. What do I do?
A Zoom account can be disconnected by removing the Zoom app from the Wix marketplace. To resolve this, you must remove the Zoom app from your site and then reinstall it.
Step 1 | Remove the Zoom App
Go to the Manage Apps tab in your site's dashboard.
Click the More Actions icon
 next to the Zoom app.

Click Delete.
Select a reason for deleting the app from the drop-down list.
Click Delete App.
Step 2 | Reinstall the Zoom App
Go to the Booking Services tab in your site's dashboard.
Click the relevant service.
Scroll down to the Service Details section.
Click Add Video Conferencing.
In the window that appears click Connect.Note: If the Connect button is not replaced by a 'Connected' label, click Done, refresh the page and try again.
Click Done.