Customizing Wix Bookings pages
Wix Bookings: Adding and Setting Up a Weekly Timetable
The Weekly Timetable makes it easier for your clients to find and book the right class. After you add a Weekly Timetable to your site, you can customize it to suit your business and branding.
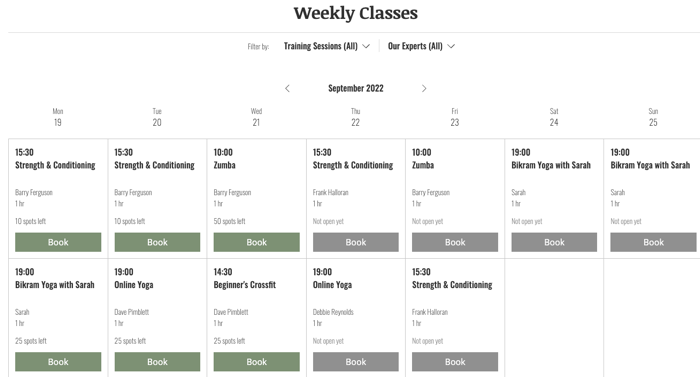
The Weekly timetable displays the registration status for each class throughout the week (for example, "Closed" or "Not open yet"). The buttons for each class also change depending on the registration status (for example, "Book now," "Join Waitlist" or "Full").
Notes:
Courses and appointments do not appear in the weekly timetable.
If your business offers more than 100 class services, only the first 100 classes appear on the Weekly Timetable.
Step 1 | Add a Weekly Timetable to your site
The Weekly Timetable allows clients to find the classes they want to book each week without searching through your service list.
Wix Editor
Studio Editor
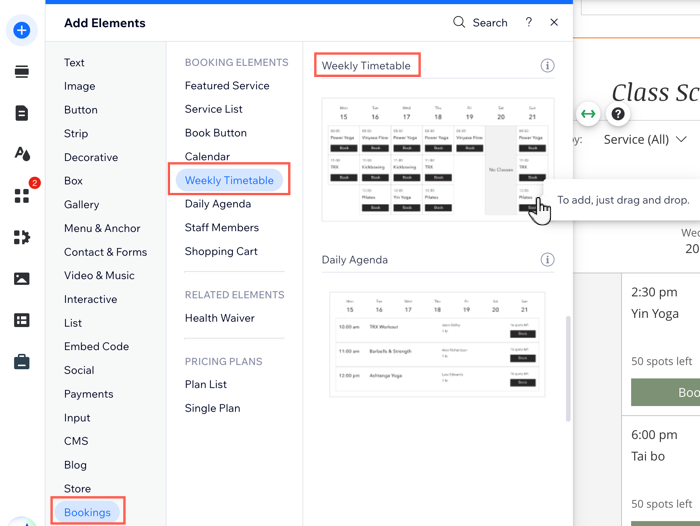
Click Add Elements
 on the left side of the editor.
Click Bookings.
Click Weekly Timetable.
Drag a timetable onto your page.
Tip:
Your timetable automatically displays your visible classes on the days they are available. Hidden classes do not appear in the timetable. You can display a maximum of 100 class services on the Weekly Timetable.
Step 2 | Choose which elements to show
Now choose which elements to include in the Weekly Timetable, such as the timetable header and the Service and Staff filters. You can also choose to display your locations if your classes take place at more than one address.
Tip:
For convenience, your clients can filter the weekly timetable by service and by staff member to find the class they want to book.
To choose which elements to show on the page:
Click the Weekly Timetable element in your editor.
Click Settings.
Click the Display tab.
Select the checkboxes next to the elements you want to display.
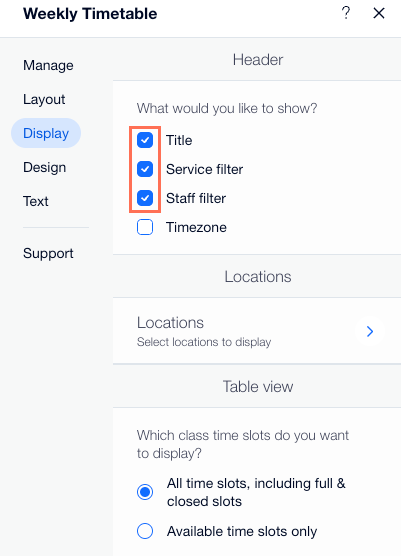
(Optional) Click Locations if you hold classes at more than one business address. Then select the checkboxes next to each location you want to display on your Weekly Timetable.
Choose how you want to display your table of classes:All time slots, including full and closed slots
Available time slots only
Want to set the total time slots displayed per day on the mobile version of your site?
Click the Switch to mobile icon
 at the top of the Wix Editor.
Click the Weekly Timetable element and click Settings.
Click the Display tab and enable the Limit display of time slots toggle.
Drag the Time slots displayed per day slider to set the total displayed.
Under Session details, select the checkboxes next to each of the session details you want to display in the Weekly Timetable.
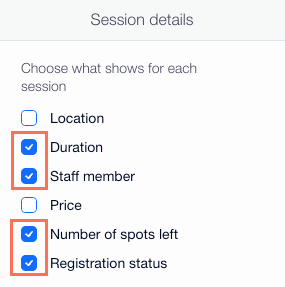
Click the Show button on each session time slot toggle to decide whether or not clients can book classes:Enabled: The relevant button (for example, "Book now," "Join Waitlist" or "Full") appears under each class on the timetable.
Disabled: Buttons do not appear below classes in your timetable.
Step 3 | Edit the Weekly Timetable text
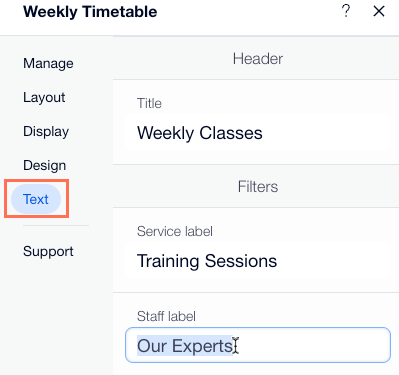
You can now edit the text that appears throughout your Weekly Timetable. This is useful if you have specific ways of describing your services, staff or availability. Choose what call-to-action text you put on your book and waitlist buttons. This includes messages you display when classes are full or closed for bookings.
To edit the timetable text:
Click the Weekly Timetable element in your Editor.
Click Settings.
Click the Text tab.
Edit the text that appears on your timetable:Title: Enter a title to appear above your timetable.
Filter labels: Choose the titles for your Service and Staff filters on the timetable.
Table Slots: Edit the text for your class availability and registration statuses.
Button: Edit the text for each of the buttons you display on your timetable.