


Designing your plans pages
Pricing Plans: Displaying Plans on Multiple Site Pages
After setting up your pricing plans, a site page is automatically added to show them to your clients. You can advertise your plans on other pages by showing a plan list or a specific one you want to highlight.
There are 2 panels in your Editor that let you add these elements to site pages - the Add panel, and the pricing plans' Settings panel.
In this article, learn more about adding pricing plan elements:
Notes:
If you want to add the plans to a new page, first add a new page to your site:Show me how to add a new page with Wix Editor.
Show me how to add a new page with Editor X.
If you add a folder to your site menu, you cannot display plans on pages that are in that folder.
Using the Add panel to display pricing plans
The Add panel in your Editor includes elements that feature your plan list or a single plan. You can add these elements to promote your plans on any page of your site.
Note:
The steps below apply to the Wix Editor but not Editor X. Skip to the next section to learn how to add Pricing Plans widgets using the Settings panel.
To display pricing plans using the Add panel:
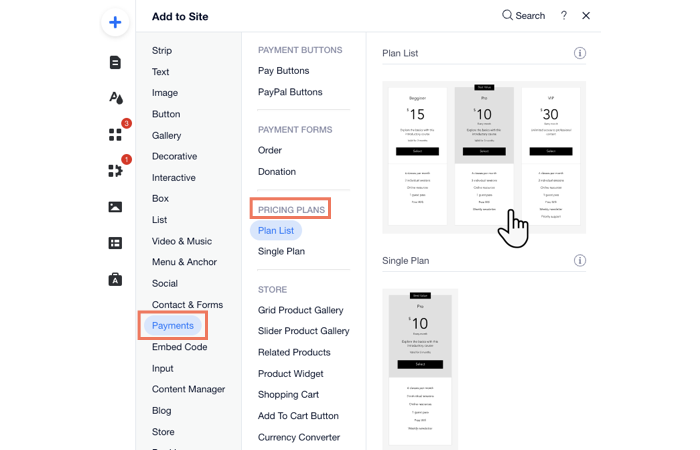
Click Add Elements
 on the left side of the Editor.
Click Payments.
Choose whether to display a Plan List or a Single Plan and drag the element onto the page.
Select the plan(s) you want to display:Click the element in the Editor.
Click Settings.
Select the Plans tab.
Select the checkboxes next to the plans you want to display.
Customize the design and layout of your new Pricing Plans widget.
Using the Settings panel to display pricing plans
You can use the Pricing Plans settings panel in your Editor to show plans on more pages. From the Add-Ons tab, choose the additional pages where you want to promote a single plan or the full list.
To display plans using the Settings panel:
Go to the Pricing & Plans page in your Editor.
Click the Pricing Plans app on the page.
Click Settings.
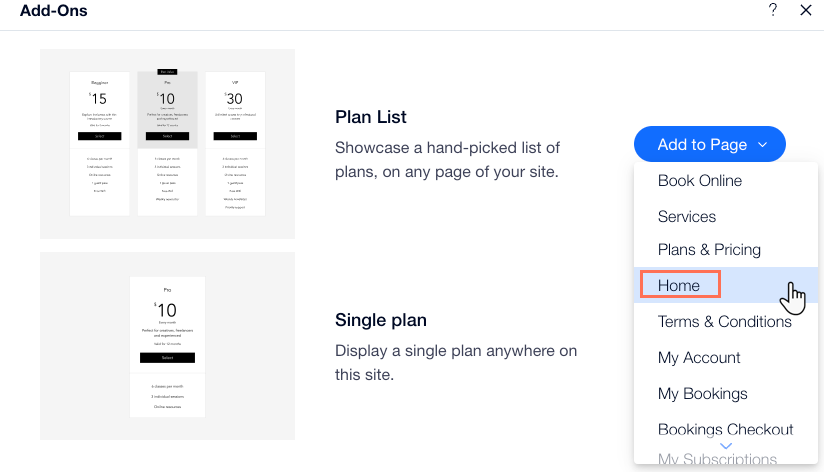
Click the Add-Ons tab.
Click the Add to Page drop-down next to Plan List or Single Plan.
Select the page where you want the widget to appear.
Select the plans you want to display on the new page:Click the new Pricing Plans widget in your Editor.
Click Settings.
Select the Plans tab.
Select the checkboxes next to the plans you want to display.
Customize the design and layout of your new Pricing Plans widget.