Managing purchased plans
Pricing Plans: Managing Your Clients' Subscriptions
Manage the pricing plans you've sold directly from your site's dashboard. In the Subscriptions tab, you can mark a plan as paid, change the duration of a plan, cancel a plan and more.
To find the specific plans you need to see, apply filters like status and start date. You can then save this filtered view for quick access in the future.
In this article, learn more about:
Tips:
You can use Google Analytics to track your pricing plan sales and more.
Learn more about the benefits of using the Subscription Analytics dashboard.
Viewing and filtering purchased subscriptions
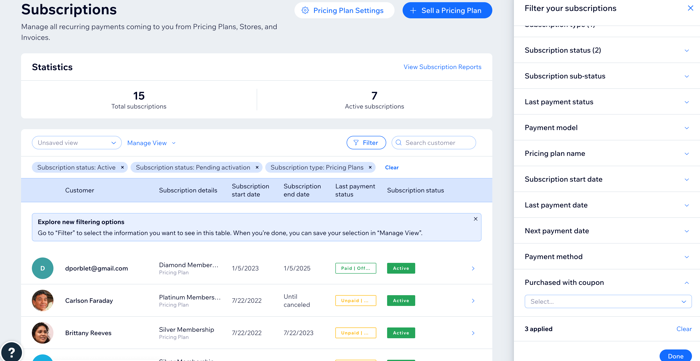
You can customize how you view your subscriptions using a combination of filters to find exactly the information you need. For example, view only unpaid plans and invoices or plans that are soon to expire. You can also use the filter to view subscriptions purchased using a specific payment method.
To view and filter purchased plans:
Go to Subscriptions in your site's dashboard.
Choose what you want to do next:View a plan: Hover over any plan and click View.
 Filter the list:Click Filter next to the search bar.
Apply the relevant filters from the list on the right. Learn more about the different filtering options.
(Optional) Click Save View to access this filtered view in the future. Give this view a name you can recognize.

Tips:
A list of the applied filters appears at the top of the subscriptions list. You can click the 'x' to remove them individually, or Clear to remove all filters.

After saving a view, you can edit the filters, rename and delete a view at any time by clicking Manage View.
Marking a plan as paid
When you sell a subscription to a client manually, their payment status automatically appears "Unpaid". When you receive payment, you can update the status yourself.

To manage your purchased plans:
Go to Subscriptions in your site's dashboard.
Click the relevant plan.
Click Manage Subscription.
Click Mark as Paid.
Tip:
After payment, the status changes to "paid".

Extending the duration of a plan
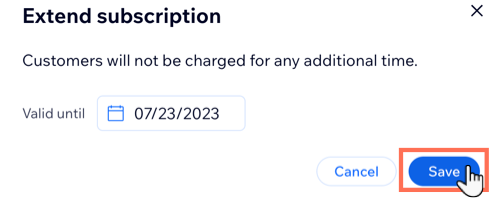
You might want to extend the duration of a plan. This can happen, for example, when a client was sick and wasn't able to make use of the plan. Extending a plan does not charge clients any additional fees.
Note:
If a client cancels a plan or allows it to expire, it is not possible to extend it. They can purchase a new plan instead.
To extend the duration of a plan:
Go to Subscriptions in your site's dashboard.
Click the relevant plan.
Click Manage Subscription.
Click Extend subscription.
Enter the new end date for the plan.
Click Save.
Editing the number of sessions in a package
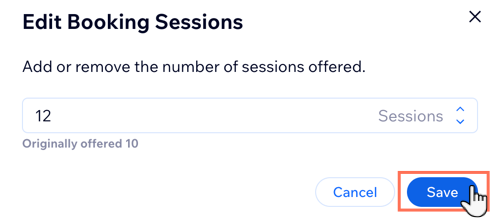
You may sometimes want to reward or compensate clients by adding extra sessions to an existing package. You may also want to deduct a session from a package if your client fails to show up for a session without sufficient notice. Make sure to include this in the plan policy.
When you add sessions to a package, you don't collect any additional money from the client.
Note:
It is not possible to edit an expired package.
To edit the number of sessions in a package:
Go to Subscriptions in your site's dashboard.
Click the relevant package.
Click the Edit icon
 next to Sessions Remaining.
Enter the new number of sessions remaining in the package.
Click Save.