


Using the Wix app for Pricing Plans
Pricing Plans: Creating Plans in the Wix App
Create new membership plans or packages on the go using the Wix app. With Pricing Plans, you choose the duration and pricing of the plan, the available payment methods, and what benefits each plan includes.
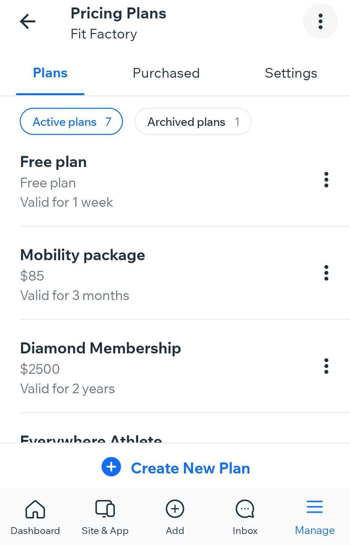
Before you begin:
Make sure you add Pricing Plans to the Wix app.
To create a Pricing Plan:
Go to your site in the Wix app.
Tap Manage
 at the bottom.
Tap Pricing Plans under Catalog.
Tap Create New Plan.
Enter the plan's name and tagline.
List the plan benefits:
Tip: Here you can explain to clients what they get when they buy the plan.Go to the List what's included section and enter the first feature (e.g. 24/7 gym access).
Tap Add more to add additional features.
Choose your pricing options:
Recurring Payments: Customers pay each week, month, or year until the plan ends.Select Recurring Payments.
Tap the Payment Frequency drop-down and select an option.
Enter the price per payment.
One-Time Payment: Customers pay one amount for the duration of the plan.Select One-time Payment.
Enter the plan price.
Free Plan: Customers do not pay. Select Free Plan.
Set the plan duration by tapping the Length of Plan drop-down and selecting when the plan expires.
(Recurring and one-time payments only) Tap the Setup Fee toggle to apply a setup fee to the first payment of your plan. Then enter the Amount and the Setup fee name.
Tap the Free Trial toggle to create a plan that starts with a free trial period.
Note: This option is available for plans with recurring payments.Connect your plan to Wix content and services you create.
Tap the options below to choose your Advanced Settings for the plan:Single Purchase Only: Tap to enable the toggle to create a trial plan that can only be booked once per client.
Allow Plan Cancellation: Tap to enable the toggle to allow clients to cancel plans themselves in the My Subscriptions page.
Custom Start Date: Tap to enable the toggle to allow clients to choose when the plan starts.
Plan Policies: Tap to enter policy information and tap Save.
Note: The policy appears on the checkout page.
Collect additional info at checkout: Tap the relevant form and tap Save. Learn more about collecting additional info from customers at checkout.
Note: You can only create and manage custom forms on desktop.
Customize a Thank You Page:Tap to customize the message and button text on your Thank You Page and then tap Save.
Tap the relevant option to choose where to redirect your customers after checkout:Home Page: Customers go straight to your home page after completing their purchase.
Other page: Enter the URL of the page.
Tap Save.
Tap Save at the top right.
Want to make changes to a plan?
After you make plans and sell them, you can edit your plans. When you do:
Changes to the price and plan duration only affect new purchases. Existing clients continue to receive the conditions they agreed to when they purchased a plan.
Changes you make to the connected benefits do affect existing plan holders. For example, if you no longer offer a class that was connected to a plan, you can remove it from the list of connected services.
To increase prices for an existing client with recurring payments, cancel the client's plan so it doesn't renew and then direct them to purchase the plan again.
To make changes to a plan that a specific client purchased, go to the Subscriptions area in your mobile app.