top of page

Designing your plans pages

Pricing Plans: Displaying Different Plan Types Using Tabs

Streamline your customer experience by displaying your different pricing plans using tabs. For example, you can display your monthly and yearly plans using separate tabs. This makes it quicker and easier for your customers to find the plan that's right for them.
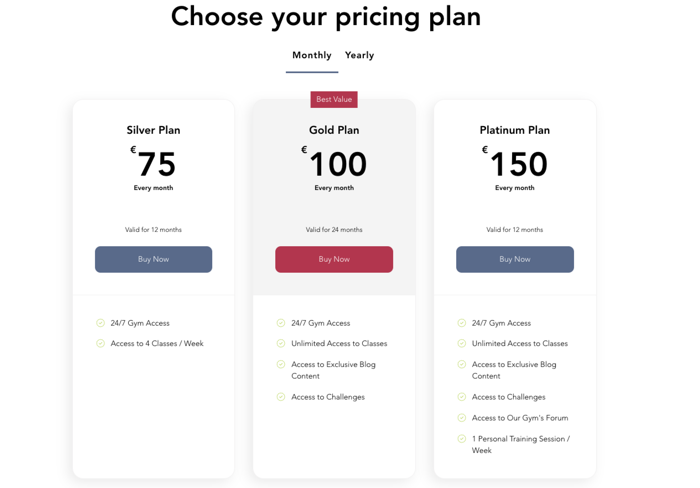
A screenshot showing monthly and yearly pricing plans displayed using separate tabs.

Step 1 | Add tabs to your site

Start by adding the tabs element to the relevant page on your site.

To add tabs:

  1. Click Add Elements on the left of the Editor.

  2. Click Interactive.

  3. Click Tabs under Boxes.

  4. Click and drag your chosen tab design to add it to your page.
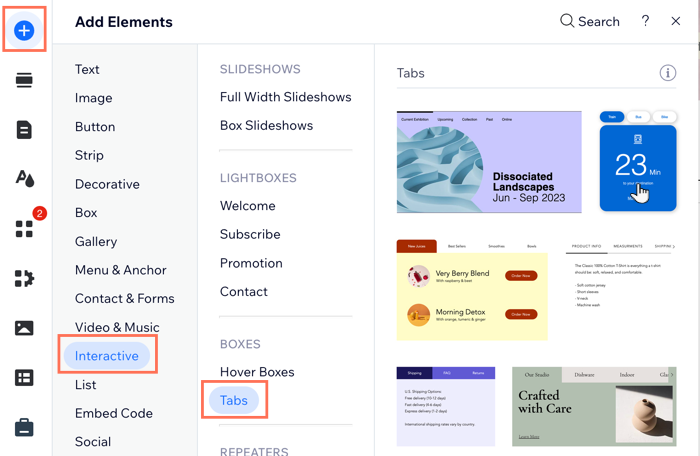
A screenshot showing how to add tabs to a page on your site in the editor.

Step 2 | Name your tabs

Now that you've added the tabs to the relevant page on your site, give each tab the correct name, so your customers can quickly find the right pricing plan type for them. For example, you can name the tabs according to payment frequency, for example: weekly, monthly, and yearly.

To name your tabs:

  1. Click the tabs element in your Editor.

  2. Click Manage Tabs.

  3. Hover over the relevant item in the panel.

  4. Click the More Actions icon .

  5. Click Rename.

  6. Enter the new name into the field.

  7. Click Done.

  8. Repeat steps 3 -7 for each tab you display.
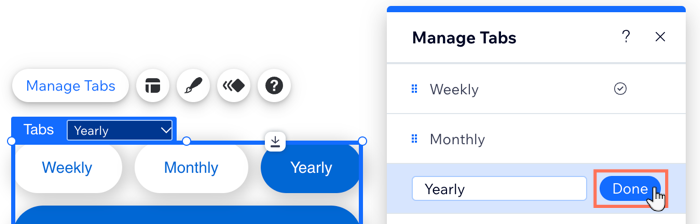
A screenshot showing how to rename tabs in the editor.

Step 3 | Add the pricing plans elements to your tab items

After naming your tabs, add the pricing plans elements to all the tabs, and then customize each one to display the relevant pricing plans.

To add elements to your tabs:

  1. Click the tabs element in your Editor.

  2. Open the relevant tab item from the drop-down.

  3. Click Add Elements on the left side of the Editor.

  4. Click Payments.

  5. Click either Plan List or Single Plan under Pricing Plans.

  6. Drag the relevant element onto the tab.

  7. Drop the element when you see the Attach to Tab message.
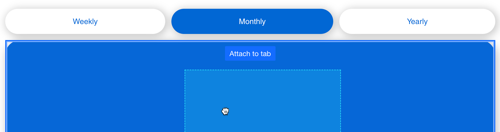
A screenshot showing the attach to tab message when adding a single plan widget to a tab in the editor.

  1. Repeat steps 2 - 7 for each tab.

Step 4 | Choose what plans to display in each tab

Now that you have pricing plans widgets added to each of your tabs, you can choose the relevant plans you want to display on each widget on each tab.

To choose what plans to display in each tab:

  1. Click the tabs element in your Editor.

  2. Select the first tab from the drop-down.

  3. Click to select the pricing plans element you added.

  4. Choose which plans to display, depending on which pricing plans widget you chose for each tab.

Plan List

  1. Click the Plan List widget in the tab.

  2. Click Settings.

  3. Click Plans.

  4. Select the checkbox next to each plan you want to display in the selected tab.

A screenshot showing how to select which plans to display in a plan list widget.

Single Plan

  1. Click the Single Plan widget in the tab.

  2. Click Settings.

  3. Click the drop-down and select the plan you want to display.

A screenshot showing how to select which plan to display in a single plan widget.

Need A Professional Website?
Contact Us 
Today!

Wix Restaurants: Customizing and Designing Your Menu

Wix Restaurants: Setting the Availability of Menus, Sections and Dishes

Wix Restaurants: Creating a Combo Meal

Wix Restaurants: Managing Dish Options

Wix Restaurants: Adding Images to Your Menus

Wix Restaurants: Creating Your Menus

Wix Restaurants: Setting Up Your Availability for Online Reservations

Wix Restaurants: Managing Your Reservation Schedule

Wix Restaurants: Customizing Your Table Reservations Form

Wix Restaurants: Managing Table Reservations and Walk-ins

Wix Restaurants: Managing Your Notifications for Table Reservations

Wix Restaurants: Sending Reservation Notifications to Guests

Wix Restaurants: Setting Up Prepayment for Table Reservations

Wix Restaurants: Adding a Reservation Widget to a Page

Wix Restaurants: Viewing Guest Stats in Wix Table Reservations

Wix Restaurants: Exporting Your Table Reservations

Wix Restaurants: Translating Your Restaurant Reservations

Wix Restaurants: Deleting the Table Reservations App

Wix Restaurants: Creating and Managing your Restaurant Floor Plan

Wix Restaurants: Adding and Setting Up Wix Table Reservations

Wix Restaurants: Creating Another Online Ordering Page

Wix Restaurants: Setting Up Order with Google

Wix Restaurants: Managing Notifications for Online Orders

Wix Restaurants: Saving and Charging Customers' Credit Cards

Wix Restaurants: Managing Orders With DoorDash Drive

Wix Restaurants: Setting Up DoorDash Drive for Your Restaurant

Wix Restaurants: Manually Creating an Order

Wix Restaurants: Manually Printing Online Orders from the Wix App

Wix Restaurants: Troubleshooting Thermal Printing of Online Orders (new) from the Wix App

Wix Restaurants: Printing Online Orders from the Wix App

wix experts
Graphic2Traffic web design
©
bottom of page