


Dayful by Wix
Dayful by Wix: Embedding Your Widgets Online
After creating your services on Dayful by Wix, generate a code to embed widgets on your existing website. You can feature a specific service to promote it, a calendar for clients to see your availability, the full list of your services and more.
Need help with Dayful?
Send a message to our Experts and they will get back to you as soon as possible.
Step 1 | Generate the embed code for your service widgets
If you already have a site, you can embed different widgets as required. These include your service list, a featured service, and your service calendar. You can also embed a Book button or a clients area button to provide your clients with instant access to your services.
Start by copying the code to the relevant widget.
To generate the code for your service widgets:
Go to Website Widgets in your Dayful dashboard.
Choose what type of widget you want to embed:
Service List
The Service List widget displays all of the visible services you offer. You can hide or show services that you display on your Service List at any time.
Click Embed under Service List.
Choose which services you want to display from the drop-down.
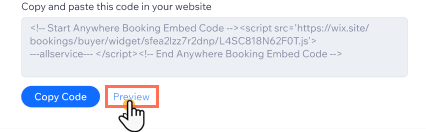
Click Copy Code.
Tip: Click Preview to see how the widget looks before you embed it in your site.
Featured Service
The Featured Service widget allows you to display one particular service you want to promote on a specific page.
Click Embed under Featured Service.
Choose which service you'd like to display from the drop-down.
Click Copy Code.
Service Calendar
The Service Calendar widget allows you to display a calendar for one of your services. Your clients can then book the time and date that best suits them.
Click Embed under Service Calendar.
Choose which service you'd like to display from the drop-down.
Click Copy Code.
Book button
The Book Button is a great way to get clients booking right away. Make sure you add enough information about the service so clients know what to expect from the service before clicking the Book Button.
Click Embed under Book button.
Select the service you want to connect to the Book button from the drop-down.
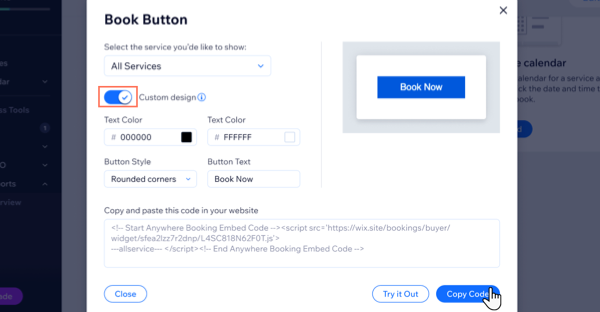
(Optional) Enable the Custom design toggle to change the button's look:Choose the button text color.
Choose the button background color.
Select the button style from the drop-down (e.g. rounded corners).
Enter the text you want to appear on the button.
Click Try it Out to preview how the button will look.When ready, click Copy Code.
Clients Area Button
The Clients Area button is great for directing your existing members to their dedicated section of your website. The Clients Area button is useful when you run promotions, or share important, private information for members only.
Click Embed under Clients Area Button.
(Optional) Customize the Clients Area Button:Select the Button Style from the drop-down (e.g. rounded corners).
Choose the button color.
Enter the button text.
Choose the button text color.
Tip: Make sure the text color contrasts with the button color.When ready, click Copy Code.
Tip:
You can remove the style from the embed code of your widgets. Your button then adopts your website's style.
Step 2 | Embed your Dayful by Wix widgets on your site
Now that you have the code for the widget you want to embed, add it to your website. Different website creation platforms can have a different methods for embedding and customizing widgets.
Important:
If you embed your widgets into an external location, Wix cannot provide support, and Wix is no longer in control of the way your site appears or functions. Additionally, Google Analytics and search engines may not work properly with embedded widget.
To embed your Dayful by Wix widgets on your existing site:
Copy the code for the widget you want to embed on Dayful by Wix.
Log in to your existing site.
Embed the Dayful widget using the code you copied. Click below for more instructions if you're building a site on one of these platforms:
Squarespace
Learn how to embed code on a Squarespace site.
Wordpress
Go to the Widgets page under the Appearance menu in the WordPress dashboard.
Choose the Custom HTML option.
Click Add Widget.
Enter the widget title.
Paste your HTML code.
Click Save.
Shopify
Go to Online Store.
Select Themes.
Select Edit code from the Actions dropdown.
Select the theme.liquid from the left-side menu.
Create a space under the <head> tag.
Paste your Dayful by Wix embed code.
Unbounce
Scroll to the relevant page and click the gear icon next to the page name.
Click Edit Champion Variant.
Hover over the menu options and click Custom HTML.
Drag the button onto the page.
To copy the embed code for your booking page, from your Home page select the gear icon on the right side of the page to expand the menu, then select Add to Website.
Weebly
Click Edit Site.
Select the relevant page from the Build tab.
Select the Basic toolbar.
Click and drag Embed code to the relevant part of the page.
Click the custom HTML box to edit and paste in your Dayful by Wix code.
Publish the changes.
Frequently Asked Questions (FAQs)
How do I add services on Dayful?
Follow the links below for detailed instructions on how to set up your different services:
Appointments - clients choose any available time slot during your business hours.
Classes - recurring sessions for multiple participants at specific times on specific days.
Courses - a multi-session course or workshop that starts and ends on a particular day.
How do I make my services visible?
When you create your appointments, classes and courses in Dayful, you can choose whether they're visible on your Booking Page or not.
Go to Services in your Dayful dashboard.
Hover over the relevant service and click the More Actions icon
 .
.Click Show on site / Hide from site.