


Sending pay links
Wix Pay Links: Creating and Managing Pay Links
Instantly request payments by sharing unique pay link URLs. Use email, social media, SMS, or any other channel to share these links. You can also create a QR code for a pay link. Payments made via your pay links appear in your Wix account just like other transactions.
Send pay links to single or multiple recipients. Quickly and easily request one-time payments for products/services, or easily co-ordinate group activities, social event collections, and more. Pay links are not linked to any products or services listed on your site, so they can be used for many different purposes.
Creating and sending a pay link
Before you begin:
You need to upgrade your site so you can accept online payments to use Pay Links. If your plan expires, your active pay links will be on hold.
In order to accept payments, you must also set up a payment method. If you've already set up a payment method for Wix Stores, Wix Bookings or Wix Events, you do not need to set one up again.
Choose to create a one-time pay link or multi-payment link. A one-time pay link expires after your chosen contact makes one payment. A multi-payment link can be shared with multiple contacts and used for multiple payments. It can also be used for recurring payments from a single contact.
To create and send a pay link:
Go to Pay Links in your site's dashboard.
Click Create Link.
Click One-time payment to create a link that accepts one payment, or click Multi payment to create a link that accepts multiple payments.
Click Next.
Set up your pay link:Link name: Enter a name for your pay link.
Price: Enter the amount of money your pay link will charge your customer.
(Optional) Description: Enter a description for your pay link. This should clearly summarize the reason for payment.
(Optional) Set an expiration date: Click Open settings and enable the Set an expiration date toggle. Set a date when the link will expire and cannot be used.
(Optional) Customize link: Click Open settings and set a Button color, edit Button text and upload a Link image. On the left you'll see a preview of how your pay link will be displayed.
(Optional, multi-payment only) Limit the number of payments: Click Open settings and enable the Limit the number of payments toggle to set the number of times the link can be used before it expires.
Click Create Link.
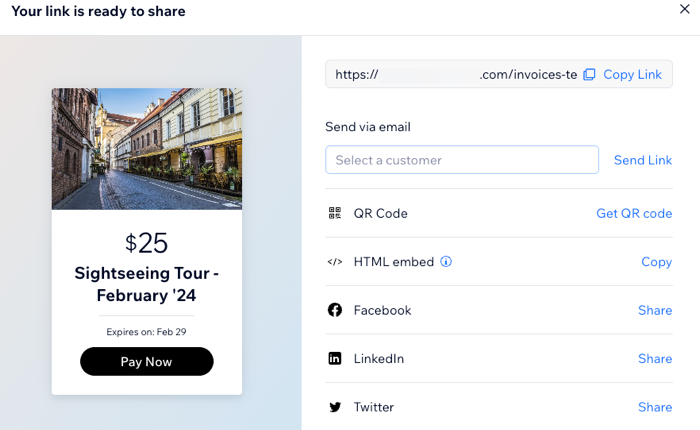
Your link has been created. Choose what you want to do:Copy Link: Copy the link to your clipboard.
Send via email: Select a contact using the Select a customer drop-down and click Send Link to send your pay link to this contact.
Note: Click + Add Contact in the drop-down to create a new contact to send your pay link to.
HTML embed: Add pay link widget to your site by using HTML code.
QR Code: Click to generate a QR code. Customers can scan this code to access your pay link.
Facebook: Click Share to share your link via Facebook.
LinkedIn: Click Share to share your link via LinkedIn.
Twitter: Click Share to share your link via Twitter.
Managing your pay links
All of the pay links you create will be listed on the Pay Links page in your site's dashboard. The actions you can take for each link will depend on the link's type (one-time payment or multi-payment) and status.
On your Pay Links page, you'll see a status attached to each pay link:
Active: Your link is accepting payments.
Inactive: Your link is not accepting payments.
Note: If your inactive link hasn't expired, you can change its status to active.Paid: Payment has been made via this link.
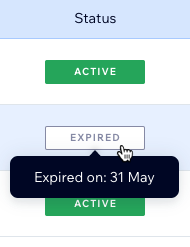
Expired: The expiration date you selected has passed and the link is no longer active.
Hover over your pay link's status to view further information.
To manage your pay links:
Go to Pay Links in your site's dashboard.
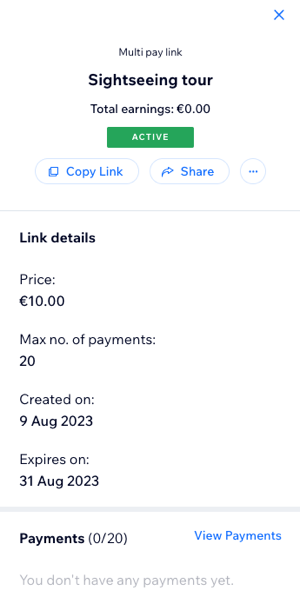
Click a pay link to view further information in a panel on the right.
Choose what you want to do:Copy Link: Copy this pay link URL to your clipboard.
Share: Send via email, QR code, Facebook, LinkedIn or Twitter.
Activate: Make an inactive link active.
Open link: Click the More Actions icon and select Open link to view an active pay link.
Deactivate: Click the More Actions icon and select Deactivate to make an active link inactive.
Note: If no payments have been made, you'll also be able to select Delete to permanently delete a pay link.
View Payments: View details of each payment.
FAQs
Here are some common questions about pay links:
Why is my contact unable to make a payment?
If your contact reports that they are unable to make a payment, it could be because:
Your pay link is not accepting payments. Check its status - to accept payments, it needs to be Active rather than Inactive, Expired or reached its payment limit. If a pay link has a payment limit, it will not accept further payments if it has reached its limit or has pending transactions that will reach its limit (e.g. pay link with a limit of 3, with 2 payments received and 1 transaction in progress).
Your pay link is temporarily offline. Refreshing the page should fix this.
How do I change the currency of my pay links?
You can change the currency of all invoices, price quotes and pay links. You do this from Settings in your site's dashboard.
How do I embed a Pay Link on my site using an HTML code?
You can embed HTML code to your site directly from the Add Elements panel.
To add a HTML embed to your site:
Click Add Elements
in your editor.
Click Embed Code.
Click Popular Embeds.
Choose the type of embed you want to add to your site:Embed HTML: Embed a code snippet to display a widget on your site pages and set it up.
Embed a site: Display an external site in a window on your page.
Click your chosen embed to add it to your site.
Learn more about embedding HTML code, external sites or widgets on your site.
Can I customize the appearance of my pay links?
Yes, you can customize your pay links by setting the button color, editing the button text, and uploading a link image. These options are available when you create or edit a pay link under the Customize link section.
How do I track the payments received through my pay links?
You can track payments received through your pay links by going to the Pay Links page in your site's dashboard. Click on a specific pay link to view detailed information about each payment, including the date, amount, and payer details.
Can I limit the number of times a pay link can be used?
Yes, for multi-payment links, you can limit the number of times the link can be used. This option is available under the Limit the number of payments section when you create or edit a pay link.
What should I do if a payment through a pay link fails?
If a payment fails, check the status of the pay link to ensure it is active and not expired or inactive. You may also want to verify that your payment method is correctly set up. If the issue persists, contact Wix Customer Care for further assistance.