


Wix Stores
Migrating from Shopify to Wix Stores
Interested in migrating from Shopify to Wix Stores? Welcome on board! This article will show you how to migrate using the Cart2Cart app. This app allows you to migrate products, orders, and coupons from your Shopify store to Wix.
You can add the Cart2Cart app to your Wix site for free, but Cart2Cart charges a fee to perform the migration. The exact price is determined by which elements you choose to migrate, what optional extra services you select, and more.
Advanced method:
Alternatively, as a free DIY option, you can import products directly through a CSV file. Learn How
During the migration process, Cart2Cart offers you a preview, so you see an exact price breakdown before you commit to any changes or pay any fees. Click to get a cost estimate from Cart2Cart.
Before you begin:
Make sure to add Wix Stores to your site. Learn How
To migrate store orders, you must first upgrade to a Premium plan or Studio plan that allows you to accept payments.
Step 1 | Add the Cart2Cart App and Select a Wix Account
To start the migration process, go to the Wix App Market and add the Cart2Cart app. Then, make sure the email associated with the relevant Wix account is selected.
Wix Editor
Studio Editor
Dashboard
Click Add Apps
 on the left side of the editor.
Search for the Cart2Cart app in the search bar.
Click Add to Site.
Select an option:Sign in to your existing Cart2Cart account.
Create a new Cart2Cart account:Click Sign Up.
Fill in the required fields.
Click Sign Up.
In the Cart2Cart dashboard, make sure the email associated with the relevant Wix account is selected.

Click Source and Target Cart Setup.
Tip:
If you close the migration tab at any stage, you can access the Cart2Cart dashboard from the Manage Apps tab in your site's dashboard.
Step 2 | Source and Target Cart Setup
In this step you select your source cart (Shopify) and provide the necessary permissions to access it.
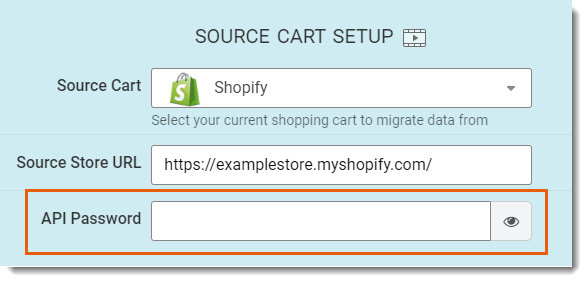
Select Shopify from the Source Cart drop-down.
Enter your store's URL (e.g. http://your-store-name.com).
Get your Shopify API password:Log in to Shopify.
Click the Apps tab on the left.
Click Manage private apps.
 Click Create a New Private App.
Enter Cart2Cart in the Private app name field.
Enter the email of a developer or the person most suited to deal with technical issues in the Emergency developer email field.
Set your permissions to Read Access.
 Scroll down and click Save.
Copy your API password and return to Cart2Cart.
Paste the API credentials in the API Password field.

Select Wix from the Target Cart drop-down.
Click Choose Entities.
Step 3 | Select What to Migrate and Perform a Demo Migration
You can migrate (import) different types of data into your Wix store. Afterwords, select any available additional migration options.
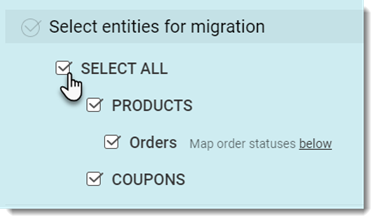
To select migration options:
Select which of types of data (e.g. products, orders, and coupons) you want to migrate to Wix.
Note: Imports are limited to 1,000 products and 1,000 orders.(Optional) Select any of the additional options you see displayed (options vary depending on what you selected in step 1):Select the Clear current data on Target Store before Migration to delete data in your Wix store for the entities you are migrating.
Important: This step is irreversible.
E.g. if you import products and select this option, any products already in your Wix dashboard will be deleted. Learn More
Select the Skip product thumbnail images migration checkbox. Watch video to learn more
Select the Change products quantity to 100 on Target Store ($29). Learn More
Perform data mapping: (relevant when importing orders): Orders in each platform have different statuses. Make sure they are classified correctly in your Wix dashboard by matching terms. Learn More
Click Start Free Demo.
Cart2Cart now performs a demo migration. This gives you a chance to preview the migration and check that everything is ok before you make changes and pay Cart2Cart for the process.
Step 4 | Check Demo Migration Results and Complete the Migration
Now that the demo migration is complete, click Check the Results to view your data in your Wix dashboard.
 Products can be found in the Wix Store Products tab.
Orders can be found in the Wix Orders tab.
Coupons can be found in the Wix Coupons tab.
When you're satisfied with the result, select one of the insurance plans or click the Skip Migration Insurance option. Watch a Cart2Cart video on insurance options
When you're ready, review the migration price.
Tip: Click the Menu icons to see the price breakdown.

Pay and complete the migration:Click Add Funds for Full Migration.
Enter the required details.
Click Buy now.
When the migration is complete, you'll receive an email notification.