


Live streaming your videos
Wix Video: Live Streaming from Your Desktop
With Wix Video, you can stay connected to your site visitors in real-time. Set up a live stream directly from your desktop and go live at any time. This is a great way to make new updates and provide new content on the go.
Before getting started:
Make sure you add a Wix Video element on the page where you want the live stream to appear, and set it to display the channel the live stream will play on.
Make sure you have an encoder before going live. An encoder is the platform that connects your computer's camera to the Wix Video player.
In this article, we discuss live-streaming using the OBS encoder, but you can use any encoder that supports custom keys. Learn more about downloading live stream encoders.
It's time to go live! Follow these steps to start streaming from your desktop.
Step 1 | Setting up your Live Stream
1. Go to your Video Library and click Live Stream.
2. Click Desktop under Go Live Now.
3. Click I Have an Encoder (If you don't have the encoder yet, learn how to get it here).
4. Choose a Wix Video channel for your live stream.
Under Video Info, add the relevant details for your live stream:Cover Image
Title (This is the only mandatory field)
Publisher
Categories
Tags
Description
Under Video Pricing, choose to monetize your stream or allow your fans to watch for free.Free: From the drop-down menu, choose to allow anyone to watch or enable a mandatory sign-up.
Paid: Select the checkboxes:Video can be purchased: Enter the price and select the download options.
Video can be rented: Enter the price and choose how long it's available to rent for.
Note: These prices apply to both viewing your live stream and buying/renting the saved video file later.
Under Show a Trailer: Turn the toggle on and upload a file.
Note: When you conclude your live stream, it is saved to your Video Library. From there, you can sell or rent it like any other video. The trailer you add here will serve as the preview before a purchase is made.Under More about this video you can choose to enter more specific details about your stream like cast, crew and if it contains mature content.
5. Click Next on the top right.
Note: If you're going live without scheduling beforehand, you must start your stream within an hour of clicking Next. Otherwise, the links expire and the details you entered are lost.
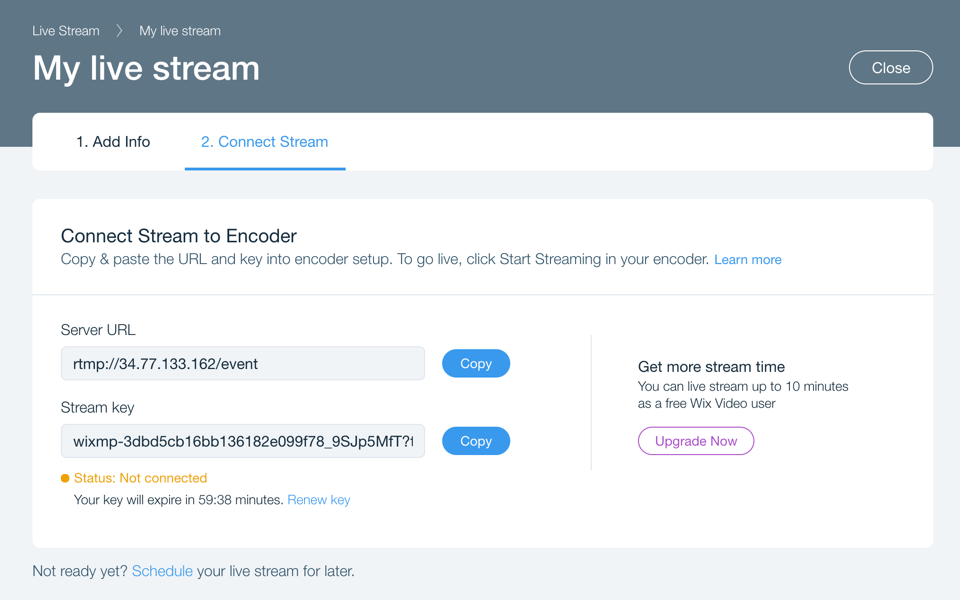
6. On the Connect Stream tab, copy URL and key:
a. Server URL: This is the online "location" of your stream.
b. Stream key: This identifies your live content.
7. Paste the URL and the Stream key into the Encoder (see step 2).
Note: The links expire if you don't go live within an hour. Otherwise, the details you have entered are deleted. To get new links, click Renew key.
Step 2 | Open and connect your encoder
You can use any encoder as long as it supports custom keys. If you opt for a different encoder, the steps may be different than what is outlined below.
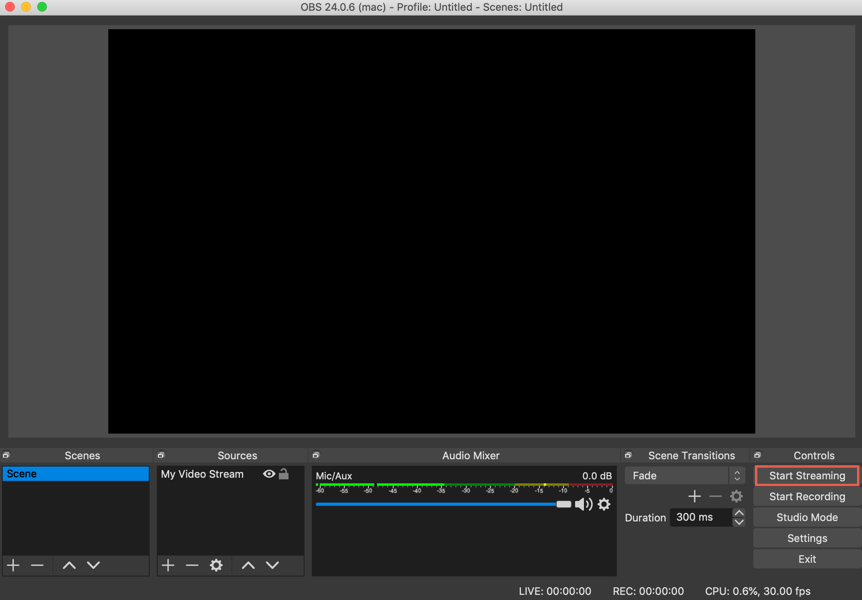
Open the OBS Studio Encoder on your computer.
Click Settings on the bottom right.
Click the Stream tab on the left.
Select Custom Streaming Server from the drop-down menu on top.
Paste each link (mentioned in step 6 of the set-up, above) in the appropriate field.
Click OK. A feed from your camera should appear on the encoder.
Click Start Streaming. Action! Your stream is live and online!
When you're done, click Stop Streaming on the encoder.
Notes:
For security reasons, the stream key resets every hour.
Currently, Wix Video only offers support and troubleshooting for the OBS Studio encoder - other encoders may not connect with Wix Video. If you want to use a different encoder, make sure you know where to enter the Server URL and the stream key.
Your computer's camera should connect automatically. Otherwise, complete these steps:On the bottom left, under "Sources", click Add
 .
.
Select Video Capture Device.
Name the Capture Device and click OK.