


Setting up your store
Wix Stores: Creating Restricted Store Pages
Take control over who can access your store pages. This can be useful when selling wholesale or B2B.
You have the option of reserve access to password holders or to site members. You have the flexibility to decide how you want to restrict who can become a member of your site.
In this article, learn how to:
Restricting access to store pages
You can restrict access to those pages where you display products. This can include the Category Page, the Shop Page, or any page to which you've added a Product Gallery.
Wix Editor
Studio Editor
Click Pages & Menu
 on the left side of the editor.
Choose the page you want to restrict:
Category Page or Shop Page:Click Store Pages.
Click Category Page or Shop.
A site page with a Product Gallery:Click Site Menu.
Click the page with the Product Gallery you want to restrict.
Click the Settings
 or More Actions
  icon on the page.
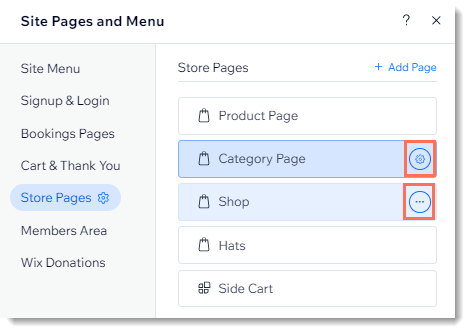
(For Gallery Pages only) Click Settings
.Click the Permissions tab.
Set a permission level:
Password holders: Only visitors with the password can access the page.Enter the password.
Members only:Select Members only.
Select which of your members can access the page:All members: Anyone who signs up to become a site member can access the page.
Only selected members or paying customers:Select from your Member Roles: Click the Edit icon to select a member role. Learn more about roles and permissions
Allow membership plan holders access: Select a pricing plan you created or click Create a Plan to add the Pricing Plans app and create your first membership plan or package. Learn more about Pricing Plans
Creating retail & restricted wholesale store pages
If you sell both retail and wholesale, you can create regular store pages for your retail customers and then duplicate and edit your products for sale on your wholesale page.
To create retail and wholesale store pages:
Duplicate each of the products that you want to sell wholesale.
Edit the wholesale products:Set the price of each wholesale product.
Mention how many products are sold at the wholesale price, either in the product name or description or use product options to sell at set quantities.
Note: Your inventory does not update automatically according to this number.
Create a new category for the wholesale products and add the relevant products. Learn how
Create a new store page and select a category to display.
Change the privacy settings of the page.
Tip: Follow the instructions in the previous section above.Stop each of your wholesale products from being indexed.
Note: This prevents the product from appearing in search engine result and in site searches if you added a search box to your site.
Limiting access to members you approve
You can restrict access to visitors you approve manually. When visitors sign in to your site, they receive a message explaining that their member login request is awaiting approval. You receive an email and a notification in your dashboard prompting you to accept or decline the request.
To limit membership to approved members:
Go to Signup & Login Security in your site's dashboard.
Select whether you want everyone to be able to sign up or only people you manually approve under Who can be a site member?.
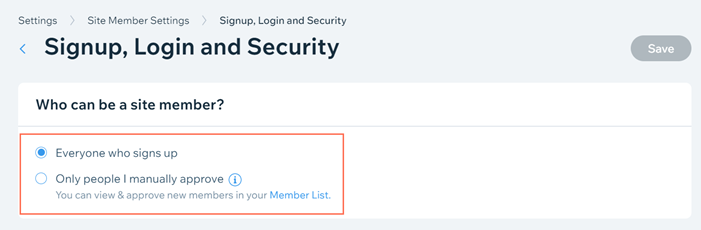
Click Save.
What's next?
After you receive a site member request, go to your Site Members tab to approve or block the member request.
Hiding store elements from search engines
If you restricted access to your site or to certain parts of your site, you may also want to stop them from appearing in search engine results. Learn how to: