


Setting up Photo Albums
Wix Photo Albums: Managing Your Favorites Lists
Use the Wix Photo Albums Favorites list feature to enable your clients and album visitors to create lists of their favorite photos.
A Favorites list is an ideal way to allow your clients and visitors to "proof" your full photo collection. They will be able to download, favorite and add comments to individual images, detailing any special instructions they have. Create a Favorites list and share it with a client to begin this "proofing" process.
Manage your Favorites lists to ensure you and your clients are getting the most from your albums.
In this article, learn more about:
Customizing visitor interactions and the notifications you receive
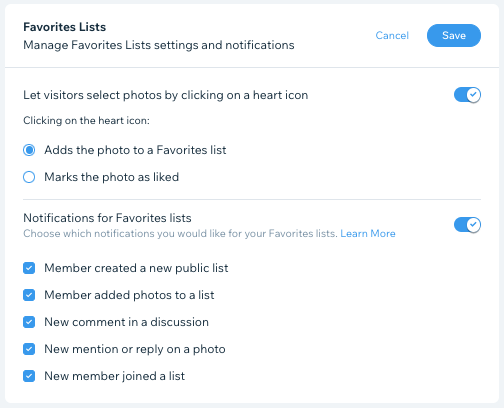
Enable the heart icon to let clients or visitors easily mark their favorite photos. Choose how you'd like to be notified of Favorites list activity.
To customize visitor interactions and your notifications:
Go to Photo Albums in your site's dashboard.
Click Manage Album next to the relevant album.
Click the drop-down in the Favorites Lists section to expand it.
Set your album's heart icon settings:Enable the Let visitors select photos by clicking on a heart icon toggle to allow visitors to mark their favorite photos with heart icons.
Choose whether clicking the heart icon adds the photo to a Favorites list or marks the photo as liked.
Enable the Notifications for Favorites lists toggle to receive notifications when certain Favorites lists actions are taken. Select the checkboxes next to the actions you'd like to receive notifications for.
Click Save.
Updating a list's info and privacy settings
View and manage your list's name, note, and privacy settings. Keep a list private or open it to all site visitors.
To update a list's info and privacy settings:
Go to Photo Albums in your site's dashboard.
Click Manage Album next to the relevant album.
Click Manage Lists under Favorites lists at the right.
Click the relevant Favorites list.
Click the More Actions icon
 at the top.
Click Edit List Info.
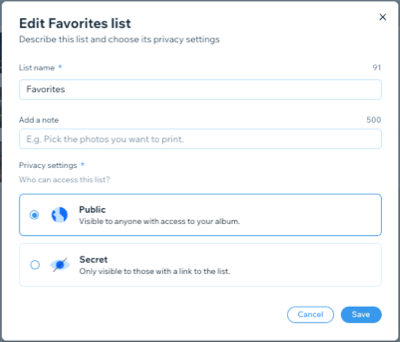
Edit this Favorites list's info:List name: Edit the name of your list.
Add a note: Add extra information about the list for your clients.
Privacy settings: Select whether you want your list to be public or secret.
Click Save.
Viewing a list's photos and deleting the list
Download all photos or file names, or check out how your list appears on your live site. You can delete a list if you no longer need it.
To view a list's photos or delete the list:
Go to Photo Albums in your site's dashboard.
Click Manage Album next to the relevant album.
Click Manage Lists under Favorites lists at the right.
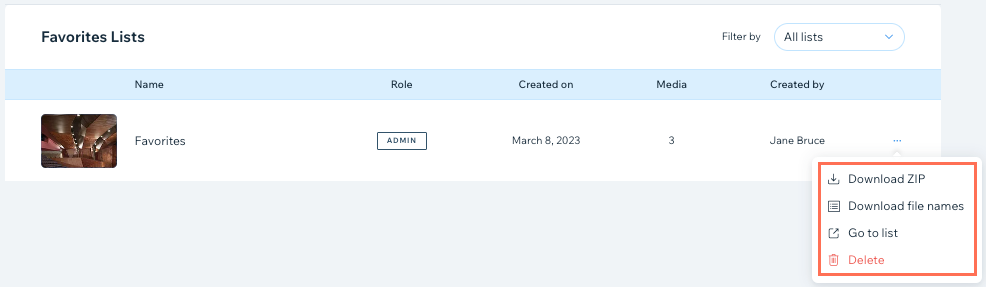
Click the Filter by drop-down to view all lists, lists created by you, or lists created by others.
Note: When you view lists created by others, you only see lists that you are a member of.Click the More Actions icon
next to a favorites list and choose what you want to do:Download ZIP: Download a ZIP file of this list's photos.
Download file names: Download the file names of the photos as a CSV file.
Go to list: Go to the list on your live site.
Delete: Delete the list.
Sharing a list and viewing individual images and comments
Share a list with a client to begin the "proofing" process. Learn more about communicating with clients.
View and manage individual images, replying to any comments that have been added.
To sharing a list or view individual images and comments:
Go to Photo Albums in your site's dashboard.
Click Manage Album next to the relevant album.
Click Manage Lists under Favorites lists at the right.
Click the relevant Favorites list.
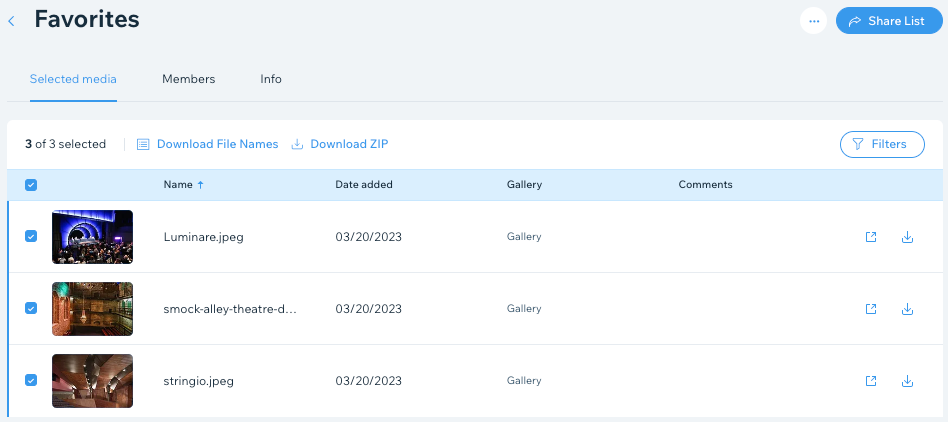
Choose what you want to do:Share your list with a client: Click Share List.
Filter the images: Click Filters. For example, you can select to view only images that have new comments.
View and reply to comments: Click a comment next to an image.
View an image on your site: Click the View icon next to an image.
Download an image: Click the Download icon next to an image.
Removing a member from a list
Remove a member from a list if you no longer want them to be able to view or interact with the list.
To remove a member from a list:
Go to Photo Albums in your site's dashboard.
Click Manage Album next to the relevant album.
Click Manage Lists under Favorites lists at the right.
Click the relevant Favorites list.
Click the Members tab.
Click the More Actions icon
next to the relevant member.Click Remove Member to remove this member from this Favorites list.