Promoting your event
Wix Events: Promoting Your Event With Hopp
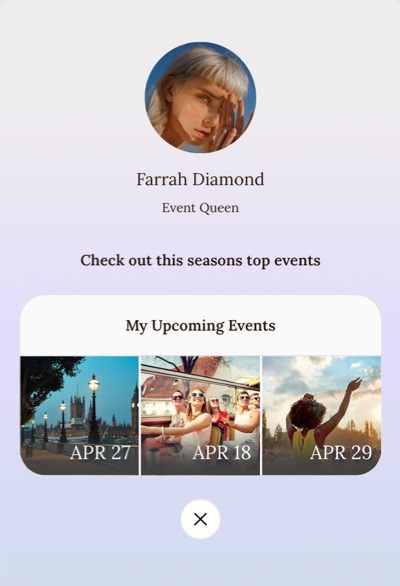
Promote your event with a Link in Bio page using Hopp. This makes it easy for your guests to find all the essential details about your event, purchase tickets, access exclusive content, and follow your social channels.
Whether on mobile or desktop, your guests can navigate through all your events' details from one convenient page.
Step 1 | Create a Hopp account
To get started creating your own Link in Bio page, you'll first need to set up a Hopp by Wix account. You can sign in with your existing Wix account or create a new one if you don't have one yet.
Tip:
You can click Not Now for step 3 and connect your Wix site later.
To create a Hopp account:
Go to hopp.co.
Click Log In on the top right to sign in, or Get Started for Free to create a new Wix account.
Select the relevant Wix site and click Connect Site.
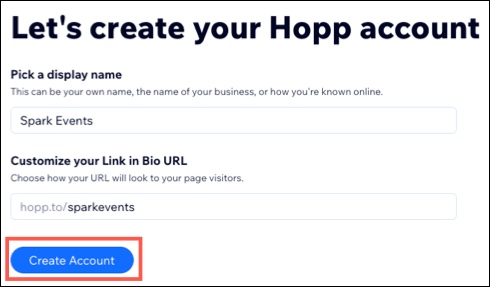
Tip: You can click Not Now and connect your Wix site later.Choose a name to showcase on your page and customize the URL for your Link in Bio page.
Click Create Account.
Step 2 | Customize your Link in Bio page
Now that you have a Hopp account, it's time to personalize your Link in Bio page. This can include features like a contact form for event inquiries, a subscription link for event updates, and links to your social platforms.
Customize the design and utilize the advanced search to increase page visits so people can easily find and access your content.
Tip:
You can click Skip for steps 1, 3, and 4 and return to them later when editing your Link in Bio Page.
To customize your link in bio page:
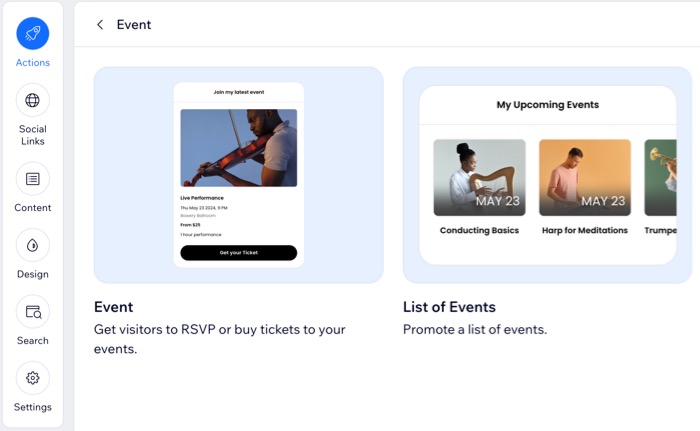
Choose the actions you want to show on this page (e.g. Event, List of Events), then click Next.
Select a template with a layout you like, then click Use This Template.
Add social icons to your page, then click Next.
Add an advanced search box to your page, then click Add Search.
Tip: We recommend adding this if you plan to include a lot of content Link in Bio page. This will help your visitors to find the event or info they need.Click Edit Page to view and customize the page further.
Customize the Actions tab on the left to promote your event:
Get visitors to RSVP or buy event tickets
Click the Actions tab.
Click + Add Action.
Click Events.
Click Event.
Choose how you want visitors to join your event:Enter the Event page URL.
Choose an event from your Wix site.
Click Next.
Customize the Action Appearance:Choose how you want to display the event.
Enter a title to showcase the event.
Click the Button click behavior drop-down and select how you want your event to appear.
Click Next.
(Optional) Edit the event Display settings and Search settings as needed.

Promote a list of events
Click the Actions tab.
Click + Add Action.
Click Events.
Click List of Events.
Choose what events you want to promote:Upcoming Events: Enter the number of upcoming events you want to display.
Tip: You must upgrade to a Pro Plan to use this feature.
Custom List of Events: Click +Add New Event to manually add a new one or select one from your Wix site.
Click Next.
Customize the Action Appearance:Choose how you want to display the event.
Enter a title to showcase the event.
Click the Button click behavior drop-down and select how you want your event to appear.
Select how you want to the list of events to appear.
Click Next.
(Optional) Edit the event Display settings and Search settings as needed.

7. Click the tabs on the left to further customize your Link in Bio page:
Social Links: Add a clickable social platform logo to your Link in Bio page that your audience can click to access your social profiles.
Content: Customize your profile image, name and add a brief description on your page.
Design: Edit the look of your Link in Bio page to suit you and your brand.
Search: Your audience can use your Link in Bio search box to search for links to any content that you add to your page. Assign as code to each link that your audience can search by.
Settings: Customize your Link in Bio settings such as profile image/video, title, bio, heading and language.
Step 3 | Publish your Link in Bio page
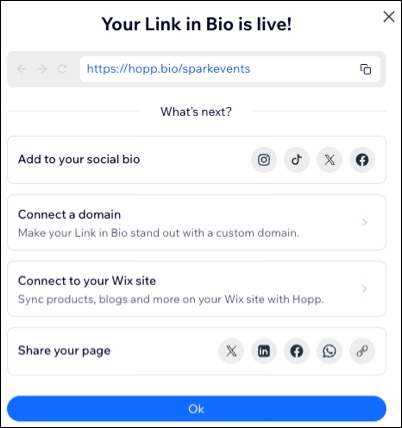
Once you have finished making your Link in Bio your own, publish the page and add it to your social media channels.
To publish link in bio page:
Click Publish at the top right of the Link in Bio editor.
Choose how to share your Link in Bio page:Share a direct link.
Share on social media such as YouTube, Twitter, LinkedIn and Facebook.