top of page

Using the Wix app for Wix Events

Wix Events: Creating an Event Schedule in the Wix App

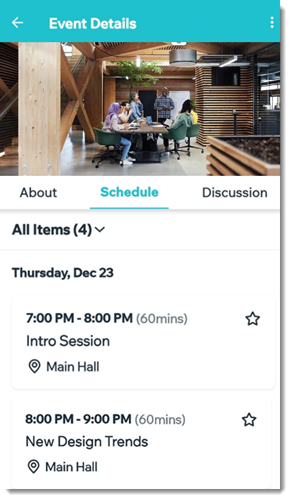
Let participants know what's happening at your event by creating an event schedule. Schedules are ideal for conferences, festivals, and more.
Before you begin:

Make sure to create and save your event. Learn more about the different types of events you can create.

To create an event schedule:

  1. Go to your site in the Wix app.

  2. Tap Manage  at the bottom.

  3. Tap Events.

  4. Select Published Events or Draft Events.

  5. Select the relevant event.
    Note: For recurring events, you can add a schedule to an individual occurrence of an event.

  6. Tap the Manage tab.

  7. Select Add-ons.

  8. Tap Add to Event under Schedule.

  9. Add the first schedule item:Enter the Item Name (e.g. Opening Session).
    Set the start and end dates and times.

    (Optional) Fill out the Item details:Enter the Place (e.g. Main Stage).
    (Optional) Click Add Tags to enter a tag and tap Done (Android) or Return (iOS) on your keyboard, and then tap Done at the top right.
    Note: Tags are used to classify event sessions. For example, for a renewable energy conference, you might create tags for "Solar Energy", "Wind Energy", and "Electric Vehicles". Guests can filter the schedule to locate the events they're interested in. After you create a tag, apply it to other items of the same type.
    (Optional) Tap Add Description to enter a description of the schedule item and tap Done.
    Tap Save.

  10. Add more scheduled items:Tap Add New Item.
    Repeat step 9 above for each of the scheduled items in your event.

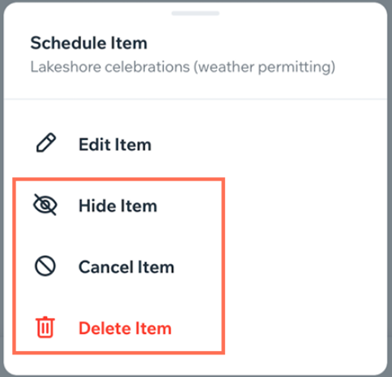
To hide, cancel, or delete an item:

Tap the More Actions icon  next to the relevant item and select an option:

  • Hide Item: Hide the item so you can display or edit it later.

  • Cancel Item: Cancel the item and show in the schedule that the item has been canceled.

  • Delete Item: Permanently delete the item and remove it from the schedule.
Need A Professional Website?
Contact Us 
Today!

Google Workspace Error Message: "Your subscription has been suspended by your reseller"

Google Workspace Error Message: Service Is Temporarily Suspended until Your Customer Accepts the New Terms of Service

Google Workspace Error Message: "You already have a Google Workspace business email account. You can manage it from the Google Admin Console"

Google Workspace: Data Migration from an External Email to Your Google Workspace

Google Workspace: Revoking Admin Status to Delete a Workspace Account

Google Workspace: Connecting Your Business Email to a Mail Client Using IMAP and SMTP

Google Workspace: Changing the Language of Your Business Email

Google Workspace: Emails Missing from Your Business Email

Google Workspace: Allowing Access for ‘Less Secure Apps’ in Your Business Email

Google Workspace: Adding Google Workspace MX Records to Your Wix Account

Google Workspace: Setting Up a Domain Alias

Google Workspace: Manually Verifying Your Domain with Google

Google Workspace: Connecting a Business Email for a Domain Pointing to Wix

Google Workspace: Setting Up an Email Alias for an Existing Workspace User Email Address

Google Workspace: Resetting a Workspace User's Password

Google Workspace: Renaming a Workspace User

Google Workspace: Accessing Your Additional Workspace Users

Google Workspace: Purchasing Additional Business Emails from Wix

Google Workspace: Setting Up Business Email Users

Gemini for Google Workspace: An Overview

Google Workspace: Upgrading a Workspace Plan

Google Workspace: Choosing a Plan

Google Workspace: Business Email Sending Limits

Google Workspace: Forwarding Emails From Your Business Email to Another Email Address

Google Workspace: Resetting Your Admin Password

Google Workspace: Accessing Your Admin Console

Google Workspace: Identifying Your Admin Workspace User

Google Workspace: Setting Up Your Business Email on Mobile Devices

Google Workspace: Username and Password Guidelines

Google Workspace: Accessing your Business Email Through Your Wix Account

wix experts
Graphic2Traffic web design
©
bottom of page