


Memberships, packages & payments
Wix Bookings: Creating a Membership Plan
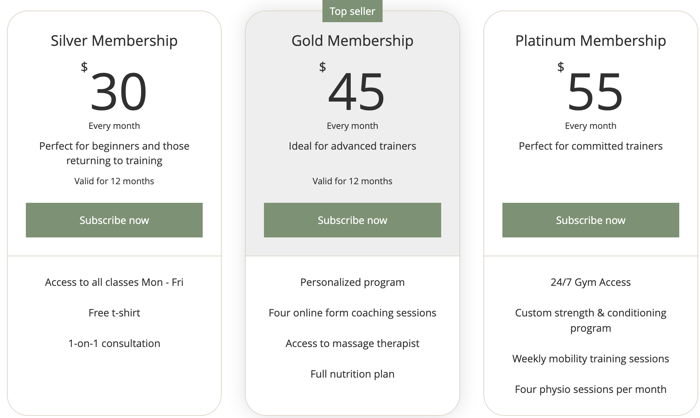
Improve monetization and increase recurring income by offering your clients membership plans. Give them unlimited access to selected services for a month, a year, or any time frame you choose (e.g. a yearly gym membership).
Clients can choose between paying for a service using their membership plan or paying using another method (cash, card, or discount coupons). You can also create services that can only be paid for by using a pricing plan exclusively.
Notes:
Membership plans are not available for courses.
Clients cannot use their memberships to pay for group bookings.
In this article, learn more about:
Creating a membership plan
You can create a membership plan while creating a new Wix Bookings service or editing an existing one.
Note:
You can create services that are payable with a membership plan only or services that can be paid for in cash, online, and with a membership plan. Learn more about selecting how you charge for Bookings services.
To create a membership plan:
Go to Booking Services in your site's dashboard.
Create a new appointment or class, or edit an existing one.
Scroll down to the Price and Payment section.
Choose the relevant price option in the Price type drop-down.Fixed Price: Set a standard price for the service.
Free: Choose this option for free service.
Varied prices: Create different price options depending on either the client type or the staff member.
Custom Price: Describe how you charge for the service, for example, "Price negotiable".
Create the pricing plan and connect the booking service to it:Click Create New Plan next to Memberships & Packages.
Click Membership.
Click Next.
Enter the Membership name and Description.
Click the What services are included? drop-down.
Click the checkbox next to the services you want to include in the membership. Or you can click Select All Services to create an all-inclusive membership.
Note: The service you are creating is already linked to this planClick the second drop-down and choose from the following options:Unlimited number of sessions: Allow clients to attend as many sessions as they like.
Limited number of sessions: Choose the number of sessions clients can attend as part of their membership.Set the limit in the Number of sessions field.
Choose how clients pay under Price and Duration:
Recurring payments: After checkout, clients pay weekly, monthly or yearly for their membership. This is a great way to improve monetization on your site.Choose how often the membership payment recurs from the Payment period drop-down.
Enter the recurring cost in the Price field.
Choose an end date using the Payments stop after drop-down.
(Optional) Enable the toggle to offer clients a free trial period.
One-time payment: Your clients pay for the membership as they check out:
1. Enter the membership's price.
2. Decide how long this membership is valid for using the drop-down.
Free: Client's won't be charged for the membership plan.Choose how long the membership is valid for using the drop-down.
Select the checkbox next to any relevant perks you want to add to the membership under Extra Benefits.
Under Settings, choose any additional terms and conditions you want to add to the membership from the following options:Limit to 1 per person: Enable the toggle to limit the membership to one per client.
Let clients cancel: Enable the toggle to allow clients to cancel their membership at any time on your site.
Clients set start date: Enable the toggle to allow clients to choose at checkout when their membership begins.
Add a policy: Create your own terms & conditions for the membership.Click Add.
Enter your terms and conditions in the field provided.
Click Save.
Click Save.
When ready, click Save at the top right to update this service.
Tip:
You can edit the membership plan later on both the service creation form under Booking Services or from Pricing Plans in the site dashboard.
Adding an 'Explore plans' button to the Service List
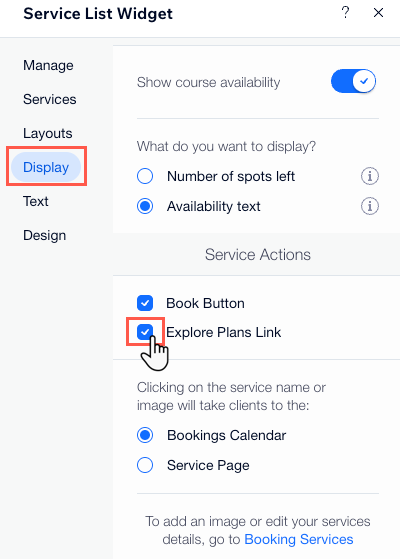
You can add an "Explore Plans" link to your site's Service List from your Editor. Clients see this option just below the Book Now button before they book a service. The link takes them to your Plans & Pricing page.
Note:
Adding an 'Explore plans' button to the service list is optional. Clients will still see the option to purchase a membership plan for plan-only services.
To add an 'Explore plans' button to the Service List:
Wix Editor
Studio Editor
Go to your Book Online page:Click Pages & Menu
 on the left side of the editor.
Click Bookings Pages.
Click the Book Online page.
Click the Book Online element on your page.
Click Settings.
Click Display.
Under Service Actions, select the Explore Plans Link checkbox.
What's next?
Check out the full course on Wix Learn about offering packages.
Make sure to customize the look of your membership plan.
Why not create a package to offer your clients more flexible options when booking your services? Packages are a great way to introduce clients to your services without the need to make a big commitment.