top of page

Designing your plans pages

Pricing Plans: Displaying Different Plan Types Using Tabs

Streamline your customer experience by displaying your different pricing plans using tabs. For example, you can display your monthly and yearly plans using separate tabs. This makes it quicker and easier for your customers to find the plan that's right for them.
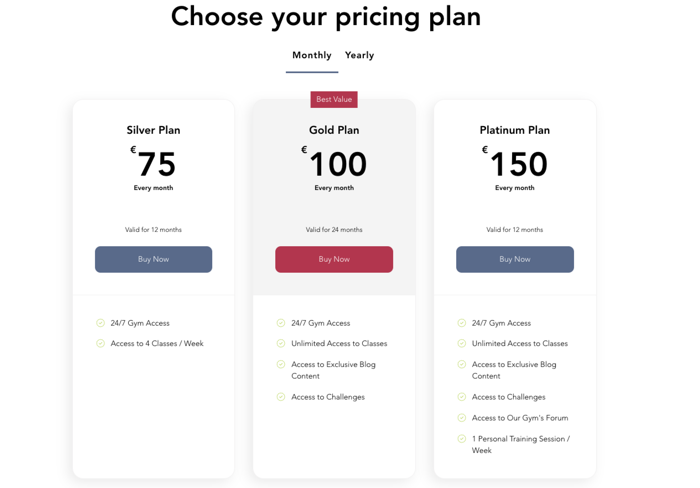
A screenshot showing monthly and yearly pricing plans displayed using separate tabs.

Step 1 | Add tabs to your site

Start by adding the tabs element to the relevant page on your site.

To add tabs:

  1. Click Add Elements on the left of the Editor.

  2. Click Interactive.

  3. Click Tabs under Boxes.

  4. Click and drag your chosen tab design to add it to your page.
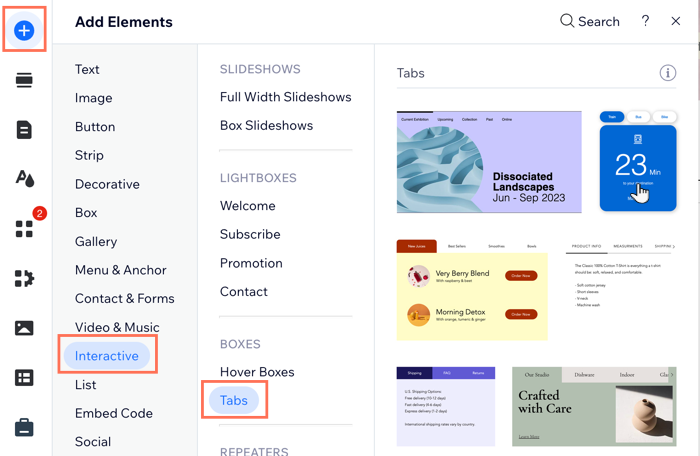
A screenshot showing how to add tabs to a page on your site in the editor.

Step 2 | Name your tabs

Now that you've added the tabs to the relevant page on your site, give each tab the correct name, so your customers can quickly find the right pricing plan type for them. For example, you can name the tabs according to payment frequency, for example: weekly, monthly, and yearly.

To name your tabs:

  1. Click the tabs element in your Editor.

  2. Click Manage Tabs.

  3. Hover over the relevant item in the panel.

  4. Click the More Actions icon .

  5. Click Rename.

  6. Enter the new name into the field.

  7. Click Done.

  8. Repeat steps 3 -7 for each tab you display.
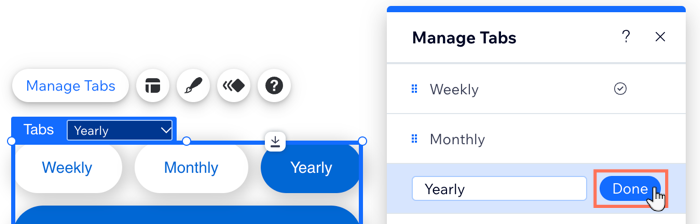
A screenshot showing how to rename tabs in the editor.

Step 3 | Add the pricing plans elements to your tab items

After naming your tabs, add the pricing plans elements to all the tabs, and then customize each one to display the relevant pricing plans.

To add elements to your tabs:

  1. Click the tabs element in your Editor.

  2. Open the relevant tab item from the drop-down.

  3. Click Add Elements on the left side of the Editor.

  4. Click Payments.

  5. Click either Plan List or Single Plan under Pricing Plans.

  6. Drag the relevant element onto the tab.

  7. Drop the element when you see the Attach to Tab message.
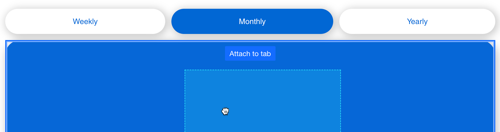
A screenshot showing the attach to tab message when adding a single plan widget to a tab in the editor.

  1. Repeat steps 2 - 7 for each tab.

Step 4 | Choose what plans to display in each tab

Now that you have pricing plans widgets added to each of your tabs, you can choose the relevant plans you want to display on each widget on each tab.

To choose what plans to display in each tab:

  1. Click the tabs element in your Editor.

  2. Select the first tab from the drop-down.

  3. Click to select the pricing plans element you added.

  4. Choose which plans to display, depending on which pricing plans widget you chose for each tab.

Plan List

  1. Click the Plan List widget in the tab.

  2. Click Settings.

  3. Click Plans.

  4. Select the checkbox next to each plan you want to display in the selected tab.

A screenshot showing how to select which plans to display in a plan list widget.

Single Plan

  1. Click the Single Plan widget in the tab.

  2. Click Settings.

  3. Click the drop-down and select the plan you want to display.

A screenshot showing how to select which plan to display in a single plan widget.

Need A Professional Website?
Contact Us 
Today!

Google Workspace Error Message: "Your subscription has been suspended by your reseller"

Google Workspace Error Message: Service Is Temporarily Suspended until Your Customer Accepts the New Terms of Service

Google Workspace Error Message: "You already have a Google Workspace business email account. You can manage it from the Google Admin Console"

Google Workspace: Data Migration from an External Email to Your Google Workspace

Google Workspace: Revoking Admin Status to Delete a Workspace Account

Google Workspace: Connecting Your Business Email to a Mail Client Using IMAP and SMTP

Google Workspace: Changing the Language of Your Business Email

Google Workspace: Emails Missing from Your Business Email

Google Workspace: Allowing Access for ‘Less Secure Apps’ in Your Business Email

Google Workspace: Adding Google Workspace MX Records to Your Wix Account

Google Workspace: Setting Up a Domain Alias

Google Workspace: Manually Verifying Your Domain with Google

Google Workspace: Connecting a Business Email for a Domain Pointing to Wix

Google Workspace: Setting Up an Email Alias for an Existing Workspace User Email Address

Google Workspace: Resetting a Workspace User's Password

Google Workspace: Renaming a Workspace User

Google Workspace: Accessing Your Additional Workspace Users

Google Workspace: Purchasing Additional Business Emails from Wix

Google Workspace: Setting Up Business Email Users

Gemini for Google Workspace: An Overview

Google Workspace: Upgrading a Workspace Plan

Google Workspace: Choosing a Plan

Google Workspace: Business Email Sending Limits

Google Workspace: Forwarding Emails From Your Business Email to Another Email Address

Google Workspace: Resetting Your Admin Password

Google Workspace: Accessing Your Admin Console

Google Workspace: Identifying Your Admin Workspace User

Google Workspace: Setting Up Your Business Email on Mobile Devices

Google Workspace: Username and Password Guidelines

Google Workspace: Accessing your Business Email Through Your Wix Account

wix experts
Graphic2Traffic web design
©
bottom of page