


Check-in by Wix for Events
Check-in by Wix: Adding and Managing Staff Members
With Check-in by Wix, you can give your staff the power to handle guest check-ins and ticket scanning. Decide who gets to add guests, track payments, and dive into event analytics.
You can add staff members and assign them to the events you need help with. Then, you provide a unique QR code or direct link, enabling staff members to access the app and manage events.
In this article, learn more about:
Before you begin, download the Check-in by Wix app.
Adding staff members
Add staff members to an event making sure each member has the right access for the job.
Check-in app
Dashboard
Log into the Check-in by Wix app.
Tap Manage Staff at the bottom.
Tap + Add Staff.
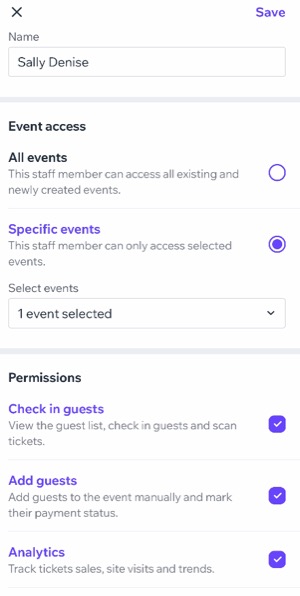
Enter the person's name.
Select the Event access you want your staff member to have:All events: All existing and new events you create.
Specific events: You decide which events this staff member can access.Tap the Select Events drop-down and choose the relevant event.
Tap Done.
Select the checkbox(es) next to the relevant Permissions:Check in guests: View guest list, check in guests, and scan tickets.
Add guests: Add guests and mark their payment status.
Analytics: Track ticket sales, site visits, and trends.
Tap Save at the top right.
What's next?
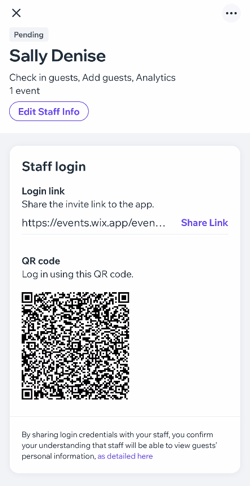
Share the invite link with staff members to the app or have them log in using the relevant QR code.
Managing staff members
Once you've added staff members and invited them to the app, you can manage their details and event access as needed.
Check-in app
Dashboard
Log into the Check-in by Wix app.
Tap Manage Staff.
Tap the More Actions icon
 next to the relevant staff member.
Choose what you want to do:
View info
Tap View info to see your staff member's info, as well as the Login link/QR code they should use in order to access the app.
Edit access
Change the events your staff member has access to (e.g. add new or remove expired events).
Tap Edit staff info.
Change the relevant event access.
Tap Save.
Pause access
You can temporary stop access for a staff member (e.g. if they are on vacation or on leave).
Tap Pause access.
Tap Pause Access to confirm.
You can resume access when the time is right. The staff member will need to log in to the app again with a new login link or QR code.
Tap the More Actions icon
next to the relevant staff member.Tap Give access.
Tap Resume to confirm.
Delete staff member
Remove a staff member who no longer works for you.
Tap Delete staff member.
Tap Delete to confirm.

FAQs
Click a question to learn more about managing your staff members.
What can my staff do in the Check-in by Wix app?
Staff members can scan tickets and check-in guests at events. They also have access to event details and guest information.
Is there a limit to how many staff members can be added to an event?
Yes. You can add up to 100 staff members to each event.
Can I give a username and password to staff members?
No. Staff members do not have their own username and password.
How can my staff members log into the Check-in app?
Staff members can access the app using event specific invite link or QR code that you share with them.